What PSI for Brad Nailer: Achieve Perfect Fastening Results
Picture this: you’re finally building that beautiful wooden bookshelf you’ve always wanted. You’ve got your wood, your design, and your trusty brad nailer ready to go. Then, bam! The nails either don’t sink properly, or they split the wood. Frustration sets in, right? The culprit often lies in your air compressor settings. This post explores the ideal psi for brad nailer usage. You’ll learn how to get the right settings to ensure your projects come out flawlessly every time. By the end, you’ll feel confident in achieving professional-looking results and avoid common woodworking frustrations.
Key Takeaways
- You will learn the factors that affect the ideal PSI settings.
- You’ll discover how to adjust your air compressor for the best results.
- You will understand how to prevent wood splitting and other common problems.
- You’ll get an overview of nailer types and their respective PSI requirements.
- You’ll know how to choose the right nails for your projects.
- You’ll gain confidence in operating a brad nailer and achieving excellent results.
Understanding PSI and Brad Nailers
The term PSI, or pounds per square inch, is a measure of air pressure. It’s essentially the force with which your air compressor pushes air. When you use a brad nailer, the air compressor delivers pressurized air to the tool. This pressure drives the brad nails into the wood. Setting the correct PSI is critical. Too little pressure, and the nails won’t sink. Too much, and you risk splitting the wood or damaging the nailer. It’s all about finding the sweet spot for your specific project.
Brad nailers are designed to drive thin, headless nails, called brads. These nails are perfect for trim work, decorative elements, and any project where you want minimal visibility of the fastener. They are also useful for assembling furniture. These tools are powered by compressed air. This is why you need an air compressor. The air compressor provides the necessary power to drive the nails. It is important to know the right settings. You can do this by paying attention to the wood you are working with.
What is PSI?
PSI is a standard unit for measuring air pressure. Imagine it as the force pushing on a surface. In the context of a brad nailer, PSI determines how hard the nail is driven into the wood. The higher the PSI, the more force the nailer applies. Understanding this is key to getting the right settings. It ensures the nails are driven flush without damaging the wood. It also ensures the nailer doesn’t damage itself. Setting the correct PSI is not just about the nailer. It is about the wood and the project at hand.
For example, if you are working with soft wood, you will need a lower PSI. Soft woods are more easily damaged. If you are working with hard wood, you will need a higher PSI. Hard woods are more resistant to nails. In general, brad nailers operate between 60-100 PSI, but this can vary. It is important to look at the wood type and the nailer’s specifications. Always test the pressure on a scrap piece of wood first.
The Role of Air Compressors
Air compressors are essential tools for powering brad nailers. They store and release compressed air. The compressor has an air tank that fills up with air. It then supplies the air to the nailer through a hose. The size of the air compressor matters. It depends on the frequency of your projects and the size of your projects. A small compressor may be fine for occasional home use. A larger compressor is needed for frequent, large-scale projects. Consider the CFM rating. This stands for cubic feet per minute. It measures the volume of air the compressor delivers.
Choosing the correct compressor depends on the needs of the project. A small compressor may not be able to keep up with the demands of continuous use. It may run out of air. This can lead to delays and frustrations. It’s best to check the nailer’s air requirements before selecting a compressor. This will avoid problems. Always use the proper fittings to ensure a secure and airtight connection. This will help with the flow of air.
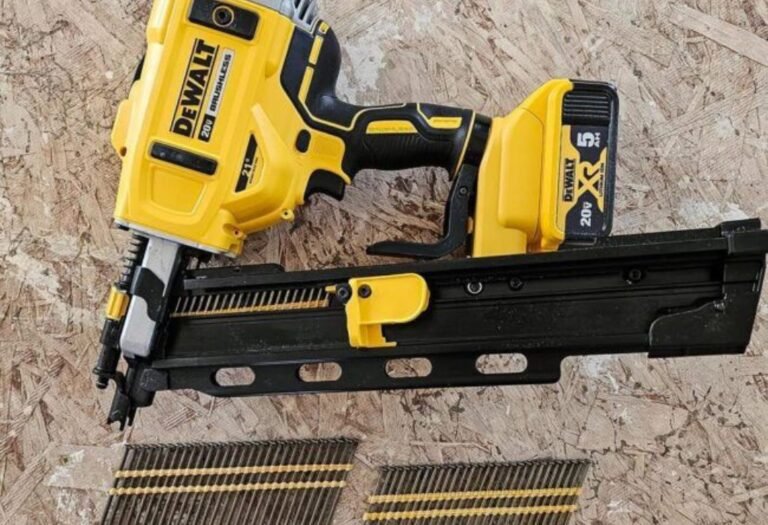
Brad Nailer Anatomy
A brad nailer is made up of several key parts that work together to drive nails. There’s the housing, which protects the internal mechanisms. The magazine, where you load the brad nails, and the trigger, which activates the nail-driving process. Other important parts include the nose, which guides the nail. It is also important to consider the safety mechanisms, and the air inlet. These parts work together to make the brad nailer function. The design also helps protect the user.
Knowing the different parts will help you use the nailer correctly. It will also help you when something goes wrong. For example, a jam may be due to a problem in the magazine. A malfunction might relate to the trigger mechanism. Understanding the components allows you to diagnose and fix problems quickly. Regularly cleaning and maintaining your brad nailer will extend its life. This is important. Inspect the nose to make sure it is not damaged. This can affect the quality of the work.
What PSI for Brad Nailer: Setting It Right

Knowing the correct psi for brad nailer use is essential. But the ideal pressure isn’t a fixed number. It varies depending on several factors. These factors include the wood type, the nail size, and the specific nailer model. Adjusting the PSI requires a bit of experimentation. The goal is to drive the nails flush with the surface without causing damage. The following factors will help you determine the right pressure for your project.
The type of wood is the main factor in determining the correct PSI. Softwoods, like pine or fir, require less pressure. Hardwoods, such as oak or maple, need more pressure. The nail size also affects the setting. Longer nails generally require more pressure. The nailer model itself plays a role. Each nailer is different and has a recommended PSI range. It’s best to check the specifications. A good starting point is usually between 70-80 PSI. Test on scrap wood before you start.
Wood Type Matters
The type of wood you’re working with significantly impacts the ideal PSI. Softwoods are less dense and more prone to splitting. Use a lower PSI to avoid damage. Hardwoods, on the other hand, are tougher and require more pressure to drive the nails properly. Always start with a lower PSI and increase it gradually until the nails are flush. You may have to adjust the setting depending on the kind of wood. This is because there are variations within each wood category.
- Softwoods: Softwoods, like pine, fir, and cedar, tend to split easily. It’s best to start with a PSI setting of around 60-70. If the nails don’t sink completely, increase the pressure gradually, in small increments. Too much pressure can cause dents or splits.
- Hardwoods: Hardwoods, such as oak, maple, and walnut, are denser and require more force. Begin with a PSI of 80-90. You may need to increase the pressure if the nails are not sinking flush. Watch out for any signs of wood splitting.
- Exotic Woods: Exotic woods, like mahogany or teak, can vary greatly. Start with the manufacturer’s recommendations for your specific nailer. Make adjustments as needed, always testing on scrap pieces first.
Nail Size and Length
The size and length of the brad nails you’re using also affect the ideal PSI. Longer nails need more force to be driven into the wood completely. Thicker nails can also require a slightly higher pressure. Choosing the correct nail size for the project is important. Too short, and the nails won’t hold. Too long, and they might exit the other side of the wood. The nail gauge, or thickness, matters too. Thicker gauge nails need more PSI.
When you switch between different nail sizes, you may have to adjust the PSI. As a rule, longer nails need more pressure to drive them flush. Thicker nails require more force. This is because they have more surface area. They also require more power to penetrate the wood. Always consult the nailer’s manual for recommendations on the right nail sizes. Start with a low PSI, and adjust the pressure until the nails are driven flush. Consider the type of wood too.
Adjusting Your Air Compressor
Adjusting your air compressor’s PSI is usually straightforward. Most compressors have a regulator with a gauge. This allows you to set and monitor the output pressure. The regulator controls the amount of air pressure sent to your brad nailer. Start by connecting the nailer to the compressor with an air hose. Then, gradually increase the pressure on the regulator. Test the nailer on a scrap piece of wood. Continue making small adjustments to the PSI until the nails sink flush.
- Find the Regulator: Locate the pressure regulator on your air compressor. It usually has a dial or knob with a gauge that displays the PSI.
- Connect the Nailer: Attach the air hose from your brad nailer to the compressor. Make sure the connection is secure.
- Start Low: Begin with the PSI set at the low end of the recommended range for your nailer (usually around 60 PSI).
- Test Fire: Point the nailer at a piece of scrap wood of the same type as your project.
- Adjust Gradually: Increase the PSI by small increments (e.g., 5-10 PSI). Fire the nailer again after each adjustment.
- Check the Results: Examine the nails. They should be flush with the surface. If they are not sinking, increase the pressure. If they are sinking too deep or causing splitting, decrease the pressure.
- Fine-Tune: Continue adjusting until you get the perfect depth for the nails.
Avoiding Common Problems
Even with the right psi for brad nailer, you might encounter issues. Two common problems are wood splitting and nails that don’t sink. These issues are frustrating. They can ruin your project. Fortunately, they are often easily fixed by understanding the cause and making adjustments. Other potential issues are air leaks and jams. Learning to address them will help you. This will help you achieve better results. It will also help you save time.
Wood splitting can be caused by too much PSI or using nails that are too long. Nails that don’t sink can be due to not enough PSI. It can also be due to a faulty nailer. Air leaks can occur at the hose connections. Jams can be caused by damaged nails. By paying attention to these common issues, you can improve your woodworking skills. You can also avoid unnecessary frustration. It’s often a matter of making small adjustments and troubleshooting.
Preventing Wood Splitting
Wood splitting can be a significant setback in woodworking. It ruins the appearance of your project and weakens the joints. There are several ways to prevent it. Using the correct PSI is important. Lowering the pressure on your brad nailer is essential. Using the right nail length and type of nail is also important. Pre-drilling pilot holes in the wood is also helpful. These holes create a path for the nail and reduce the risk of splitting.
- Reduce PSI: If you see splitting, lower the PSI setting on your air compressor in small increments. Test on scrap wood.
- Use Shorter Nails: If the nails are too long for the wood thickness, they are more likely to cause splitting.
- Choose the Right Nail Type: Use blunt-tipped brad nails instead of those with sharp tips.
- Pre-Drill Pilot Holes: For delicate woods or when working near edges, pre-drill pilot holes to guide the nails.
Dealing with Nails That Don’t Sink
Nails that don’t sink flush are another common problem. This happens if the PSI is too low, the nailer is not powerful enough, or the wood is too hard. Increasing the PSI is often the first step to address this issue. Inspect your air compressor and nailer to make sure they are working properly. Sometimes, the issue isn’t the pressure. It’s about how the nailer itself is working. Check the depth adjustment to ensure the nail is set correctly.
- Increase PSI: Gradually increase the PSI on your compressor. Test the nailer on scrap wood.
- Check Your Air Compressor: Make sure your air compressor is delivering the required CFM.
- Inspect the Nailer: Ensure the nailer is clean, well-lubricated, and functioning correctly.
- Use a Heavier Nailer: If you are working with hardwoods, you may need a more powerful nailer.
Other Potential Issues
Besides splitting and nails not sinking, you might encounter other problems when using a brad nailer. Air leaks at the hose connections can reduce air pressure. This impacts the nailer’s performance. Jams can occur. This is often caused by damaged nails or issues with the nailer’s magazine. Proper maintenance, including regular cleaning and lubrication, can help prevent these problems. Troubleshooting involves inspecting the tool.
If you experience air leaks, check all the connections between the compressor, hose, and nailer. Tighten them to make sure they are secure. If your nailer jams, clear the jam by following the manufacturer’s instructions. Keep your brad nailer clean. Regularly inspect the internal parts for any damage. With a little practice and patience, you can resolve these issues. This will help you achieve consistent, professional results.
Brad Nailer Types and PSI Requirements
Not all brad nailers are the same. Different types of nailers exist. Each has its own features and PSI requirements. Understanding these differences can help you choose the right tool for the job. Pneumatic nailers, powered by compressed air, are the most common type. Electric nailers are another option. They run on electricity and offer convenience. Choosing the right nailer depends on your budget and preferences.
Pneumatic nailers generally require a PSI between 60-100. Electric nailers may have different power settings. They often specify the nail size they can handle. The weight and ergonomics of the tool should also be considered. Choosing the right brad nailer depends on factors. These factors include the type of projects you will be doing. They also include the level of portability and power you require. Reading reviews of the nailer is important.
Pneumatic vs. Electric Brad Nailers
Pneumatic brad nailers are the industry standard. They are powered by compressed air from an air compressor. This makes them powerful and reliable. Electric brad nailers plug into a standard outlet. They don’t need an air compressor. However, they can be less powerful. Some models are cordless. Cordless models run on batteries. This adds to the portability. You can select either kind of nailer depending on your project.
| Feature | Pneumatic Brad Nailer | Electric Brad Nailer |
|---|---|---|
| Power Source | Air compressor | Electric outlet or battery |
| PSI Range | 60-100 PSI (adjustable) | Varies, often lower (not adjustable) |
| Power and Performance | Generally more powerful | Varies, can be less powerful, dependent on the model |
| Weight | Typically lighter | Can be heavier, especially cordless models |
| Portability | Limited by air hose length | Cordless models offer great portability, corded ones are limited by the cord |
Other Nailer Types
Besides brad nailers, other types of nailers serve different purposes. Finish nailers are larger and use thicker nails. They are ideal for trim work and molding. Pin nailers use tiny, headless pins. They’re great for delicate projects where you want minimal visibility of the fastener. Framing nailers are designed for building projects. They can use larger nails. Each nailer is designed for a specific purpose.
- Finish Nailers: They use slightly larger nails than brad nailers. They are ideal for attaching crown molding or baseboards. They work at a similar PSI range.
- Pin Nailers: These tools drive very small, headless pins. They are perfect for detailed work. They are often used for assembling small boxes or crafts. They require less PSI than brad nailers.
- Framing Nailers: These are the most powerful type of nailer. They use large nails. Framing nailers are for construction work.
Nailer Specifications
When selecting a brad nailer, pay attention to the manufacturer’s specifications. These specifications provide important information about the tool’s capabilities. They include the recommended PSI range, nail size compatibility, and air consumption. Knowing these specifications is essential to ensure your projects come out well. Make sure you select the right tool for the job. Check the air consumption, or CFM. This specifies how much air the nailer needs.
- PSI Range: This tells you the recommended operating pressure for the nailer.
- Nail Size: This specifies the sizes of nails the nailer can handle.
- Air Consumption (CFM): This tells you how much air the nailer consumes per firing.
- Magazine Capacity: This indicates how many nails the magazine can hold.
- Weight: This will affect the ease of use.
- Features: Consider features like tool-free depth adjustment and no-mar tips.
Choosing the Right Nails
Selecting the correct nails is as important as setting the right psi for brad nailer use. The size, gauge, and type of nail you choose can greatly impact your project’s outcome. Using the wrong nails can cause splitting, poor hold, and an overall unprofessional appearance. Knowing how to select the right nails for the job is essential to a successful outcome. This can involve matching the nail size with the wood thickness. It also involves selecting the right type of nail.
Nail length should be appropriate for the thickness of the wood. The nail should penetrate far enough to provide a secure hold. But it should not exit the other side of the wood. Nail gauge, or thickness, matters too. Thicker nails provide more holding power. But they also increase the risk of splitting. Consider the project’s use. If the project is for outdoor use, select nails made from corrosion-resistant materials. The correct nails will ensure your project’s durability.
Nail Size and Gauge
Nail size and gauge are key considerations. Nail size is described by its length, usually in inches. Choose a nail long enough to penetrate the wood securely. Gauge refers to the thickness of the nail. The gauge number is inversely related to the nail’s thickness. A lower gauge number indicates a thicker nail. Thicker nails provide better holding power, but they can split the wood if the PSI is too high. Choosing the right size and gauge is critical.
- Length: The nail length should be at least two and a half times the thickness of the top piece of wood.
- Gauge: Choose a gauge appropriate for the wood type and project requirements. Thicker gauges (16-18 gauge) are for more demanding applications.
- Nail Head: Brad nails have very small heads that sink easily.
Nail Types and Materials
Several nail types and materials are available. These nails are suited for different uses. The most common is the brad nail. These nails are thin and headless. They are great for trim work. Different materials are available for the nails. You can choose stainless steel for exterior use. Coated nails increase holding power. Always select the right nail type and material. This is crucial for the success of your project.
- Brad Nails: These are the most common type. They are perfect for trim and decorative work. They are great for delicate jobs.
- Finish Nails: These have slightly larger heads. They offer better holding power. They are useful for molding.
- Stainless Steel Nails: These are corrosion-resistant. They are essential for outdoor projects.
- Coated Nails: These nails have a special coating that increases their holding power.
Matching Nails to the Project
Choosing the correct nails can be simple when you understand the project. For example, for trim work, brad nails are ideal. For outdoor projects, stainless steel nails are a must. Consider the wood type. Softer woods may need thinner nails. Harder woods can handle thicker nails. The nails must be the right length. They must also match the thickness of the wood. Selecting the right nails enhances your project’s durability.
- Trim Work: Use brad nails in a 18 gauge. Match them with the wood type.
- Crown Molding: Use finish nails. Consider the size of the molding.
- Outdoor Projects: Use stainless steel brad nails. These are resistant to corrosion.
Frequently Asked Questions
Question: What is the ideal PSI for a brad nailer for general use?
Answer: For general use, a good starting point is usually between 70-80 PSI. However, always test on scrap wood first and adjust based on the wood type and nail size.
Question: Can I use the same PSI for softwood and hardwood?
Answer: No. Softwoods generally require a lower PSI (60-70 PSI) to avoid splitting, while hardwoods need a higher PSI (80-90 PSI) to ensure the nails are driven flush.
Question: What happens if I use too much PSI?
Answer: Too much PSI can cause the wood to split or dent. It can also damage the nailer.
Question: How do I know what size brad nails to use?
Answer: The nail’s length should be at least two and a half times the thickness of the top piece of wood. Consider the project’s use and the wood type.
Question: What should I do if my brad nailer isn’t sinking the nails properly?
Answer: First, check the PSI. Gradually increase the PSI until the nails sink flush. Ensure the compressor is providing enough CFM. Check the nailer for jams. Make sure you’re using the correct nails.
Final Thoughts
Knowing the right psi for brad nailer use is not an abstract concept. It’s a key skill for achieving great results. The pressure setting you choose makes a difference. You should not only consider the type of wood. Also, the size of your nails can influence the settings you choose. By taking a little time to understand how pressure and the tool work, you can avoid common issues. You’ll become proficient at getting your nails set right. This means no more splitting wood. Or struggling with nails that won’t go in.
This skill isn’t hard to master. Start with a good grasp of the fundamentals. Then, always experiment with a piece of scrap wood. Take the time to make small adjustments, and soon you’ll find the perfect settings. Remember, the goal is always to achieve a flush, clean finish. This is what separates a good project from a great one. So, grab your brad nailer, your air compressor, and your wood. Practice the settings. You will be fastening with confidence and crafting with precision.

I’m Michael R. Turner, the founder, lead writer, and passionate DIY enthusiast behind 101diytools.com. With years of hands-on experience in home improvement and power tools, I built this platform to share practical tips, in-depth guides, and honest reviews to help DIYers of all skill levels tackle projects with confidence and the right tools.