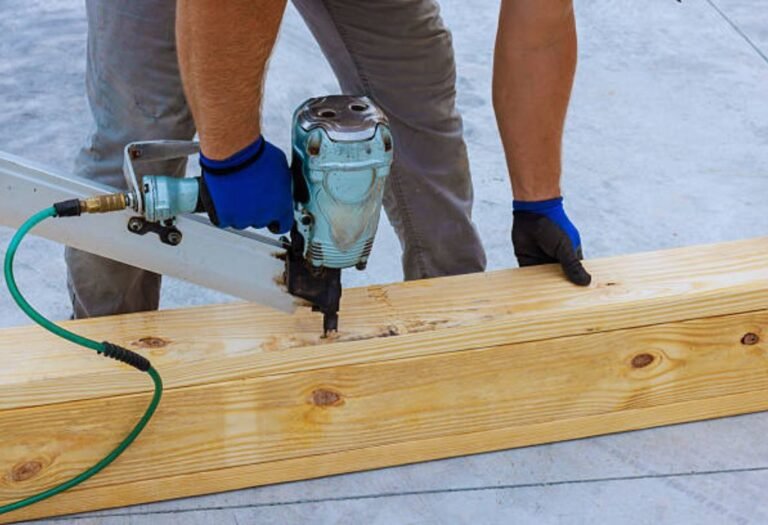
Why Is Your Nail Gun Not Shooting Nails? Troubleshooting Guide
Picture this: You’re in the middle of a project, the final piece of trim is ready, and you reach for your trusty nail gun. You squeeze the trigger. and nothing. The frustration boils over as you’re left with an unfinished task. Sound familiar? It’s a common problem that can throw off your entire workflow. This guide is built to help you diagnose and fix the issue. You’ll learn the most probable causes of this problem, and how to get your tool running smoothly again. By the end, you’ll be able to quickly troubleshoot, saving you time and money. This will also give you the information necessary to know how to maintain your tool so it performs well for a longer period of time.
Key Takeaways
- Identify the common reasons a nail gun fails to fire nails.
- Learn how to safely inspect and clear jams in your nail gun.
- Understand the importance of proper air pressure and its impact.
- Discover the best practices for nail gun maintenance to prevent issues.
- Find out how to choose the right nails for your specific gun and project.
- Get tips on handling common problems that might be causing malfunctions.
Common Reasons a Nail Gun Not Shooting Nails
A nail gun not shooting nails can be the result of several different issues. These problems can range from simple fixes to more complex mechanical problems. You can explore a variety of potential causes. Proper diagnosis is the first step toward getting your tool back to work. Knowing what to look for will help you minimize downtime and maintain your project’s momentum. This section covers the most prevalent issues, from air supply problems to issues with the nails themselves. We will also include problems with the gun’s mechanics.
Air Supply Problems and Their Effect
Your air supply is the lifeline of your pneumatic nail gun. Without adequate air pressure, your gun won’t work correctly. This section looks at common air supply issues and their effects on your tool’s performance. Checking your air compressor, hose, and fittings is critical. Issues with your air supply can cause your gun to function erratically, or not at all. You will find out how to evaluate your setup to ensure it meets your tool’s requirements.
-
- Insufficient Air Pressure: Nail guns require a certain air pressure to operate effectively. Your air compressor may not be providing enough pressure. Check the manufacturer’s guidelines for your nail gun.
Air pressure is measured in pounds per square inch (PSI). Most nail guns operate between 70 to 120 PSI. If your compressor’s pressure is too low, the gun will lack the necessary force to drive the nails completely. The nail might get stuck halfway, or the gun may not fire at all. Check the gauge on your compressor to confirm the pressure is within the recommended range. A simple adjustment can resolve this issue.
-
- Air Leaks: Air leaks in your system can diminish the air pressure. These leaks can occur at various points. They could be located at the compressor, the hose, or the gun itself. Look for any hissing sounds or visible air escaping from connections.
Air leaks often result in a loss of power. They decrease your gun’s ability to drive nails. Carefully inspect the air hose for any cracks or damage. Check the connections at both ends. Use soapy water on the connections. Bubbles will indicate a leak. Tighten or replace any faulty parts.
-
- Clogged Air Filters: Nail guns have air filters to prevent debris from entering the tool. A clogged filter can restrict airflow, leading to reduced pressure. Regular maintenance is essential to avoid this problem.
A dirty or clogged filter will reduce the volume of air reaching the nail gun’s internal components. This restriction impacts the gun’s ability to fire nails. Locate the air filter on your nail gun. Remove it and clean it regularly. If the filter is beyond cleaning, replace it.
-
- Compressor Problems: Your air compressor must be in good working condition. If the compressor isn’t producing enough air, or cycling properly, the nail gun will not work. Issues with the compressor can range from low tank pressure to motor failure.
Many times, the compressor will struggle to keep up with the demand. This can happen during prolonged use. Check the compressor’s settings and its operating condition. Ensure it’s the right size and type for your nail gun. If the compressor is the problem, consult a professional for service or replacement.
Nail Issues and Gun Compatibility
Choosing the right nails for your nail gun is essential for smooth operation. Using the wrong size or type of nails can lead to many problems. These include jams, misfires, or incomplete driving. This part covers the importance of nail compatibility, proper loading techniques, and the common problems associated with nails. Proper nail selection can ensure that your projects are done correctly. You will minimize downtime caused by malfunctions.
-
- Incorrect Nail Size or Type: Using nails that don’t match your nail gun’s specifications is a common mistake. Each nail gun is designed to work with specific nail sizes and types. Using the wrong size can cause jams. It can also cause incomplete driving or damage the gun.
Always refer to your nail gun’s manual. It will list the recommended nail sizes and types. Using nails that are too long can damage the tool. Using nails that are too short may not be strong enough for the task. Ensure that the nail head type and angle match your gun’s requirements.
-
- Nail Magazine Problems: The nail magazine holds the nails. Problems with the magazine can prevent the gun from firing. This includes issues like nails getting stuck or the magazine not feeding correctly. Regularly inspect and maintain the magazine to ensure reliable nail feeding.
A magazine that’s overloaded can cause jams. Nails may not feed smoothly. If the magazine is dirty or damaged, it can cause problems. It is important to keep the magazine clean and free of debris. Make sure the nails are loaded correctly, according to the manufacturer’s instructions.
-
- Nail Jam: A nail jam is a common problem. It happens when a nail gets stuck inside the gun’s firing mechanism. This can be caused by using the wrong nail size, or driving nails into hard materials. If the gun is firing erratically, it will increase the likelihood of a jam.
If your gun jams, the first step is to disconnect the air supply. Consult the manufacturer’s instructions for clearing the jam. Use the correct tools to remove the jammed nail without damaging the gun. Regular maintenance and proper nail selection can prevent jams.
-
- Nail Quality Issues: Using low-quality or damaged nails can lead to malfunctions. If the nails are bent, rusted, or have manufacturing defects, they may cause problems. The gun may misfire, or the nail may not drive correctly.
Always use high-quality nails from a reputable manufacturer. Inspect the nails before loading them into the magazine. Discard any nails that are bent or damaged. Poor-quality nails not only cause functional issues. They can also affect the quality of your work.
Internal Gun Problems and How to Address Them
Sometimes, the problem lies within the nail gun itself. This section looks at internal mechanical issues that can prevent your gun from shooting nails. This includes problems with the firing mechanism, worn-out parts, and lubrication. It also covers what you can do to identify and address these issues. Regular maintenance can keep your tool in good working order. Proper troubleshooting will help you to restore its function.
-
- Firing Mechanism Failure: The firing mechanism is what drives the nail. If the mechanism fails, the nail gun won’t fire. This can be caused by worn parts, damage, or buildup of debris.
The firing mechanism includes components like the driver blade, piston, and seals. Wear and tear over time can affect the gun. You can also identify a worn driver blade or damaged seals. This will cause the gun to not fire. Regularly inspect these parts for wear. Replace them when needed. The manufacturer’s instructions will provide information on how to disassemble and repair the firing mechanism.
-
- Worn or Damaged Seals: Seals play a key role in the firing mechanism. They create an airtight environment. This allows the gun to generate the force needed to drive nails. Worn or damaged seals can cause air leaks. These leaks will reduce the pressure. This can prevent the gun from firing.
Air leaks within the gun will cause it not to fire. Inspect the seals regularly for wear, cracks, or other signs of damage. Replace the seals as needed. Replacement is necessary to ensure optimal performance. Refer to the manufacturer’s instructions for the correct seal replacement procedure.
-
- Lack of Lubrication: Proper lubrication is important for the moving parts of your nail gun. Without lubrication, friction increases. This can cause the gun to malfunction. It can lead to the accelerated wear of internal parts.
Apply the correct type of lubricant to the gun’s moving parts regularly. Doing so will ensure smooth operation. Check the manufacturer’s instructions for the appropriate lubricant and application frequency. Over-lubrication can cause other problems. Apply only the recommended amount.
-
- Driver Blade Issues: The driver blade strikes the nail head and drives the nail into the material. Over time, the blade can wear down, chip, or break. Damage to the driver blade can cause the gun to not fire, or to drive nails improperly.
Inspect the driver blade for any signs of wear or damage. This includes chipping, bending, or excessive wear. If the blade is damaged, it will need to be replaced. Consult the manufacturer’s manual. Follow the procedures for replacement. Properly maintained blades will improve the gun’s performance.
Safety Practices
Operating a nail gun requires a focus on safety. Nail guns are powerful tools. They can cause serious injuries if not handled with care. This section provides key safety practices. Proper use of the tool will keep you and those around you safe. Safety glasses, gloves, and ear protection are essential. You also need to know how to handle the gun, and potential dangers.
-
- Always Wear Safety Gear: Eye protection, gloves, and hearing protection are a must when using a nail gun. Safety glasses will protect your eyes from flying debris. Gloves will protect your hands. Ear protection will prevent hearing damage.
Eye protection must meet safety standards. Make sure your gloves fit properly. Ear protection can be earplugs or earmuffs. Always check your safety gear before each use of your tool. Replace damaged or worn gear immediately.
-
- Disconnect the Air Supply: Before performing any maintenance, or clearing a jam, disconnect the air supply. This prevents the gun from accidentally firing. Accidental firing can lead to serious injury.
Before working on your gun, disconnect the air hose from the compressor. This will release any remaining pressure. Ensure the air supply is completely shut off. If the gun still seems pressurized, consult the manufacturer’s instructions on how to release the pressure safely.
-
- Never Point the Gun at Yourself or Others: Always treat a nail gun as if it’s loaded. Never point the gun at any person or animal. Keep the gun pointed away from yourself. Always know what is behind the item you are nailing.
Be aware of the potential for the nail to pass through the material. Keep a safe distance from other people. When not actively using the gun, store it in a safe place. This will prevent accidental use by children or unauthorized persons.
-
- Use the Correct Technique: Know how to handle your nail gun. Maintain a firm grip on the tool. Position your hand and body to control the gun and ensure a secure working position.
Use the right technique for your task. Know how to fire the gun to the material at the right angle. Make sure you are using a secure, stable stance. This is necessary to maintain control. Follow the manufacturer’s instructions for proper use.
Troubleshooting Steps for a Nail Gun Not Shooting Nails

If your nail gun fails to shoot nails, follow these troubleshooting steps. Proper diagnosis will save you time and frustration. From checking the air supply to inspecting the gun’s internal components, these steps will help you identify and fix the issue. Keep in mind safety is key. Always take precautions before working on your tool.
-
- Check the Air Supply: Start by ensuring the air compressor is turned on and supplying the right pressure. Examine the air hose for leaks. Make sure all connections are secure. If you find a leak, fix it or replace the faulty components.
Check the pressure gauge on the compressor and the nail gun. Make sure the pressure is within the range recommended by the manufacturer. If the air pressure is too low, the gun will not fire correctly. Air leaks or compressor problems may need to be addressed before moving on.
-
- Inspect the Nails: Examine the nails you are using. Make sure they are the correct size and type for your nail gun. Inspect the nails for damage like bends or rust. Replace any damaged or incompatible nails.
Remove the nails from the magazine. Make sure they are aligned correctly. If the nails are not feeding properly, the gun will not fire. Make sure you are using nails that are the correct angle. Verify that they are loaded correctly according to the gun’s manual.
-
- Clear the Jam: If the gun has jammed, disconnect the air supply first. Consult the nail gun’s manual for instructions. Use the provided tools to carefully remove the jammed nail. Always follow the manufacturer’s specific instructions.
Once you have removed the jammed nail, inspect the firing mechanism for any damage. Check the driver blade for wear and tear. Make sure the gun is clean and free of debris. Regular maintenance will prevent jams from happening.
-
- Check the Air Filter: Make sure the air filter is clean and not clogged. A dirty filter can restrict airflow and affect the gun’s performance. Remove the filter, clean it, or replace it if needed.
A restricted airflow will reduce the pressure. This can prevent the gun from firing. Clean the filter often to keep the tool running at peak performance. This will prevent problems and maintain performance.
-
- Lubricate the Nail Gun: Apply lubricant to the moving parts of the nail gun. This is according to the manufacturer’s recommendations. Proper lubrication is crucial for preventing friction and ensuring smooth operation.
Lubricate the tool before each use. Make sure you use the recommended lubricant. This will keep the moving parts in good working order. Over-lubricating can cause problems. Use only the recommended amounts.
-
- Test the Nail Gun: After performing these steps, reconnect the air supply. Test the nail gun. Check if it’s firing nails correctly. If the gun is still not working, it may require professional service.
If the nail gun still won’t fire, consult the user manual or contact a qualified repair technician. Do not try to disassemble or repair the gun yourself. This might void the warranty or cause more damage. A professional will have the expertise and the tools necessary for the correct fix.
Maintaining Your Nail Gun for Optimal Performance
Regular maintenance will keep your nail gun running well. This section discusses the essential care practices. Regular cleaning, lubrication, and inspection will prevent problems. You can also extend the tool’s life. Following these guidelines will keep your nail gun working efficiently. You can also ensure the quality of your work.
-
- Regular Cleaning: Cleaning your nail gun after each use is a key step. This removes any debris. This will prevent the build-up of residue. It will also ensure smooth operation.
Use compressed air to blow out dirt and dust from the internal parts and magazine. Wipe down the exterior with a clean cloth. Regular cleaning will prevent jams and other malfunctions.
-
- Proper Lubrication: Lubricating the nail gun is essential for smooth operation. This will reduce friction and wear. Following the manufacturer’s instructions is necessary to keep your gun working well.
Use the recommended lubricant. Apply it to the moving parts of the gun. The frequency of lubrication may vary. It depends on the frequency of use. Do not over-lubricate your gun, as this can attract dirt and debris.
-
- Inspect for Wear and Tear: Regularly inspect your nail gun for any signs of wear and tear. This is essential for preventing potential problems. Look for worn or damaged parts that may need replacement.
Check the driver blade, seals, and other moving parts. Replace any worn or damaged parts promptly. Early detection can prevent major problems. Proper maintenance will ensure that your gun works properly.
-
- Store the Nail Gun Properly: Proper storage is key to extending the life of your nail gun. Store the tool in a dry, clean place. This is where it’s protected from the elements. This will prevent corrosion.
Always disconnect the air supply before storing your nail gun. Clean and lubricate the gun before storing it. Proper storage will keep the tool in good condition for future use.
-
- Follow the Manufacturer’s Instructions: Always refer to the manufacturer’s instructions for specific maintenance recommendations. These instructions will provide detailed guidance on how to care for your gun.
Manufacturer’s instructions provide the best guidance on proper maintenance. This will ensure that you follow the recommended procedures. Doing this can prevent mistakes and maintain your warranty.
Choosing the Right Nails for Your Project
Selecting the right nails is essential for achieving good results in your projects. Choosing the right nail size and type will ensure the materials are held together. Matching the nail specifications to the type of wood or material will avoid any problems. Knowing nail sizes, coatings, and head types will improve the outcome of your projects. This will also guarantee the durability and appearance of your work.
-
- Understanding Nail Sizes: Nail sizes are described using the penny (d) system. The length of the nail varies with the penny size. Choose the correct nail size based on the thickness of the materials. This will ensure adequate penetration.
The nail size should be at least three times the thickness of the top piece of material. This will give you a firm hold. Always check the manufacturer’s recommendations for the nail gun. You should also consider the thickness of the materials when selecting the correct nail size.
-
- Different Nail Types: There are various types of nails. Each type is designed for a specific purpose. This includes framing nails, finish nails, and roofing nails. Selecting the proper nail type will ensure the best results for your project.
Framing nails are used for structural framing. Finish nails are used for trim work. Roofing nails are designed for securing roofing materials. Consider the function of the nail, and the materials you are using, when choosing a nail type.
-
- Nail Coatings: Nail coatings will protect the nail from rust and increase its holding power. The nail coating can influence the performance of the nail, and how long it lasts. Galvanized nails are a popular choice. They prevent corrosion.
Galvanized nails are coated with zinc. This protects them from rust. Stainless steel nails are ideal for outdoor projects. They prevent corrosion in humid conditions. Coatings extend the life of the nails and the durability of your work.
-
- Head Types: There are different types of nail heads. These include round head, flat head, and finishing head. The nail head will influence the appearance. The head type will also impact the strength of the joint. Choose the head type based on the needs of your project.
Round-head nails are used for framing and general construction. Flat-head nails are commonly used in trim work. Finishing head nails are designed to be nearly invisible. Consider the visual appearance and the structural requirements of your work when choosing the nail head type.
Frequently Asked Questions
Question: Why is my nail gun not firing?
Answer: Common causes include low air pressure, a jammed nail, incorrect nail size, or a problem with the firing mechanism.
Question: How do I clear a nail gun jam?
Answer: Disconnect the air supply, consult the manufacturer’s instructions, and use the correct tools to remove the jammed nail.
Question: What air pressure should I use for my nail gun?
Answer: Check your nail gun’s manual. Most nail guns operate between 70 to 120 PSI, but this can vary.
Question: What type of oil should I use to lubricate my nail gun?
Answer: Use the manufacturer’s recommended pneumatic tool oil. This will ensure the gun functions properly and is protected from wear.
Question: What safety precautions should I follow when using a nail gun?
Answer: Always wear safety glasses, gloves, and hearing protection. Never point the gun at yourself or others, and disconnect the air supply before maintenance.
Final Thoughts
A nail gun not shooting nails can be a source of frustration, but with the right knowledge, it’s a problem that’s often easily solved. You have discovered some frequent reasons for this issue. You also have the key steps to diagnose and correct them. Regular maintenance and proper nail selection are essential. These practices will prevent issues and ensure your tool’s performance. You can use these insights to keep your nail gun in top shape. Do not hesitate to check your nail gun’s manual for specialized advice. Take the time to implement the tips outlined, and you’ll be able to work without interruptions. Happy building!

I’m Michael R. Turner, the founder, lead writer, and passionate DIY enthusiast behind 101diytools.com. With years of hands-on experience in home improvement and power tools, I built this platform to share practical tips, in-depth guides, and honest reviews to help DIYers of all skill levels tackle projects with confidence and the right tools.