Why Is My Nail Gun Leaving Holes Too Big Fix It
Is your nail gun leaving oversized holes? The most common culprits are often excessive air pressure or an incorrect depth adjustment, causing nails to sink too far into the material. Fine-tune your compressor’s PSI to the manufacturer’s recommendation and adjust the tool’s depth dial until you achieve a perfectly flush finish, ensuring cleaner, more professional results.
Ever finished a DIY project, stepped back to admire your handiwork, and then felt a pang of disappointment? Instead of perfectly flush nails, you’re staring at unsightly craters where your nail gun has gone a little overboard. You’re not alone! It’s incredibly frustrating when your nail gun leaving holes too big seems to be a recurring problem, turning a clean finish into something that looks… well, less than professional.
I’ve been there myself, scratching my head, wondering if my trusty nail gun had developed a mind of its own. It’s a common issue that can range from a minor annoyance, easily fixed with a bit of wood filler, to a major headache if it’s impacting the integrity or aesthetic of your project. The good news is that an oversized hole usually isn’t a sign of a broken tool, but rather a simple adjustment or technique tweak. Let’s dive into why your nail gun might be creating those craters and how you can fix it to achieve those pristine finishes we all strive for.
No one wants to spend extra time sanding and filling when the job should be quick and clean. Understanding the root cause of your nail gun leaving holes too big is the first step toward flawless results. So, grab a cup of coffee, and let’s troubleshoot this together, making sure your next project looks exactly how you envisioned it.
Key Takeaways
- Adjust air pressure: Lower PSI for shallower, smaller holes.
- Set depth control: Fine-tune for flush nail placement.
- Match nail length: Use correct nails for material thickness.
- Select proper gauge: Thinner nails mean smaller entry holes.
- Hold gun firmly: Prevent ricochet and surface damage.
- Check nosepiece: Ensure it’s clean and undamaged.
- Angle gun correctly: Always shoot perpendicular to surface.
📑 Table of Contents
- Understanding Normal vs. “Too Big” Holes
- Incorrect Nail Gun Depth Setting: A Common Culprit
- The Wrong Nail for the Job: Size and Type Matter
- Air Pressure Issues: Too Much Power
- Worn or Damaged Components: Beyond Simple Adjustments
- Proper Nailing Techniques: User Error and Best Practices
- Common Nail Gun Types and Expected Hole Characteristics
- Conclusion
Understanding Normal vs. “Too Big” Holes
Before we panic about craters, it’s helpful to understand what a “normal” nail hole looks like. Different nail guns and nail types are designed for different applications, and each leaves a characteristic mark. A pin nailer, for instance, will leave an almost invisible hole, while a framing nailer will leave a much more noticeable one. The key is to distinguish between what’s expected and when the hole truly becomes “too big.”
What to Expect from Your Nail Gun
- Pin Nailer (23 Gauge): These leave tiny, almost imperceptible holes, ideal for delicate trim work where you want minimal visible evidence of fasteners.
- Brad Nailer (18 Gauge): Brad nails are slightly thicker and leave a small, clean hole that’s easy to fill. Perfect for attaching thinner trim and molding.
- Finish Nailer (15 or 16 Gauge): These nails are stronger and leave a slightly larger hole than brads. They’re great for baseboards, crown molding, and door casings, where the hole can be easily filled and painted over.
- Framing Nailer (8-12 Gauge): Designed for heavy-duty work like framing walls or building decks, these nails are thick and leave a significant hole, often countersunk. These holes are usually not a cosmetic concern.
When a Hole Becomes “Too Big”
A hole becomes “too big” when it’s significantly wider than the nail head itself, creating a noticeable divot or tear in the material around the nail. This often happens when the nail is driven too deep, or the gun’s nose isn’t making proper contact. If you’re using a finish nailer and it’s leaving holes the size of a dime, that’s definitely too big!
Incorrect Nail Gun Depth Setting: A Common Culprit
This is probably the most frequent reason for your nail gun leaving holes too big. Most nail guns have an adjustable depth setting, which controls how far the nail is driven into the material. If this setting is too aggressive, the gun will push the nail head well below the surface, creating an oversized divot.
The Depth Adjustment Dial Explained
Your nail gun likely has a dial or lever near the nosepiece that allows you to adjust the nail’s depth. Turning it one way will make the nail less aggressive (driving it less deep), and turning it the other will make it more aggressive (driving it deeper). Some models might require an Allen wrench to adjust the driver blade itself.
Setting the Perfect Depth
The goal is usually to drive the nail head just flush with the surface or slightly countersunk so it can be easily filled. To avoid your nail gun leaving holes too big:
- Start by setting the depth to a less aggressive setting.
- Test it on a scrap piece of the same material you’re working with.
- Fire a nail. Is it flush? Too shallow? Too deep?
- Adjust incrementally. If it’s too shallow, increase the depth slightly. If it’s countersinking too much and creating a big hole, reduce the depth.
- Repeat until you get the desired result.
Remember, different materials (softwood vs. hardwood) will react differently to the same depth setting, so always test!
The Wrong Nail for the Job: Size and Type Matter
Using the incorrect nail can also contribute to your nail gun leaving holes too big. It’s like trying to fit a square peg in a round hole – or, in this case, a thick nail into a delicate piece of trim.
Matching Nails to Your Material
Every nail gun is designed to work with a specific range of nail gauges (thickness) and lengths. Using nails that are too thick for the material or the gun’s intended purpose can lead to problems.
- Framing Nails on Trim? No Way! Trying to use a framing nailer (which fires thick nails) on delicate trim will almost certainly blow out the wood and leave enormous, unacceptable holes.
- Consider the Gauge: For fine woodworking or delicate trim, always opt for a brad or pin nailer. Their thinner nails create much smaller holes.
Using Smaller Gauge Nails for Finer Work
If your project calls for a subtle fastening method, ensure you’re using the appropriate nail gun and nail gauge. A 23-gauge pin nailer will leave a nearly invisible mark, whereas an 18-gauge brad nailer leaves a small, easily fillable hole. Using a 15-gauge finish nailer on a piece of quarter-round molding, for example, is likely to result in a significantly oversized hole or even split the wood.
Air Pressure Issues: Too Much Power
For pneumatic (air-powered) nail guns, the air pressure from your compressor plays a huge role in how the nail is driven. Too much pressure can be a significant reason for your nail gun leaving holes too big, as it essentially overpowers the drive.
Regulating Your Compressor’s PSI
Most nail guns have a recommended operating PSI (pounds per square inch) range, usually found in the tool’s manual. Going above this range, or even at the higher end for softer materials, can cause the nail to be driven too forcefully.
To adjust:
- Ensure your air compressor’s regulator is properly set.
- Start with a lower PSI within your nail gun’s recommended range (e.g., 70-80 PSI for finish nailers).
- Test fire on scrap material.
- If the nail is not driven flush, gradually increase the PSI in small increments (5-10 PSI at a time) until you achieve the desired depth without creating craters.
The Impact of Excessive Pressure
When the air pressure is too high, the nail gun’s driver blade hits the nail with excessive force. This can cause the nail head to punch through the material too aggressively, tearing the wood fibers around it and creating those undesirable large holes. It can also cause the tool to “bounce” back slightly, leading to inconsistent depth.
Worn or Damaged Components: Beyond Simple Adjustments
Sometimes, the problem isn’t just about settings or technique. Over time, parts of your nail gun can wear out or become damaged, leading to issues like your nail gun leaving holes too big.
Inspecting the Driver Blade
The driver blade is the part that actually strikes the nail. If it’s bent, chipped, or excessively worn, it might not be driving the nail cleanly or consistently. A damaged driver can cause the nail to go off-angle, tear the material, or simply not seat properly, leading to a larger entry point.
Tip: If you suspect a worn driver blade, consult your tool’s manual for replacement instructions or take it to a qualified service center.
Checking the No-Mar Tip
Many nail guns come with a “no-mar” tip – a rubber or plastic cap that fits over the nosepiece. This tip is designed to protect your workpiece from marks and ensure proper contact. If the no-mar tip is missing, damaged, or excessively worn, the metal nosepiece of the gun can press directly into the wood, creating an indentation around the nail hole that makes it appear much larger.
Tip: Always ensure your no-mar tip is in good condition and properly seated. Replacements are usually inexpensive and readily available.
Other Potential Mechanical Issues
While less common, other internal issues like a faulty firing mechanism or worn seals could affect the tool’s performance. If you’ve tried all the adjustments and checked for visible wear, and your nail gun leaving holes too big persists, it might be time for a professional inspection.
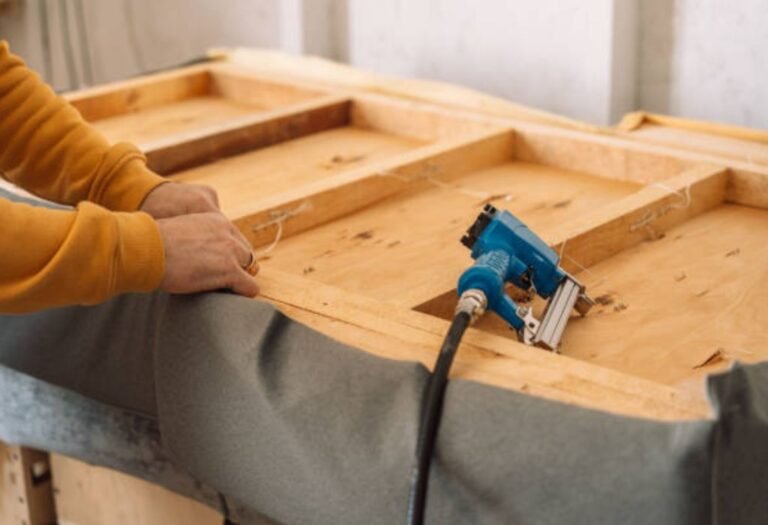
Proper Nailing Techniques: User Error and Best Practices
Even with the perfect settings, poor technique can still lead to imperfect results. How you hold and operate your nail gun makes a big difference in the quality of the finish.
Angle of Attack and Tool Stability
For consistent, clean holes, hold your nail gun perpendicular to the workpiece. If you hold it at an angle, the nail will enter the wood at an angle, potentially creating a larger, less clean hole. Also, ensure the tool is held firmly and steadily against the surface to prevent it from bouncing or moving during firing, which can tear the wood.
Dealing with Material Hardness
Different woods have different densities. You might need to adjust your depth setting or air pressure when moving from a soft pine to a dense oak. Harder woods may require slightly more pressure or depth to achieve a flush drive, while softer woods will need less to prevent over-driving and creating large holes. Always test on scrap!
Practice Makes Perfect
Like any tool, proficiency with a nail gun comes with practice. Take the time to experiment with different settings on scrap materials. Pay attention to the sound of the gun, the feel of the recoil, and the resulting nail hole. This will help you develop a “feel” for your tool and minimize instances of your nail gun leaving holes too big.
Common Nail Gun Types and Expected Hole Characteristics
Here’s a quick reference to help you gauge what to expect from different nail gun types:
| Nail Gun Type | Common Nail Gauge/Size | Expected Hole Size / Characteristic | Typical Use |
|---|---|---|---|
| Pin Nailer | 23 Gauge | Tiny, almost invisible pinhole | Delicate trim, small craft projects, holding glue-ups |
| Brad Nailer | 18 Gauge | Small, clean pinhole, easily filled | Light trim, molding, decorative work, cabinet assembly |
| Finish Nailer | 15 or 16 Gauge | Slightly larger, easily filled hole, often countersunk | Baseboards, crown molding, door casings, furniture building |
| Framing Nailer | 8-12 Gauge (full head) | Noticeable, larger hole (often countersunk for strength) | Framing, sheathing, subflooring, deck building |
Conclusion
Discovering your nail gun leaving holes too big can be a real project killer, but as we’ve seen, it’s usually a fixable problem. From simply tweaking the depth setting and adjusting air pressure to ensuring you’re using the right nails for the job and maintaining proper technique, there are many straightforward solutions at your fingertips. Don’t let oversized holes dampen your DIY spirit!
Take the time to understand your tool, test settings on scrap material, and practice. With a little patience and these tips, you’ll be driving nails like a seasoned pro, leaving behind only the crisp, clean finishes you envisioned. Happy nailing!
Frequently Asked Questions
Why are my nail gun holes too big and cratered?
This issue is most commonly caused by an incorrect depth adjustment setting on your nail gun. If the depth is set too aggressively, the nail is driven too deep, creating a countersink effect that appears as a larger, cratered hole around the nail head.
Can incorrect air pressure cause my nail gun to leave oversized holes?
Yes, especially with pneumatic nail guns, excessive air pressure can be a significant factor. Too much pressure drives the nail with excessive force, potentially blowing out the surrounding wood and leading to a hole much larger than the nail’s actual diameter.
Am I using the wrong nail size if my nail gun is leaving holes too big?
Absolutely, using an incorrect nail gauge or length for your specific nail gun and application can result in oversized holes. Always ensure the nail gauge and type are compatible with your nail gun and suitable for the material you are fastening.
How does the no-mar tip prevent my nail gun from leaving holes too big?
The no-mar tip, or nosepiece, acts as a protective buffer between the nail gun’s metal housing and your workpiece. Without it, or if it’s worn, the gun’s nose can directly impact and indent the wood surface, making the apparent hole significantly larger than just the nail’s entry point.
Could a worn-out part in my nail gun be causing it to leave holes too big?
Yes, internal wear and tear can contribute to the problem. A worn or damaged driver blade or a faulty nosepiece assembly can cause the nail gun to not seat fasteners cleanly, resulting in excessive wood damage and larger-than-normal holes.
What’s the first thing I should check if my nail gun is leaving holes too big?
Start by checking your nail gun’s depth adjustment setting, as this is the most frequent culprit. For pneumatic models, also verify that your air compressor’s pressure is set correctly and not too high for the nails and material you are using.

I’m Michael R. Turner, the founder, lead writer, and passionate DIY enthusiast behind 101diytools.com. With years of hands-on experience in home improvement and power tools, I built this platform to share practical tips, in-depth guides, and honest reviews to help DIYers of all skill levels tackle projects with confidence and the right tools.