Your Guide How to Use a Roofing Nailer for Perfect Shingles
Mastering your roofing nailer for flawless shingles involves more than just pointing and shooting. Prioritize safety and correct technique, focusing on proper air pressure, nail depth, and the accurate nailing pattern to secure each shingle perfectly. This ensures a durable, aesthetically pleasing, and professional-grade roof installation every time.
Ever gazed up at your roof and thought, “Could I actually fix that myself?” Or maybe you’re planning a full re-roofing project and wondering about the tools that make the pros look so efficient. Well, my friend, you’re in the right place! We’re talking about the game-changer for any roofing task: the roofing nailer. This incredible tool transforms hours of manual nailing into minutes of precise, effortless work. It’s not just about speed; it’s about consistency and accuracy, giving your shingles a professional, long-lasting finish.
I remember my first time holding a roofing nailer. It felt a bit intimidating, a powerful machine ready to tackle a big job. But with a little guidance and practice, it quickly became an indispensable part of my toolkit. If you’re a DIY enthusiast or a budding contractor, learning how to use a roofing nailer correctly is a skill that will save you time, effort, and potentially a lot of frustration. This guide is designed to walk you through everything you need to know, from safety precautions to nailing techniques, so you can confidently tackle your next roofing project.
By the end of this post, you’ll have a clear understanding of what it takes to operate this tool safely and effectively, ensuring your shingles are laid perfectly. Let’s dive into your comprehensive guide on how to use a roofing nailer.
Key Takeaways
- Prioritize Safety: Always wear safety glasses and gloves.
- Adjust Nail Depth: Set pressure for flush, non-damaging nail placement.
- Load Nails Correctly: Ensure nails feed smoothly into the magazine.
- Align Shingles Perfectly: Use chalk lines for straight, uniform shingle courses.
- Place Nails Accurately: Drive nails within the shingle’s designated nailing strip.
- Practice First: Test on scrap material before starting your roof.
- Maintain Your Nailer: Keep tool clean and lubricated for longevity.
📑 Table of Contents
Safety First: Your Most Important Tool
Before you even think about loading nails or connecting an air hose, safety must be your absolute top priority. Working on a roof presents its own set of dangers, and adding power tools to the mix means you need to be extra vigilant. Think of safety gear not as optional accessories, but as essential components of your roofing toolkit.
Essential Safety Gear
- Safety Glasses: This is non-negotiable. Nails can ricochet, and debris can fly. Always wear impact-resistant safety glasses or goggles to protect your eyes.
- Work Gloves: Protect your hands from splinters, sharp shingle edges, and the tool itself. Good grip is also crucial when handling the nailer and climbing.
- Hearing Protection: Roofing nailers can be quite loud, especially during prolonged use. Earplugs or earmuffs will protect your hearing from damage.
- Hard Hat: While not always mandatory for DIY, it’s a smart idea, especially if you’re working with others or near falling objects.
- Sturdy Footwear: Wear non-slip work boots with good ankle support. Falling from a roof is a serious risk, and proper footwear helps maintain stability.
- Fall Protection: If you’re working on a steep roof, consider a safety harness and rope system. This might seem like overkill for a small job, but a fall can be catastrophic.
Safe Operating Practices
Beyond the gear, responsible operation is key. Always keep your focus on the task at hand. Never point the nailer at yourself or others. Disconnect the air supply before performing any maintenance, clearing jams, or leaving the tool unattended. Be aware of your surroundings, especially when moving around on the roof. Learning how to use a roofing nailer safely means respecting its power and capabilities.
Understanding Your Roofing Nailer
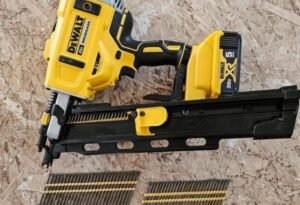
Not all nailers are created equal. A roofing nailer is specifically designed for installing asphalt and fiberglass shingles. It’s different from a framing nailer or a finish nailer, primarily because it uses coiled nails with a larger head and often has a depth adjustment feature for consistent nail placement without over-penetrating the shingle.
Key Components of a Roofing Nailer
- Magazine: This is where the coiled roofing nails are loaded. They typically hold 120 nails or more.
- Trigger: The part you pull to fire a nail. Most roofing nailers have two modes: sequential (fire one nail per trigger pull) and contact/bump fire (hold trigger and bump nose against surface to fire). We’ll talk more about this.
- Depth Adjustment: This dial or lever allows you to control how deeply the nail is driven into the shingle. This is critical for preventing over-driving or under-driving.
- Exhaust Port: Where compressed air exits after each shot. Keep it clear.
- Nosepiece/Contact Trip: This part makes contact with the shingle and must be depressed before a nail can fire (in contact fire mode).
- Air Inlet: Where you connect your air hose.
Types of Firing Modes
Most roofing nailers offer two firing modes, and knowing the difference is vital for safe and effective operation:
- Sequential Firing: You must depress the nosepiece and then pull the trigger for each nail. This is slower but much safer and recommended for beginners or precision work.
- Contact Firing (Bump Fire): You hold the trigger down and simply bump the nosepiece against the shingle to fire nails rapidly. This is faster but requires more control and can lead to accidental firing if not handled carefully. For beginners learning how to use a roofing nailer, sequential mode is generally a safer starting point.
Setting Up for Success: Air Compressor & Nailer
A roofing nailer needs an air compressor to operate. Choosing the right compressor and setting it up correctly are crucial steps before you even pick up your first shingle.
Connecting the Air Compressor
Your air compressor needs to provide enough CFM (Cubic Feet per Minute) and PSI (Pounds per Square Inch) to power your nailer efficiently. Most roofing nailers require around 90-120 PSI. Connect your air hose to the compressor’s air outlet, ensuring the fitting is secure. Then, connect the other end of the hose to the nailer’s air inlet. Always check that all connections are tight to prevent air leaks.
Adjusting Air Pressure
This is where the magic of consistent nailing begins. Start your compressor and let it build up to its maximum pressure. Then, adjust the regulator on your compressor to the recommended PSI for your nailer (usually found in the tool’s manual, or start around 90-100 PSI). You’ll fine-tune this later based on how the nails are driving. The goal is for the nail head to sit flush with the shingle surface, not sunken in or standing proud.
Loading Roofing Nails
Roofing nails come in coils, typically connected by a wire or plastic strip. To load them:
- Disconnect the air hose from the nailer for safety.
- Open the magazine door or latch.
- Place the coil of nails into the magazine, ensuring the nails are facing the correct direction (usually points toward the nosepiece).
- Thread the first few nails into the feeding mechanism.
- Close the magazine securely.
Always use the correct length and type of nails specified for roofing. Typically, 1-1/4 inch or 1-1/2 inch galvanized roofing nails are used, designed to resist corrosion.
Mastering the Nailer: Techniques for Perfect Shingles
Now that your setup is ready and safe, it’s time to learn the techniques for actually laying shingles. Precision here is key for a weather-tight and aesthetically pleasing roof.
Proper Nailing Pattern and Placement
Every shingle manufacturer has specific guidelines for nailing, but generally, nails should be placed along the nailing line, typically about 1 inch above the cut-out (the slot between shingle tabs) and about 5/8 to 1 inch in from each side. Use 4-6 nails per shingle, depending on local building codes and wind resistance requirements. Always refer to the shingle manufacturer’s instructions for the most accurate nailing pattern.
Achieving the Right Nail Depth
This is arguably the most critical aspect of learning how to use a roofing nailer effectively. The nail head should be flush with the shingle surface. It should not cut into the shingle (over-driven) nor stick up (under-driven).
- Over-driven: If the nail head sinks into the shingle, it weakens the shingle and can lead to tears. Reduce the air pressure on your compressor or adjust the depth setting on your nailer.
- Under-driven: If the nail head is standing proud, it can prevent the next shingle course from lying flat, potentially puncturing it. Increase the air pressure or adjust the depth setting.
Test your settings on a scrap piece of shingle first! Make small adjustments to the air pressure or depth setting until you achieve perfect flush nailing. Consistency is key.
Holding and Operating the Nailer
Hold the nailer firmly with both hands, if possible, especially when using contact fire mode. Keep the nailer perpendicular to the shingle surface. This ensures the nail drives straight down. When firing, apply even pressure to the nosepiece. For contact firing, slide the nailer along the shingle, bumping the nosepiece as you go to fire nails in quick succession. For sequential, reposition and fire for each nail. Practice on scrap material until you feel comfortable and confident.
Maintenance and Troubleshooting Your Roofing Nailer
Like any power tool, a roofing nailer needs regular care to perform optimally and last a long time. Knowing how to maintain it and troubleshoot common issues will save you headaches down the line.
Routine Maintenance Tips
- Lubrication: Add 3-5 drops of pneumatic tool oil into the air inlet before each use, or at the start of a long work session. This keeps the internal components lubricated and prevents wear.
- Cleanliness: Keep the nailer clean. Dust and debris can build up, especially around the nosepiece and magazine. Use a cloth and compressed air to clean it regularly.
- Inspect for Wear: Periodically check the contact trip, O-rings, and other moving parts for wear or damage. Replace worn parts as needed.
- Store Properly: When not in use, disconnect the air hose, drain any air from the compressor, and store the nailer in its case or a dry, clean place.
Common Troubleshooting Scenarios
Even with perfect technique, issues can arise. Here are a few common problems and how to address them:
- Nailer Not Firing:
- Is the air hose connected and is there air pressure?
- Is the magazine loaded correctly?
- Is the safety contact trip fully depressed?
- Check for a jammed nail (disconnect air, then clear).
- Nails Not Driving Flush (Under/Over-driven):
- Adjust air pressure up or down.
- Adjust the nailer’s depth setting.
- Ensure you’re holding the nailer firmly and squarely.
- Jams:
- First and foremost: Disconnect the air hose!
- Open the magazine and carefully remove the jammed nail(s). Sometimes the nosepiece may need to be opened as well (consult your manual).
- Ensure you’re using the correct type and size of nails.
Understanding these basic troubleshooting steps is part of mastering how to use a roofing nailer efficiently.
Conclusion: Confident Roofing, Perfect Shingles
There you have it! From strapping on your safety gear to driving the last nail, you now have a comprehensive understanding of how to use a roofing nailer. It might seem like a lot to take in at first, but remember, practice makes perfect. Start with small, manageable sections, take your time, and always prioritize safety.
A roofing nailer is an incredibly powerful and efficient tool that, when used correctly, can transform a daunting roofing project into a satisfying accomplishment. You’ll not only save time and effort but also achieve a professional-looking, durable roof that will protect your home for years to come. So, gather your gear, follow these steps, and get ready to nail those shingles with confidence. Happy roofing!
Frequently Asked Questions
What safety precautions should I take before operating a roofing nailer?
Eye protection is crucial; always wear safety glasses to shield your eyes from debris and ricocheting nails. Additionally, use hearing protection and appropriate gloves to protect your hands, and ensure your work area is clear of trip hazards.
How do I load nails into my roofing nailer and connect the air hose?
To load, open the nail magazine, insert a coil of roofing nails with the nail heads facing up, and then close the magazine securely. Connect the air hose to the air inlet fitting on your roofing nailer, ensuring it clicks into place for a secure, airtight connection.
What’s the correct way to hold and operate a roofing nailer for consistent shingle fastening?
Hold the roofing nailer firmly and squarely against the shingle, ensuring the nose piece is flat against the surface. Apply steady, downward pressure and pull the trigger, allowing the nailer to drive the nail flush without over-penetration or leaving it proud.
How do I adjust the depth setting on my roofing nailer to prevent over-driving or under-driving nails?
Most roofing nailers feature a depth adjustment dial or lever near the nose piece. Perform test nails on a scrap piece of shingle and adjust the setting until the nail head sits perfectly flush with the shingle surface, without tearing the material or standing proud.
How many nails should I use per shingle, and what is the proper nailing pattern?
For standard 3-tab shingles, use four nails per shingle, placed just below the tar strip (the self-sealing adhesive strip). For architectural shingles or areas prone to high winds, local building codes may require five or six nails, spaced evenly across the shingle’s exposure area.
What are common issues when using a roofing nailer, and how can I troubleshoot them?
Common issues include nails failing to drive fully (often due to low air pressure or an incorrect depth setting) or frequent jamming (which can be caused by damaged nails or a worn driver blade). Regularly clean your roofing nailer, ensure your air compressor maintains adequate PSI, and use high-quality nails to prevent most problems.

I’m Michael R. Turner, the founder, lead writer, and passionate DIY enthusiast behind 101diytools.com. With years of hands-on experience in home improvement and power tools, I built this platform to share practical tips, in-depth guides, and honest reviews to help DIYers of all skill levels tackle projects with confidence and the right tools.