Learn How To Use Nail Gun For Furniture Projects Easily
Unlock the secret to faster, stronger furniture builds with a nail gun, but remember that safety and precision are paramount for professional results. This guide demystifies choosing the right nailer and fasteners for various projects, teaching you how to achieve secure joints with ease. Master the essential techniques to confidently and efficiently construct beautiful, durable furniture pieces, transforming your DIY experience.
Learn How To Use Nail Gun For Furniture Projects Easily
Remember those frustrating moments trying to hammer nails into a furniture piece, only to bend them, split the wood, or leave unsightly dents? We’ve all been there! The world of DIY furniture making is incredibly rewarding, offering the joy of creating something beautiful with your own hands. But let’s be honest, traditional nailing can sometimes feel like a step backward, slowing down your creative flow and testing your patience.
What if I told you there’s a tool that can transform your furniture projects from a slow, painstaking process into a fast, professional, and genuinely enjoyable experience? Enter the nail gun! This incredible device is a game-changer for anyone serious about building or repairing furniture. It dramatically speeds up assembly, provides consistent results, and leaves you with cleaner, stronger joints. If you’ve ever felt intimidated by power tools, don’t worry – using a nail gun for furniture is much simpler than you might think, and I’m here to walk you through it, just like a friend sharing their best woodworking secret.
In this guide, we’ll dive into everything you need to know about integrating a nail gun into your furniture projects. From choosing the right type to mastering safe operation and smart nailing techniques, you’ll soon be tackling your next DIY furniture piece with confidence and precision. Let’s make those furniture-building dreams a reality, quickly and beautifully!
Key Takeaways
- Prioritize Safety: Always wear eye protection; read your nail gun manual.
- Select Right Nailer: Choose between brad, finish, or pin nailers for your project.
- Match Nails Correctly: Select nail gauge and length appropriate for wood thickness.
- Practice on Scrap: Test depth and pressure settings before working on furniture.
- Master Proper Technique: Hold the nail gun firmly and shoot straight for strong joints.
- Secure Your Workpiece: Clamp furniture pieces firmly to prevent any movement.
- Finish Flawlessly: Conceal nail holes with wood putty for a professional look.
📑 Table of Contents
Why a Nail Gun is Your Furniture Friend
Before we even get to the “how-to,” let’s chat about why a nail gun deserves a prime spot in your workshop, especially if you love tackling furniture. It’s not just a fancy gadget; it’s a productivity booster and a quality enhancer for all your furniture projects.
Speed and Efficiency
Imagine assembling a cabinet or a bookshelf. With a hammer, each joint means careful positioning, striking, and often, a few missed hits. With a nail gun, it’s a quick “point and shoot.” This incredible speed means you can build furniture much faster, moving from concept to completion in a fraction of the time. This efficiency is a huge plus when you’re making multiple pieces or working on larger furniture projects.
Precision and Cleanliness
One of the biggest advantages of using a nail gun for furniture is the sheer consistency it offers. Nails are driven to a uniform depth every single time, either flush with the surface or slightly countersunk. This eliminates hammer marks, reduces wood splitting, and leaves tiny, neat holes that are easy to fill and sand, resulting in a much more professional finish for your furniture.
Versatility for Furniture Projects
There isn’t just one type of nail gun; there’s a whole family designed for different tasks. This versatility makes them incredibly useful for various aspects of furniture building. Whether you’re assembling a sturdy frame, attaching delicate trim, or securing thin panels, there’s a specific nail gun and nail size perfect for the job. This adaptability makes a nail gun an invaluable tool for all your creative furniture endeavors.
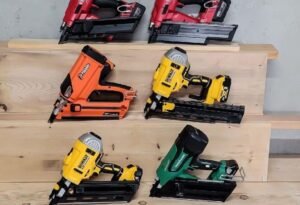
Choosing the Right Nail Gun for Furniture
So, you’re convinced! But which nail gun should you get? Don’t worry, it’s not as complicated as it sounds. Different types excel at different tasks, making them perfect for specific steps in your furniture projects.
Brad Nailers
The brad nailer is often the first nail gun many DIYers buy, and for good reason. It shoots thin 18-gauge nails (brads) that are perfect for delicate work. Think about attaching thin back panels to a cabinet, securing small trim pieces, or holding glued joints while the adhesive dries. The holes left by brads are tiny, making them almost invisible after filling. This is your go-to nail gun for furniture pieces where appearance is paramount.
Finish Nailers
A step up in power and nail size is the finish nailer, which typically shoots 15- or 16-gauge nails. These nails are thicker and provide a stronger hold than brads, making them ideal for more structural elements in furniture. Use a finish nail gun for attaching cabinet face frames, assembling drawer boxes, or securing larger trim and molding. While the holes are slightly larger than brads, they still blend beautifully with a little wood filler.
Pin Nailers
For the most delicate tasks, where you absolutely want minimal evidence of fasteners, the pin nailer is your friend. It fires 23-gauge headless pins, which are so thin they barely leave a mark. These are fantastic for tacking down veneers, securing very thin trim, or holding intricate carvings in place without fear of splitting the wood. It’s primarily a “holding” tool rather than a structural one, perfect for delicate furniture assembly.
Consider Power Source
- Pneumatic (Air Compressor): These are usually lighter and more powerful for their size, running off an air compressor. They’re reliable for continuous work but require the compressor and hose, which can limit mobility. Great for a dedicated workshop.
- Cordless (Battery-Powered): Offering ultimate freedom and portability, battery-powered nail guns are super convenient for working anywhere without being tethered. They tend to be heavier and sometimes pricier, but for many furniture projects, the convenience is worth it.
Safety First: Essential Nail Gun Practices
Before you even think about putting a nail gun near your beautiful wood, safety needs to be your absolute top priority. These tools are incredibly efficient, but they demand respect. Treat your nail gun with care, and it will serve you well for many furniture projects to come.
Read the Manual
This might sound boring, but it’s crucial. Every nail gun is slightly different. The manual will tell you about specific safety features, maintenance, and how to operate your particular model. Spend a few minutes with it – it could prevent an accident.
Personal Protective Equipment (PPE)
- Safety Glasses: Non-negotiable! Nails can ricochet, or wood splinters can fly. Always wear eye protection.
- Hearing Protection: Nail guns can be loud, especially pneumatic ones. Earplugs or earmuffs will protect your hearing over time.
- Gloves: Protect your hands from splinters and give you a better grip.
Workpiece Security
Always clamp your furniture pieces firmly in place. A shifting workpiece can cause the nail gun to jump, leading to missed shots or injury. Plus, a stable piece allows for more precise nail placement.
Understand Your Tool
Most nail guns have a contact safety tip that must be depressed against the workpiece before a nail can be fired. Also, understand the difference between “sequential” and “contact actuation” modes. Sequential (single-shot) mode is safer for most furniture work, requiring you to depress the tip then pull the trigger for each nail. Contact (bump-fire) mode fires a nail every time the tip is depressed with the trigger held down, which is faster but generally not recommended for precise furniture work.
Handle with Care
Always assume the nail gun is loaded. Keep your fingers off the trigger until you’re ready to fire. Never point the tool at yourself or anyone else. When moving around or not in use, disengage the battery or air hose.
Getting Started: Loading and Adjusting Your Nail Gun
Alright, safety covered! Now, let’s get hands-on. Preparing your nail gun for furniture assembly is straightforward, but a few key adjustments make all the difference in achieving that professional finish.
Loading Nails
Loading is usually quite simple. Most nail guns have a magazine where you slide in a strip of nails. Make sure you’re using the correct gauge and length of nails for your specific nail gun and furniture project. Refer to your manual for exact instructions, as designs can vary slightly.
Air Pressure (Pneumatic)
If you have a pneumatic nail gun, your air compressor’s pressure setting is crucial. Too low, and nails won’t drive flush; too high, and they might overdrive, splitting the wood or creating bigger holes. Start around 70-90 PSI and adjust as needed. The goal is to drive the nail head flush or slightly below the surface of your furniture piece.
Depth Adjustment
This is perhaps the most important adjustment for furniture work. Most nail guns have a depth adjustment dial or lever, often tool-free. This control dictates how far the nail is driven. You want the nail head to be either perfectly flush with the wood surface or slightly countersunk (below the surface) so you can easily fill the hole later. Test this setting carefully!
Test on Scrap Wood
Seriously, this is a non-negotiable step. Before you touch your actual furniture piece, grab a scrap piece of the same type of wood you’re using. Fire a few nails, check the depth, and adjust your air pressure or depth setting until you get perfect results. This practice run will save you from making mistakes on your final project.
Nailing Techniques for Furniture Success
With your nail gun loaded and adjusted, you’re ready to start building! Here are some tried-and-true techniques to ensure your furniture projects look fantastic and hold up well.
Holding the Nail Gun
For best control and accuracy, use a firm, two-hand grip whenever possible. One hand should be on the handle, and the other supporting the body of the tool. This keeps the nail gun steady and prevents it from wobbling, especially important for precise furniture work.
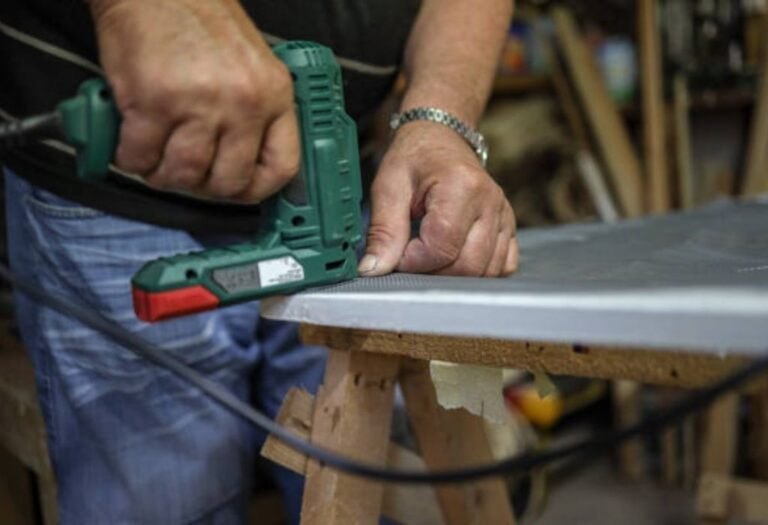
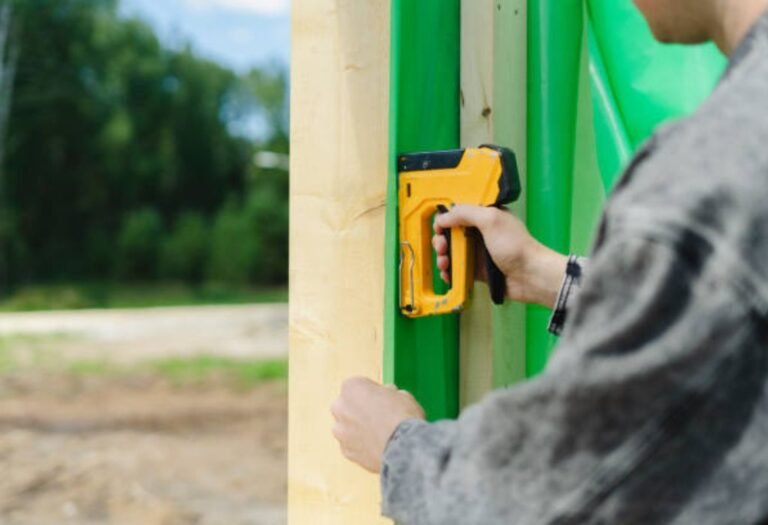
Positioning on Wood
Always place the nail gun perpendicular to the wood surface. Press down firmly to engage the safety tip. Avoid nailing too close to the edge of a board, as this can cause the wood to split. A good rule of thumb is to stay at least 1/2 inch from the edge, depending on the wood species and nail size.
Firing and Following Through
Once positioned and pressed firmly against the wood, pull the trigger. Hold the nail gun in place for a brief moment after firing to ensure the nail is fully seated and to prevent marring the wood if the tool kicks back slightly. Then, lift straight up.
Joining Corners and Edges
When joining two pieces of wood at a corner, try “toe-nailing.” This involves driving nails at an angle (usually about 45 degrees) into the workpiece. By angling the nails, you create a stronger mechanical lock between the two pieces, which is particularly useful for furniture frames and joints where extra stability is needed. Use glue in conjunction with nails for the strongest joints.
Concealing Nails
After nailing, you’ll have tiny holes. For a seamless finish on your furniture, simply fill these holes with wood filler that matches your wood species or chosen finish. Once the filler dries, sand it smooth. For a truly invisible look, especially with pin nails, you might only need a touch of stain or paint, as the holes are incredibly small.
Ready to Build with Your New Furniture Friend?
There you have it! From understanding the different types of nail guns to mastering safe operation and smart nailing techniques, you now have the knowledge to confidently use a nail gun for furniture projects. This tool isn’t just about speed; it’s about achieving a level of precision and finish that will make your DIY furniture pieces look truly professional.
Don’t be intimidated. Like any new skill, practice makes perfect. Start with some scrap wood, get a feel for the tool, and watch how quickly your confidence grows. You’ll be amazed at how much easier and more enjoyable your furniture building process becomes. So, grab your nail gun, pick out your next furniture project, and get ready to create something wonderful with ease and efficiency. Happy building!
“`
Frequently Asked Questions
Which type of nail gun is best for furniture projects?
Brad nailers (18-gauge) are generally the best choice for furniture assembly and trim work, as they create small holes that are easy to conceal. For heavier frames or structural components, a finish nailer (15- or 16-gauge) might be more suitable, offering greater holding power. Consider the specific materials and strength required for your furniture piece.
What essential safety precautions should I take when using a nail gun for furniture?
Always wear safety glasses to protect your eyes from ricocheting debris or nails. Ensure you read the nail gun’s manual thoroughly and never point it at yourself or others. Keep your free hand clear of the nailing path to prevent accidental injury.
How do I properly hold and operate a nail gun to ensure clean fastening in furniture?
Hold the nail gun firmly and perpendicular to the wood surface, ensuring the nose piece is flush against the material. Press the nose piece down to engage the safety mechanism, then firmly pull the trigger while maintaining steady pressure. This technique helps drive nails flush and prevents kickback.
What types of nails or fasteners are ideal when using a nail gun for furniture construction?
For most furniture projects, use brad nails or finish nails appropriate for your chosen nail gun. Brad nails (18-gauge) are excellent for joining thinner pieces and decorative trims, while finish nails (15 or 16-gauge) provide stronger hold for structural components. Choose nail lengths that penetrate adequately without poking through the other side.
How can I prevent wood splitting when using a nail gun for furniture pieces?
To avoid splitting, select nails with a smaller gauge, especially when working with delicate wood or near edges. Angle your nails slightly when joining two pieces to reduce stress on the wood fibers. You can also pre-drill pilot holes for thicker or harder wood, though this negates some of the nail gun’s speed benefit.
How do I adjust the depth on my nail gun for furniture and troubleshoot common issues?
Most nail guns have a depth adjustment dial or lever near the nosepiece, allowing you to set how deep the nail penetrates. If nails aren’t flush, adjust the depth deeper; if they’re too deep, adjust shallower. If jams occur, disconnect the air or power source before carefully clearing the jam according to your tool’s manual.

I’m Michael R. Turner, the founder, lead writer, and passionate DIY enthusiast behind 101diytools.com. With years of hands-on experience in home improvement and power tools, I built this platform to share practical tips, in-depth guides, and honest reviews to help DIYers of all skill levels tackle projects with confidence and the right tools.