Your Guide how to use a nail gun safely and easily
Mastering nail gun operation begins with paramount safety protocols to prevent accidents and ensure successful projects. This guide meticulously covers essential steps for safe loading, precise handling, and effective firing techniques, alongside crucial maintenance tips for longevity. By following these clear instructions, you’ll confidently and easily utilize your nail gun, boosting productivity while staying safe.
Hey there, fellow DIY enthusiast! Have you ever looked at a big home improvement project, like framing a new wall or tackling some intricate trim work, and felt a little overwhelmed by the sheer number of nails you’d have to hammer in? I certainly have! My arm aches just thinking about it. That’s where a nail gun comes into play – a true game-changer that transforms arduous tasks into quick, satisfying work.
But let’s be honest, these powerful tools can look a bit intimidating at first glance. They’re not toys; they’re serious pieces of equipment designed to drive fasteners with incredible force. That’s why understanding how to use a nail gun safely and effectively is absolutely crucial. You want to save time, not risk an injury or a ruined project, right?
Think of this guide as a friendly chat with someone who’s learned a few things through trial and error (and thankfully, no major errors!). We’re going to walk through everything you need to know, from understanding the different types of nail guns to loading them up, nailing like a pro, and, most importantly, keeping all your fingers intact. By the end, you’ll feel confident and ready to tackle your next project with your trusty nail gun.
Key Takeaways
- Always wear PPE: Protect eyes and ears with proper safety gear.
- Read the manual: Understand your specific nail gun’s features and safety.
- Secure your workpiece: Prevent movement, ricochets, and inaccurate nailing.
- Confirm firing mode: Select sequential for precision, contact for speed.
- Keep hands clear: Never place fingers near the nailing point.
- Disconnect power: Unplug or remove air before maintenance or clearing jams.
- Test on scrap: Verify depth and function before starting your project.
📑 Table of Contents
Understanding Your Nail Gun: Types and Components
Before you even think about pressing a trigger, it’s super helpful to know a little about what you’re working with. Nail guns aren’t a one-size-fits-all tool; they come in different varieties, each suited for specific jobs. Knowing the basics of how to use a nail gun starts with knowing its type.
Different Flavors of Nail Guns
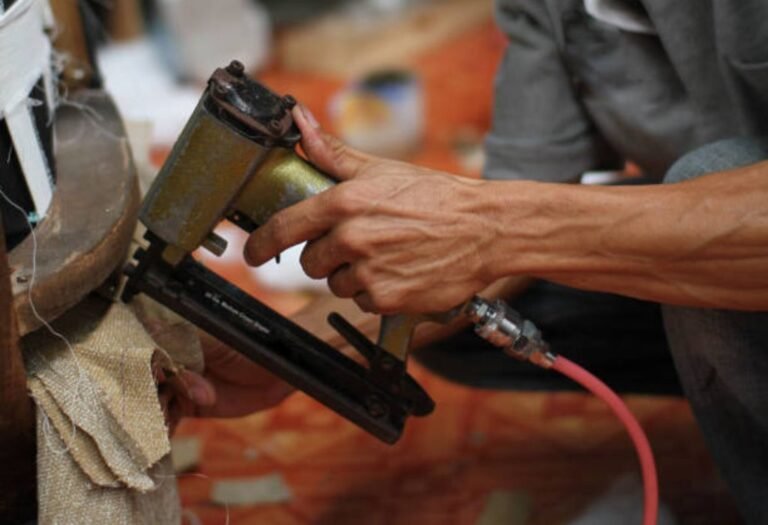
- Pneumatic Nail Guns: These run on compressed air from a compressor. They’re powerful, reliable, and generally lighter. Great for framing and heavy-duty tasks.
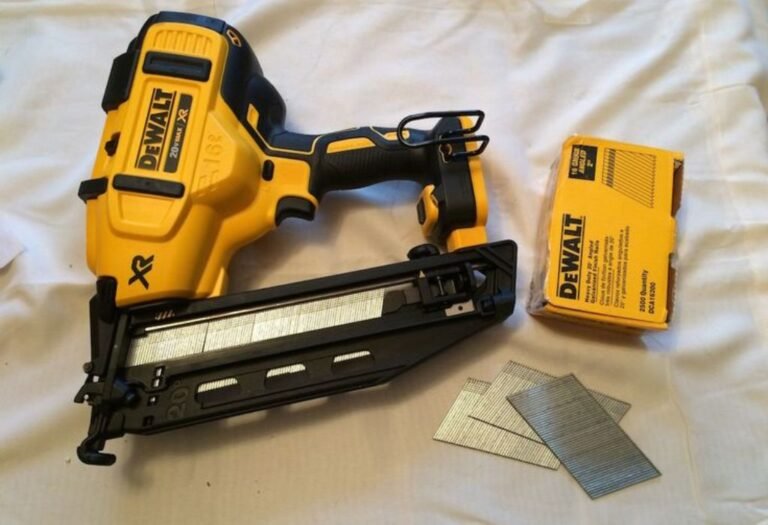
- Cordless/Battery-Powered Nail Guns: These use a rechargeable battery. Incredibly convenient for smaller jobs or remote locations, offering great portability.
- Fuel-Powered Nail Guns: A hybrid, these use a small fuel cell and a battery to ignite the fuel for power. They’re cordless but require fuel cell replacements.
- Specific Types: You’ll find framing nailers (for structural work), finish nailers (for trim), brad nailers (for delicate trim), and pin nailers (for nearly invisible fastening).
Key Parts You Should Know
Every nail gun has common components. Familiarizing yourself with these is a big step in learning how to use a nail gun properly:
- Trigger: The obvious part that makes it go.
- Magazine: Where you load the strip of nails.
- Nose/Mouth: The business end where the nail exits.
- Depth Adjustment: A dial or lever that controls how deep the nail is driven.
- Safety Tip/Contact Trip: This spring-loaded mechanism must be depressed against the workpiece before the gun will fire. It’s your primary safety feature.
Practical Tip: For general DIY projects, a good finish nailer or brad nailer is often a fantastic starting point. They’re versatile for many common tasks.
Safety First: Your Non-Negotiable Rules
I cannot stress this enough: safety is paramount when learning how to use a nail gun. These tools are incredibly efficient, but their power demands respect. A moment of carelessness can lead to serious injury. Always, always, always prioritize safety.
Personal Protective Equipment (PPE) is Not Optional
Think of your PPE as your essential armor. Never operate a nail gun without it.
- Eye Protection: Safety glasses or goggles are a must. Nails can ricochet, wood splinters can fly. Your eyes are irreplaceable!
- Hearing Protection: Nail guns, especially pneumatic ones, can be LOUD. Earmuffs or earplugs will protect your hearing.
- Hand Protection: Work gloves protect your hands from splinters and provide a better grip.
Pre-Operation Checks
Before you even plug in or load your nail gun, do a quick once-over.
- For pneumatic guns, check your air hose for cracks. Ensure connections are secure.
- For cordless guns, make sure the battery is fully charged and securely inserted.
- Verify the nails are the correct type and size for your gun and project.
- Inspect your workpiece for hidden metal that could cause a ricochet.
Relatable Anecdote: I once got a tiny wood splinter in my forehead because I briefly took my safety glasses off. It was a stark reminder that “just for a second” is too long with power tools.
Handling with Care
Always assume the nail gun is loaded. Keep your finger off the trigger until you are ready to fire. Never point it at anyone. When moving around or setting the tool down, disengage the power (unplug, remove battery, or disconnect air hose).
Getting Started: Loading and Adjusting
Alright, PPE is on, safety checks done. Now comes the exciting part: getting your nail gun ready for action. Learning how to use a nail gun properly involves mastering these initial steps.
Loading Nails Like a Pro
Each nail gun has a specific way to load nails, but the general principle is the same:
- Make sure the gun is disconnected from power.
- Open the magazine (usually a sliding or hinged cover).
- Insert the strip of nails, ensuring they face the correct direction.
- Close the magazine securely until it clicks.
Remember: Use the right nails! The length and gauge (thickness) must match what your nail gun is designed for. Wrong sizes can cause jams or damage.
Setting the Depth
This is where your scrap wood comes in handy. You want nails driven just right – either flush with the surface or slightly countersunk if you plan to fill the holes. Too shallow, and the nail head sticks out. Too deep, and you might split the wood.
- Locate the depth adjustment mechanism (often a dial or lever near the nose).
- Take a piece of scrap wood similar to your project material.
- Fire a test nail. Adjust the depth setting, then fire another test nail until you get the perfect depth.
Connecting to Power
- Pneumatic: Attach the air hose to the nail gun’s air inlet. Ensure your air compressor is set to the recommended PSI.
- Cordless: Simply insert the charged battery pack until it clicks into place.
- Fuel-Powered: Insert the fuel cell and battery.
Your nail gun is now officially ready to fire!
The Art of Firing: Techniques for Clean Nailing
With everything prepped, it’s time to learn the physical technique of how to use a nail gun effectively. Good technique not only ensures clean results but also prevents frustrating misfires and potential safety issues.
Grip and Stance
Hold the nail gun firmly with both hands for maximum control, if possible. Your non-dominant hand can support the nose or handle, while your dominant hand controls the trigger. Maintain a balanced, stable stance. Don’t lean too far over your work; let the tool do the work.
Firing Modes
Most nail guns have at least two firing modes:
- Sequential/Single Shot: You must depress the safety tip against the workpiece AND pull the trigger for each nail. This is the safest and most accurate mode, highly recommended for beginners and precision work.
- Contact/Bump Fire: You hold the trigger down, and each time the safety tip makes contact, a nail fires. This is much faster for repetitive tasks but requires careful handling.
Always start with Sequential mode. Get comfortable with the tool before even considering bump fire.
Nailing Techniques
- Position the Nose: Place the safety tip squarely on the spot where you want the nail to go. Apply firm, even pressure to depress the safety tip.
- Pull the Trigger: With the safety tip depressed, pull the trigger. The nail will fire.
- Release and Repeat: Release the trigger and lift the nail gun from the workpiece before moving to the next spot.
Practical Tip: For delicate work or when nailing near edges, angle your nails slightly. This provides better holding power and reduces the risk of splitting the wood. Practice on scrap until you feel confident in your aim and depth.
Common Challenges and Troubleshooting
Even when you know how to use a nail gun, things can occasionally go awry. Don’t panic! Most issues are easily fixable.
Nails Not Driving Fully
- Depth Adjustment: The most common culprit. Increase the depth setting.
- Air Pressure (Pneumatic): Your compressor might not be set high enough.
- Wrong Nails: Nails might be too long or too thick for the material or your gun’s power.
Jammed Nails
A nail jam can be frustrating, but clearing it safely is paramount. Always, always, ALWAYS disconnect the nail gun from its power source FIRST (unplug, remove battery, disconnect air hose).
- Disconnect power.
- Open the magazine and remove any remaining nail strips.
- Look for a quick-release lever near the nose. Open it to access the jammed nail.
- Carefully remove the bent or stuck nail using pliers. Never force it.
- Close the quick-release and magazine, then reconnect power and test on scrap wood.
Relatable Anecdote: My first jam felt like a major disaster. I almost pulled the trigger accidentally trying to clear it without disconnecting power. Safety first, every time!
Double Firing
Sometimes the gun fires two nails instead of one. This usually happens in contact/bump fire mode, often due to technique (bouncing the gun). Switching to sequential mode is the easiest fix.
Choosing the Right Nail Gun for Your Project
To help you decide which tool best suits your needs, here’s a quick overview of popular nail gun types.
| Nail Gun Type | Best For | Pros | Cons |
|---|---|---|---|
| Pneumatic Framing Nailer | Heavy-duty construction, deck building, framing walls | High power, consistent performance, relatively lightweight tool | Requires air compressor & hose, less portable |
| Cordless Framing Nailer | Roofing, remote framing, quick job site tasks | Ultimate portability, no compressor needed | Heavier, requires battery charging, may have less sustained power |
| Pneumatic Finish Nailer | Trim work, baseboards, crown molding, door/window casings | Versatile, good power for precise work, less likely to split wood | Requires air compressor & hose |
| Cordless Finish Nailer | Small trim jobs, punch-list items, areas without power access | Excellent portability, quick setup | Heavier, battery life considerations |
| Brad Nailer | Delicate trim, small craft projects, attaching thin veneers | Small nails create tiny holes, less likely to split delicate wood | Less holding power than finish nails, only for light tasks |
| Pin Nailer | Invisible fastening, holding glued pieces while drying, very delicate trim | Practically invisible holes, no need for wood filler | Almost no holding power (relies on glue), very small nails |
Choosing the right tool is a big part of mastering how to use a nail gun effectively for any given task.
Conclusion
There you have it! Learning how to use a nail gun might seem like a big hurdle at first, but with a bit of knowledge, practice, and a healthy respect for safety, you’ll be zipping through projects like a seasoned pro. These tools are incredible time-savers and can really open up new possibilities for your DIY adventures.
Remember those three golden rules: always wear your PPE, always respect the power of the tool, and always practice on scrap wood before tackling your main project. Embrace the learning curve, stay safe, and enjoy the satisfying “thwack” as each nail finds its home. Happy building!
Frequently Asked Questions
What safety precautions should I take before using a nail gun?
Always wear appropriate personal protective equipment (PPE), including safety glasses and hearing protection, before operating a nail gun. Ensure your work area is clear, and always read the manufacturer’s manual thoroughly to understand your specific tool’s safety features and operation.
How do I load nails into my nail gun?
First, ensure the nail gun is disconnected from its power source (air hose or battery). Open the magazine, insert the strip of nails with the points facing forward, and then close the magazine securely. Reconnect the power only when you are ready to use the tool.
What’s the correct technique for firing a nail gun safely and effectively?
Hold the nail gun firmly and place the nose of the tool squarely against the material where you want to drive a nail. Apply firm downward pressure, then depress the trigger to fire. Always ensure your hands are clear of the firing path and that the workpiece is stable.
How do I choose the right nail gun for my specific project?
Consider the type of project you’re undertaking; for instance, framing nail guns are for structural work, while finish or brad nail guns are for trim and delicate tasks. Also, factor in the nail size required and your preferred power source, such as pneumatic (air-powered) or cordless (battery-powered) nail guns.
What should I do if my nail gun jams or misfires?
Immediately disconnect the nail gun from its power source if it jams or misfires. Carefully follow the manufacturer’s instructions for clearing jams, which usually involves opening the nosepiece or magazine to remove the stuck nail. Never attempt to clear a jam with the power connected.
Can I adjust the nail depth with a nail gun, and how is it done?
Yes, most modern nail guns feature a depth adjustment mechanism, typically a dial or lever located near the nosepiece. You can rotate or slide this control to set how deep the nail is driven into the material. Always test the depth setting on a scrap piece of similar material before working on your final project.

I’m Michael R. Turner, the founder, lead writer, and passionate DIY enthusiast behind 101diytools.com. With years of hands-on experience in home improvement and power tools, I built this platform to share practical tips, in-depth guides, and honest reviews to help DIYers of all skill levels tackle projects with confidence and the right tools.