How to Use a Drywall Power Sander Effectively
Every renovation project reaches a point where the real test of craftsmanship begins at the drywall finishing stage.
Even a perfectly framed wall can look uneven and unprofessional if the drywall isn’t sanded smoothly enough.
Many DIYers and even seasoned contractors struggle with this stage because manual sanding is slow, exhausting, and produces clouds of fine dust.
That’s where learning how to use a drywall power sander properly can completely transform your workflow.
This single tool can smooth out large surfaces in a fraction of the time while maintaining consistency that’s nearly impossible to achieve by hand.
Drywall dust can spread across a wide area without proper dust extraction, which is why professionals prefer sanders with built-in vacuum systems.
Beyond saving time, using a drywall power sander reduces fatigue and improves surface quality before painting or texturing.
The right technique ensures your walls are perfectly flat, joints are invisible, and primer adheres flawlessly for a professional-grade finish.
Curiosity often begins with one simple question: Is it worth the investment?
The answer depends on understanding how to control speed, pressure, and sanding direction to avoid gouging or oversanding the drywall paper.
This guide will take you step by step through everything you need to know — from prepping the room and selecting the right grit, to mastering sanding strokes and avoiding common mistakes.
By the end, you’ll know exactly how to use a drywall power sander effectively to achieve a dust-free, paint-ready surface that looks smooth, level, and durable.
What Is a Drywall Power Sander and Why Use It?
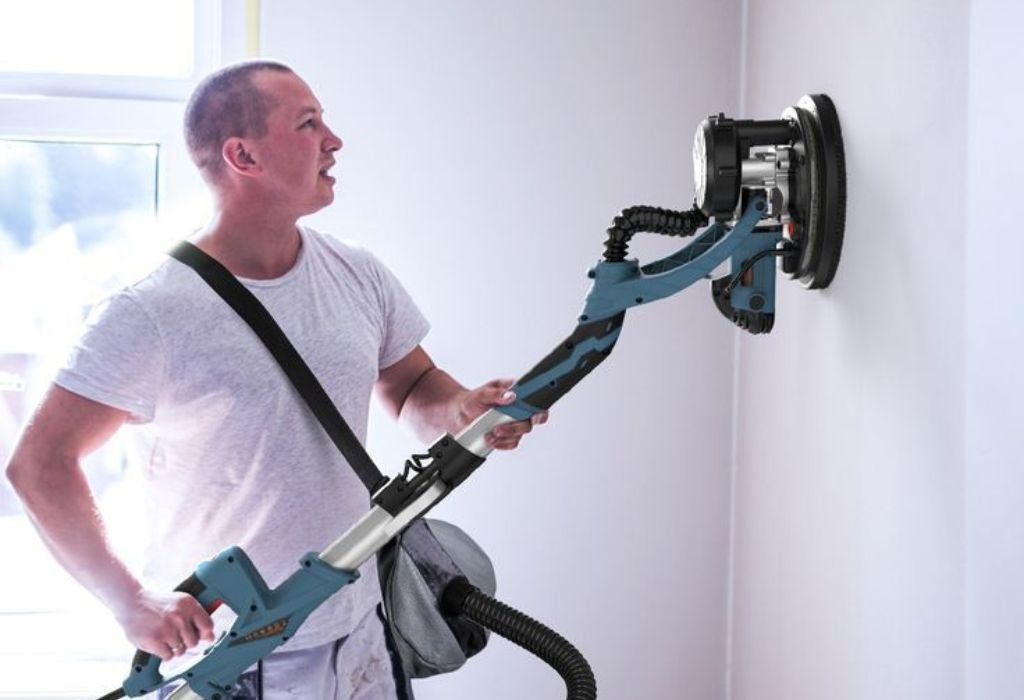
A drywall power sander is a specialized electric tool designed to smooth drywall surfaces quickly and evenly.
Unlike traditional sanding blocks or poles, it uses a rotating sanding head powered by a motor to remove joint compound and imperfections efficiently.
This tool is valuable for finishing large wall or ceiling areas, where manual sanding would be time-consuming and inconsistent.
Its built-in dust extraction system helps reduce airborne particles, keeping your workspace cleaner and safer.
Modern models often feature adjustable speeds, telescopic handles, and pivoting heads that make it easier to reach ceilings and corners.
The result is a smooth, level finish that requires less effort and delivers professional-quality results every time.
Using a drywall power sander improves surface quality, productivity, and comfort during the drywall finishing process.
For anyone preparing walls for painting or wallpapering, this tool can save hours while ensuring a flawless, paint-ready surface.
What exactly is a drywall power sander?
It is an electric sanding tool with a rotating disc that smooths drywall joints, seams, and rough patches quickly and evenly.
How does it differ from manual sanding?
Manual sanding depends on hand pressure and takes longer, while a drywall power sander provides consistent motion, faster speed, and integrated dust control.
Why is dust extraction important when sanding drywall?
Dust extraction prevents fine drywall dust from spreading across the workspace, protecting your lungs and saving cleanup time.
Can a drywall power sander be used for ceilings?
Yes, most models have extendable poles and flexible heads that allow users to sand high ceilings with ease.
What is the main advantage of using a drywall power sander?
It saves time, ensures an even surface, and produces professional results with minimal physical strain.
Preparing the Work Area and the Wall Surface
Proper preparation is essential before learning how to use a drywall power sander effectively.
A well-prepped environment prevents dust contamination and ensures the best surface results.
Seal off the room with plastic sheets and painter’s tape to contain dust within the workspace.
Cover floors and furniture, and make sure the area has good lighting so you can easily spot imperfections.
Wear protective gear including a respirator mask, safety goggles, and ear protection.
Respirators rated for fine particles significantly reduce drywall dust inhalation risk.
Before sanding, inspect the wall for loose screws, nails, or dried joint compound ridges.
Knock down high spots and fill any deep gouges or dents before starting the power sander.
Why is preparation necessary before sanding?
Preparation ensures safety, reduces cleanup, and prevents damage to finished walls or nearby surfaces.
What protective gear is needed for drywall sanding?
A dust mask or respirator, safety goggles, gloves, and ear protection are strongly recommended.
Should joint compound be completely dry before sanding?
Yes, sanding wet mud can tear paper surfaces and leave uneven textures.
Why is lighting important during drywall sanding?
Proper lighting helps reveal shadows, ridges, and high spots that might otherwise be missed.
Can preparation reduce sanding time?
Absolutely — smoother starting surfaces require fewer passes with the sander and deliver better finishes.
Choosing the Right Equipment and Accessories
Selecting the correct drywall power sander and accessories ensures smooth operation and consistent results.
There are two main types: corded models for continuous power and cordless options for flexibility in tight spaces.
A quality sander should have variable speed settings, a pivoting head, and a telescopic handle for ceilings and tall walls.
Dust collection features are critical — without them, drywall dust can spread throughout the entire home.
Use sandpaper discs between 100 and 220 grit, depending on the project phase.
Lower grits remove excess compound, while higher grits give a fine, paint-ready finish.
Which grit sandpaper is best for drywall sanding?
Use 100–120 grit for rough sanding and 150–220 for fine finishing.
What kind of dust collection is most effective?
A sander with vacuum attachment or built-in extractor prevents airborne dust and minimizes cleanup.
Should you choose a corded or cordless sander?
Corded models are ideal for large projects, while cordless ones offer convenience for smaller areas.
How important is tool maintenance?
Regularly clean dust vents, check the power cord, and replace worn sanding pads to maintain performance.
What features should you prioritize when buying a drywall sander?
Variable speed control, swivel head, lightweight design, and durable motor are essential for long-term efficiency.
How to Use a Drywall Power Sander Step by Step
Start by ensuring the wall surface is completely dry and free of loose material.
Attach the appropriate sandpaper grit to the sanding head and connect your dust extraction system.
Hold the sander flat against the wall and turn it on at a medium speed.
Move in slow, overlapping strokes from top to bottom, keeping even pressure throughout.
Avoid staying too long in one spot, as it may create gouges or swirl marks.
When most of the compound is leveled, switch to a finer grit for the final smoothing pass.
Use low to medium speed when sanding corners or ceilings to maintain control.
Regularly check your progress under bright light to ensure an even finish.
How should the sander be moved for best results?
Use long, overlapping strokes in steady motions across the wall surface.
What happens if the sander is pressed too hard?
Excessive pressure can gouge the drywall paper or create uneven patches.
When should you switch sandpaper grit?
After rough sanding, switch to finer grit once the surface feels even and level.
How can you reach ceilings safely?
Extend the telescopic handle and work slowly to maintain stability.
Is dust extraction necessary while sanding?
Yes, using a vacuum system reduces airborne dust and helps maintain clear visibility.
Common Mistakes to Avoid and Troubleshooting
Even experts make mistakes when using a drywall power sander.
Learning what to avoid can save time, materials, and frustration.
One common issue is oversanding, which happens when too much material is removed, exposing the drywall paper.
Always let the tool do the work — avoid pressing too hard.
Using the wrong grit can also cause scratches or uneven textures.
Choose grit based on the surface condition, not convenience.
If dust clouds form quickly, check that your extraction hose is tightly secured and filters are clean.
Regular maintenance prevents clogging and overheating during long sessions.
What causes oversanding on drywall?
Applying too much pressure or staying in one area for too long can damage the paper surface.
Why does my sander leave swirl marks?
Using coarse grit at high speed without steady movement often creates visible swirl patterns.
What if the surface still looks uneven?
Apply another thin layer of joint compound, let it dry, then lightly sand with fine grit.
How do I reduce airborne dust while sanding?
Ensure your vacuum hose is connected and filters are properly cleaned.
What if corners remain rough after power sanding?
Use a hand sanding sponge or corner attachment for precision work in tight spaces.
After-Sanding Tasks: Cleaning and Maintenance

Once sanding is complete, turn off your power sander and let the dust settle for a few minutes.
Wipe down the entire wall with a slightly damp microfiber cloth to remove any remaining dust particles.
Inspect the surface under bright lighting from different angles.
A properly sanded wall will look flat, smooth, and free of visible seams or ridges.
Before painting or priming, ensure all dust has been cleaned from the wall and floor.
Any leftover residue can cause paint adhesion issues or rough finishes.
Clean your sander’s dust bag, filter, and sanding head to extend its lifespan.
Check for worn pads and replace them before your next project.
How do you know when a wall is ready for painting?
When it feels smooth to the touch and no visible imperfections remain under strong light.
Should dust be cleaned before applying primer?
Yes, leftover dust can prevent primer or paint from bonding properly.
How often should sanding discs be replaced?
Change discs whenever they become clogged, worn, or fail to remove material efficiently.
What’s the best way to maintain a drywall power sander?
Clean vents, empty dust bags, and check cords and connectors after every use.
Can the same sander be used for multiple projects?
Yes, regular maintenance allows it to perform consistently across many drywall finishing jobs.
Conclusion
Mastering how to use a drywall power sander is the key to achieving a professional, smooth finish with minimal effort.
By preparing properly, using the right grit, and maintaining steady technique, you can transform uneven walls into paint-ready surfaces.
The secret lies in consistency — let the tool glide evenly, control dust effectively, and inspect the surface frequently under good lighting.
Avoid rushing the process; precision yields better results than speed alone.
After finishing, clean both your workspace and the sander thoroughly to keep the equipment in top shape.
Whether you’re renovating a single room or finishing a new home, this knowledge ensures every wall looks flawless and durable.
So before starting your next project, take the time to understand how to use a drywall power sander effectively.
It’s not just a time-saving upgrade — it’s the difference between an average job and a truly professional finish.

I’m Michael R. Turner, the founder, lead writer, and passionate DIY enthusiast behind 101diytools.com. With years of hands-on experience in home improvement and power tools, I built this platform to share practical tips, in-depth guides, and honest reviews to help DIYers of all skill levels tackle projects with confidence and the right tools.