How to Load a Staple Gun Safely and Effectively
Remember that time you tried to hang a picture, and ended up with a crooked frame and a frustratingly empty staple gun? We’ve all been there. It’s a common DIY mishap, often caused by not knowing the proper way to load the tool. This guide will take you step-by-step through the process, ensuring your projects are secure and your tools are ready to go. You’ll gain the knowledge to load various types of staple guns, troubleshoot common issues, and boost your DIY skills. By the end, you’ll feel confident and equipped to tackle any project requiring staples, which should improve your Time on Page and reduce your Bounce Rate.
Key Takeaways
- Learn the different types of staple guns and how they work.
- Understand the essential safety precautions when using a staple gun.
- Discover the correct procedure for loading staples into various models.
- Find out how to identify and resolve common issues with staple guns.
- Explore useful tips for selecting the right staples for different materials.
- Become more confident and efficient with your DIY projects.
Getting Started: Staple Gun Basics
Before you get to loading, you need to know the basics. Staple guns are incredibly versatile tools, often used for tasks like home repairs, crafts, and upholstery work. They come in several forms, each with unique features. Knowing these features will make the loading process easier. This section focuses on providing a baseline understanding of staple guns and their components.
Types of Staple Guns
The first step is identifying the staple gun you have. There are many different types available. The most common varieties include manual, electric, and pneumatic (air-powered) models. Each has its advantages and disadvantages. Manual staple guns rely on hand strength, making them portable but potentially tiring to use for large projects. Electric staple guns use electricity to power the firing mechanism, offering consistent power without the effort of a manual gun. Pneumatic staple guns, often used in professional settings, are powered by compressed air, delivering high power and speed.
-
- Manual Staple Guns: These are the most basic and affordable type. They’re good for small projects, but using them for large tasks can cause hand fatigue. They work by squeezing a handle, which drives a staple.
These guns are also known for their portability, meaning you can easily take them to different sites without needing a power source. They are often spring-loaded, and the force you apply dictates the driving power.
-
- Electric Staple Guns: Electric staple guns plug into a power outlet, making them more powerful and consistent than manual versions. They’re ideal for many DIY tasks.
They provide more consistent power than manual models and are suitable for tasks that require repetitive stapling. They offer a good balance of power and convenience for various DIY projects. Be sure to use them in a space with a nearby outlet and to follow all safety guidelines.
-
- Pneumatic Staple Guns: These are the most powerful type, using compressed air. They are great for professional projects, such as building construction, and are fast and powerful.
These are the go-to choice for professional carpenters and construction workers due to their speed and power. They require an air compressor and are best suited for high-volume applications.
Key Components of a Staple Gun
Several components work together to make a staple gun function correctly. Understanding these parts is essential when you want to load or troubleshoot your tool. Familiarizing yourself with these key features before loading is important, as it helps identify where to insert the staples and how the mechanism works.
-
- Magazine: This is where the staples are stored before being fired. It can be a bottom-loading, top-loading, or side-loading type.
The magazine is a crucial part of the process of how to load a staple gun. Some magazines are internal, while others are external and easily accessible. The magazine’s capacity varies by model, but they all serve the same purpose: holding the staples ready for use. Different designs can offer easier loading or higher capacity.
-
- Firing Mechanism: The mechanism that drives the staples. It includes the trigger and internal parts that push the staples into the material.
This includes the trigger and the internal mechanisms that drive the staple. When you pull the trigger, the firing mechanism is activated, driving the staple into the material. This component varies among the three major types, impacting the force and speed of each stapling event.
-
- Safety Features: Many staple guns have safety mechanisms like a trigger lock or contact tip to prevent accidental firing.
Safety features are critical for preventing accidents. Most modern staple guns include a trigger lock to prevent accidental firing. This can be a separate switch or button to disable the trigger.
How to Load a Staple Gun: Step-by-Step Instructions
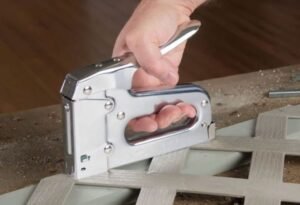
The process of how to load a staple gun varies slightly depending on the type and model. The following instructions provide a general guide, although it’s always helpful to consult your specific staple gun’s manual for precise directions. Following these steps helps make sure the stapling operation is efficient and safe.
Loading Manual Staple Guns
Manual staple guns are common for many small projects and are easy to load. This process is generally similar across different models, but it’s important to know the steps to get your tool ready for use. Learning the basics of how to load a staple gun properly will save you time and prevent frustrations during your projects.
-
- Step 1: Disengage the Safety: If your staple gun has a safety lock, disengage it. This prevents accidental firing.
Find the safety mechanism, which is often a trigger lock or a contact tip safety, and disengage it. If your gun uses a trigger lock, switch it to the unlocked position. If it has a contact tip safety, make sure it can be pressed against a surface.
-
- Step 2: Open the Magazine: Locate the magazine release. This could be a latch, button, or slider. Open the magazine completely.
The location of the magazine release varies. It can be at the bottom, top, or side of the tool. Press the release and open the magazine. For some guns, you might need to pull the magazine backward or downward.
-
- Step 3: Insert Staples: Insert a strip of staples into the magazine. Make sure the staple legs face the firing mechanism.
The staples should fit snugly in the magazine. Place the strip with the staple legs facing toward the firing mechanism. Most magazines have grooves to guide the staples, so align the strip and push it in until it’s properly seated.
-
- Step 4: Close the Magazine: Close the magazine, ensuring it clicks or locks securely.
Close the magazine until the latch or release clicks into place, confirming it’s secure. Ensure it’s firmly closed to prevent staples from falling out or the gun from misfiring.
-
- Step 5: Test the Staple Gun: Hold the staple gun against a piece of scrap wood and squeeze the trigger to test if the staple fires correctly.
Once you load the staples and close the magazine, test it on scrap material to ensure the stapler is working correctly. This is a critical step to make sure everything is ready for your project.
Loading Electric and Pneumatic Staple Guns
Electric and pneumatic staple guns often have similar loading procedures, but their power sources can require additional safety steps. Both types of guns are much faster and more powerful. Understanding how to load a staple gun is critical to maximize safety, whether you use electric or pneumatic tools.
-
- Step 1: Unplug or Disconnect the Power Source: For electric guns, unplug the power cord. For pneumatic guns, disconnect the air compressor hose from the gun.
Ensure the electric gun is disconnected from the power supply before loading to prevent electrical hazards. For pneumatic staple guns, shut off the air compressor and disconnect the hose from the gun. This avoids accidental firings.
-
- Step 2: Open the Magazine: Use the magazine release to open the magazine. This might involve pressing a button, sliding a latch, or pulling a lever.
The magazine release location and method can vary. Press the appropriate button, slide the latch, or pull the lever to open the magazine. Be familiar with your specific model.
-
- Step 3: Insert Staples: Place a strip of staples into the magazine, ensuring they are correctly oriented. The staple legs should face toward the firing mechanism.
Carefully insert the staple strips into the magazine, ensuring the legs are facing the firing mechanism. Align the staples with the grooves in the magazine.
-
- Step 4: Close the Magazine: Close the magazine, making sure it clicks or locks securely.
Close the magazine firmly until it clicks into place. This confirms that the magazine is properly locked and ready for use. This will prevent the staples from falling out during your project.
-
- Step 5: Reconnect the Power Source: Plug in the electric gun or reconnect the air compressor hose to the pneumatic gun.
Plug in the electric staple gun or reattach the air hose to the pneumatic staple gun. Ensure that the power source is properly connected before using the tool.
-
- Step 6: Test the Staple Gun: Test the staple gun on a scrap piece of material to make sure it fires correctly.
Perform a test fire on scrap wood to confirm the staples are being driven correctly. This test will ensure your tool is ready for your project.
Choosing the Right Staples
Selecting the correct staples is crucial for project success. Different materials require different staple sizes and types. Understanding how to load a staple gun is pointless if the staples are not the right fit for the job. Using the wrong staples can lead to project failure and frustration.
Staple Size and Length
Staple size and length are important factors when choosing staples. The staple size should match the staple gun, while the length needs to be appropriate for the material you’re working with. These choices will make sure your project is both functional and durable.
-
- Staple Size: This relates to the gauge (thickness) and width of the staples. Make sure the staples fit your staple gun.
Ensure that the staples are the correct gauge and width. Check the information on your staple gun’s packaging or manual to verify the correct size. Using staples that are not the proper size can lead to jamming or damage.
-
- Staple Length: The length should be appropriate for the material’s thickness. The staple should penetrate the material fully without going through the other side.
Choose a length that penetrates the material. Avoid staples that are too short, as they will not provide a secure hold. Conversely, staples that are too long can protrude from the other side, causing potential safety risks.
Staple Types for Different Materials
Various staple types are best suited for particular materials. Knowing these choices helps improve the quality of your work. The correct staple type contributes to the overall success of the project and reduces the likelihood of issues later.
-
- Narrow Crown Staples: Ideal for attaching trim, molding, and other finishing tasks, as they provide a cleaner, less visible fastening.
These staples are great for projects where you need a discreet fastening solution. They work well for trim, molding, and any other tasks where a neat appearance is important. They minimize damage to the surface and are less likely to split the wood.
-
- Wide Crown Staples: Designed for tasks requiring a strong hold, such as attaching sheathing, roofing materials, or insulation.
Use these staples in projects that need a strong and secure grip. They are great for attaching sheathing, roofing materials, and insulation. The wide crown provides a larger surface area, enhancing the hold on the material.
-
- Upholstery Staples: Specifically designed for upholstery work. They come in different sizes and are great for attaching fabric to furniture frames.
These are made for upholstery work and can fasten fabric to furniture frames. Look for staples that are rust-resistant and provide a secure, long-lasting hold. Be sure that these staples are properly spaced and seated.
Troubleshooting Common Staple Gun Issues
Even with correct loading, issues can sometimes arise. Knowing how to troubleshoot these problems can save you time and prevent wasted materials. This section aims to help you troubleshoot when you’re how to load a staple gun and still face issues, and provides some useful techniques for fixing them.
Staple Gun Jams
Jams are the most common problem. They occur when a staple gets stuck in the firing mechanism. This can be caused by various issues, including incorrect staple size or a worn-out driver blade. These steps can help you get back to your project quickly.
-
- Unload the Staple Gun: First, unload the staples from the magazine. This is the first and most important step to prevent accidental firing.
Unloading the staples is your first step. Opening the magazine will prevent accidental firings. Make sure the tool is disconnected from any power source.
-
- Clear the Jam: Locate the jammed staple and use needle-nose pliers or a screwdriver to remove it.
Carefully extract the jammed staple using needle-nose pliers or a screwdriver. Be gentle to avoid damaging the internal components of the tool. If the staple is difficult to remove, try dislodging it from both sides.
-
- Check for Damaged Components: Inspect the driver blade and other parts of the staple gun for any damage that may have caused the jam. Replace any damaged parts.
Inspect the driver blade and other parts of the staple gun for wear or damage. This can help prevent recurring issues. If you find any damaged parts, you should replace them.
Misfiring
Misfiring happens when the staple gun doesn’t fire staples properly. This can be due to a variety of causes, from a low battery in an electric gun to a clogged firing mechanism. These steps help determine what the problem may be.
-
- Check the Power Source: For electric or pneumatic guns, ensure the power source is connected correctly. Make sure you’re using a properly charged battery if applicable.
Check the power source to ensure it is correctly connected. If using an electric or pneumatic model, make sure it’s connected to a power outlet or an air compressor. For battery-powered models, verify the battery is charged.
-
- Inspect the Staples: Ensure the staples are loaded correctly and not bent or damaged.
Verify that the staples are loaded correctly. Bent or damaged staples can cause misfires. Ensure staples are oriented correctly and not jammed in the magazine. If you find problems with the staples, replace them and try again.
-
- Clean the Firing Mechanism: Remove any debris or obstructions from the firing mechanism. This can be accomplished with compressed air.
Remove any debris or obstructions in the firing mechanism to help prevent misfires. You can use compressed air or a small brush to clean the mechanism.
Staples Not Driving Flush
When staples are not driven flush with the surface, it affects the project’s appearance and the hold. There can be several causes, including incorrect staple length or low power. Here are a few troubleshooting tips to keep in mind.
-
- Check Staple Length: Verify the staple length matches the material thickness.
The staple length must match the thickness of the material. If the staple is too short, it will not fully penetrate. Adjust the staple length accordingly to ensure it sits flush with the surface.
-
- Adjust Driving Depth: Some staple guns have an adjustable driving depth feature. Adjust this to drive the staples flush.
Check your staple gun to determine whether it has an adjustable driving depth. Adjust this to get the staples to sit flush with the surface. This feature lets you fine-tune the driving force to match the material’s density.
-
- Increase Power: If applicable, increase the power setting on the staple gun.
If your staple gun has power settings, increase the power to ensure the staples are driven flush. However, be cautious when increasing the power, as it might damage thinner materials.
Safety Precautions
Safety should always come first when using a staple gun. Following safety measures can prevent injuries and make sure you use your tools properly. Making safety a priority while you’re how to load a staple gun will ensure that your DIY project is a safe experience for everyone.
Protective Gear
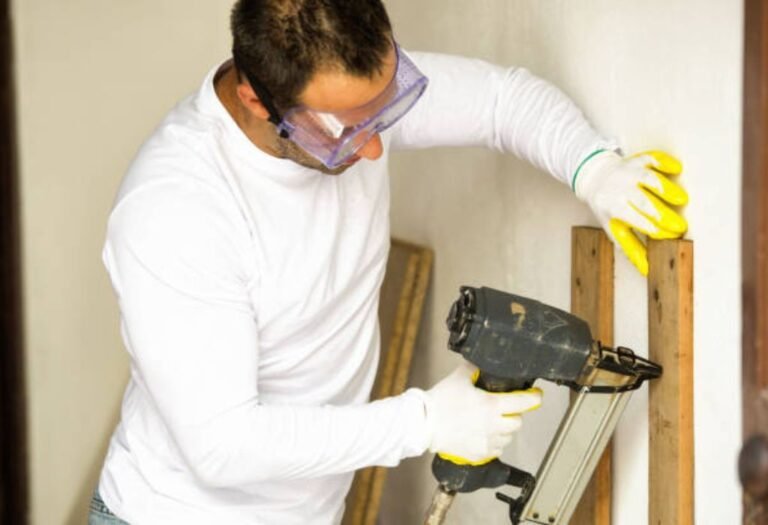
Protective gear is critical. Proper protection shields you from injuries. Using protective gear protects you from potential hazards and keeps you safe during any project that involves staples and other tools.
-
- Eye Protection: Always wear safety glasses or goggles.
Protect your eyes from stray staples and debris by wearing safety glasses or goggles. This is one of the most important safety measures. Make sure your eye protection fits well and offers full coverage.
-
- Hearing Protection: Consider wearing earplugs or earmuffs if using a pneumatic staple gun, which can be noisy.
Pneumatic staple guns can be loud. Wear earplugs or earmuffs to safeguard your hearing. Choose a type of hearing protection that is comfortable and easy to use.
-
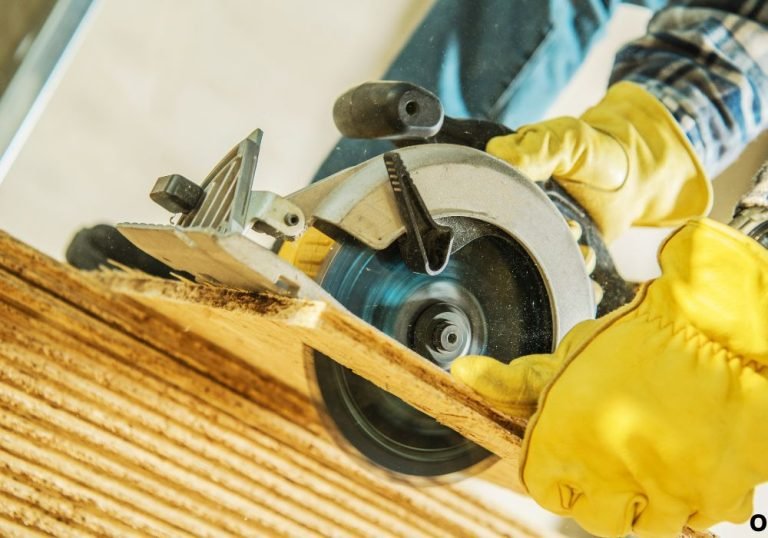
- Gloves: Wear gloves to protect your hands and improve grip.
Gloves can offer hand protection and improve your grip, which reduces the risk of accidents. Pick gloves that offer the best protection for the job you’re doing.
Safe Operating Practices
Safe practices will help prevent accidents. Following the guidelines below reduces the possibility of injuries. These practices will make every stapling project a safer experience.
-
- Never Point the Gun at Yourself or Others: Always direct the staple gun away from people.
Never point the staple gun at anyone. This is crucial to prevent injuries. Treat your staple gun as you would treat any other potentially dangerous tool. This means you should always point it in a safe direction.
-
- Use the Correct Angle and Pressure: Hold the gun perpendicular to the surface and apply even pressure.
Holding the gun at the correct angle is critical. Always hold the staple gun perpendicular to the surface. Apply even pressure when firing to avoid misfires and improve the final result. Proper pressure improves stapling accuracy.
-
- Store the Gun Safely: Keep the staple gun out of reach of children and in a secure location.
Store your staple gun out of the reach of children. Store it in a locked toolbox or a dedicated space to prevent unauthorized access. Making this a habit will ensure the safety of your home and family.
Real-Life Examples and Case Studies
The following real-life examples and case studies will help demonstrate the practical use of staple guns and the steps to follow to load and troubleshoot them. These are real-world situations showing how the correct techniques and approaches can produce successful outcomes and show the importance of how to load a staple gun correctly.
-
- Upholstery Project: A homeowner decided to reupholster an old armchair. They chose the correct staples and loading procedure, and carefully attached the fabric. The result was a like-new armchair that the homeowner could use and enjoy for many more years. They successfully learned how to load a staple gun.
The homeowner began by carefully choosing the right staples for the fabric. They researched the best staple size for the material and selected the correct type of staple gun. After preparing the fabric, they followed the proper loading procedure. They applied the fabric, making sure to apply the staples evenly to achieve a professional finish. Because of their knowledge of how to load a staple gun and related safety steps, the project was a success.
-
- Fence Installation: A contractor used a pneumatic staple gun to attach fencing. They carefully loaded the gun with the correct staples. Following all safety rules helped ensure the job was done quickly and effectively, preventing injuries.
The contractor’s preparation included selecting the correct type of staples for the fencing material. They then used a pneumatic staple gun, which greatly increased their speed. With the gun loaded, they were able to quickly fasten the fencing materials. Because they had practiced how to load a staple gun, the work was completed safely and within the timeline.
-
- Furniture Repair: An individual used a manual staple gun to fix a loose chair seat. They followed all instructions and safely loaded the gun with the right staples. The chair was quickly repaired and ready for use.
The individual properly identified the appropriate staple type for the chair seat material. They then opened the magazine, loaded the staples correctly, and closed the magazine. They tested the tool before starting the repair to make sure everything worked correctly. This gave them the confidence to proceed with the project, knowing that they correctly understood how to load a staple gun.
Frequently Asked Questions
Question: Can I use any type of staple in any staple gun?
Answer: No, you cannot. Staple guns are designed to use specific staple sizes. Always check your staple gun’s manual or packaging for the correct staple size and type.
Question: What should I do if my staple gun jams?
Answer: First, unload the staples from the magazine. Then, use needle-nose pliers or a screwdriver to carefully remove the jammed staple. If the problem persists, consult your staple gun’s manual.
Question: How can I tell if I’m using the right size staples?
Answer: The staples should penetrate the material without going all the way through, and the legs of the staple should lie flush with the surface. If they’re too short, they won’t hold; if they’re too long, they’ll stick out.
Question: What’s the difference between a narrow crown and a wide crown staple?
Answer: Narrow crown staples are used for trim and finer work, providing a more discreet fastening. Wide crown staples are used for tasks that require greater holding power, such as sheathing and roofing.
Question: Is it safe to leave staples in the staple gun’s magazine when not in use?
Answer: It’s generally a good practice to unload the staples from the magazine when the gun is not in use to prevent accidental firing. This can also help preserve the spring mechanism.
Final Thoughts
Learning how to load a staple gun effectively opens a world of possibilities for home improvement and craft projects. From understanding the different types of staple guns to mastering the loading process and knowing the right staples for each job, you now have the tools needed to complete various projects. This guide has shown you how to choose the right staples and addressed common issues like jams and misfires. You also know how to keep safety a top priority. Now that you have learned the correct way to load the staple gun, you can tackle home repairs, crafts, and other DIY projects. Go ahead and start your next project; you are now equipped with the knowledge and confidence to make it a success!

I’m Michael R. Turner, the founder, lead writer, and passionate DIY enthusiast behind 101diytools.com. With years of hands-on experience in home improvement and power tools, I built this platform to share practical tips, in-depth guides, and honest reviews to help DIYers of all skill levels tackle projects with confidence and the right tools.