How to Cut a Countertop with a Circular Saw Cleanly and Accurately
Cutting a countertop can feel like one of the most nerve-racking moments in any kitchen or bathroom project.
You’re often dealing with expensive material — laminate, wood, or solid surface — where even the smallest chip or uneven line can ruin the entire finish.
The good news is that with the right setup and technique, you can achieve factory-smooth, chip-free cuts using a simple circular saw.
Whether you’re trimming a new countertop to fit perfectly against a wall, making an opening for a sink, or customizing a replacement top, accuracy and care make all the difference.
Circular saws are powerful, versatile tools that, when paired with a fine-tooth blade and a steady hand, can deliver cuts as clean as professional shop equipment.
In this guide, you’ll learn how to cut a countertop safely and precisely — from marking and supporting the material to choosing the right blade and preventing splintering.
Follow each step carefully, and you’ll end up with smooth, square, perfectly fitted edges that make your countertop installation look seamless.
Understanding Countertop Materials
Before you start cutting, it’s important to understand what your countertop is made of.
Different materials require slightly different blades and cutting techniques to achieve clean results.
Laminate countertops (Formica or melamine) are made from particle board coated with a thin, brittle laminate layer that chips easily if cut too aggressively.
Wood countertops (butcher block) are thicker and denser, needing slower feed rates and sharp blades for smooth edges.
Solid surface countertops (like Corian) are durable but prone to melting or burning from high blade speed and friction.
Knowing your material type helps you choose the right blade and prevents accidental damage during cutting.
Regardless of type, always cut from the underside whenever possible — this hides any minor tear-out on the bottom edge instead of the visible top surface.
Tools and Materials You’ll Need
Having the correct tools prepared ensures a smooth, controlled cutting experience.
Each item plays a crucial role in accuracy, safety, and surface protection.
You’ll need:
- Circular saw (corded or cordless)
- Fine-tooth carbide blade (40–60 teeth for laminate or wood)
- Measuring tape and pencil
- Straightedge, cutting guide, or guide rail
- Clamps
- Painter’s tape
- Masking tape or drop cloth (for dust control)
- Safety goggles, hearing protection, and a dust mask
- Sawhorses or a sturdy workbench
- Sandpaper or file for smoothing edges
Optional but helpful tools include a jigsaw for curved cuts (like sink openings) and a shop vacuum to collect dust.
Step 1: Measure and Mark the Cut Line
Precision begins with careful measurement.
Measure your countertop twice before you even touch the saw — mistakes here are expensive and difficult to fix later.
Use a tape measure to mark the exact location of your cut on the underside of the countertop.
Draw a straight line with a pencil and extend it to both edges so you can see it from every angle.
If cutting for a sink or appliance, use a template (usually provided by the manufacturer) to mark the cutout area accurately.
For long straight cuts, use a carpenter’s square or level to ensure your line is perfectly perpendicular to the countertop edge.
Always double-check your marks for accuracy, including the direction of any overhangs or finished sides, before moving on to the next step.
Step 2: Apply Painter’s Tape to Prevent Chipping
Laminate and veneer surfaces are prone to chipping, especially along the saw’s exit edge.
To prevent this, apply a strip of painter’s tape directly over your cut line.
Press the tape firmly to the surface, then redraw your measurement line on top of it.
This creates a barrier that holds the laminate fibers in place as the saw blade passes through.
You can also use masking tape on both sides of the line if the surface is particularly delicate.
After cutting, remove the tape carefully at a shallow angle to avoid lifting the finish.
This simple trick greatly improves edge quality and reduces visible chips or cracks.
Step 3: Support the Countertop Properly
Countertops are heavy and can crack if not supported evenly during cutting.
Set up two or more sawhorses beneath the countertop so both sections (the cut piece and the remaining section) are fully supported.
If the off-cut piece drops midway through the cut, it can cause splintering or break the laminate.
To avoid this, use clamps or scrap boards underneath to keep both sides level and steady.
Make sure the cut line sits between the supports but close enough that neither piece sags during the process.
A well-supported countertop ensures smooth, straight cuts and protects your saw from binding.
Step 4: Install the Right Blade and Adjust Depth
Switch to a fine-tooth carbide-tipped blade — ideally one designed for plywood, laminate, or melamine.
A 40–60-tooth blade provides smooth, clean results with minimal chipping.
Unplug your saw and remove the existing blade if needed.
Mount the new blade with teeth facing forward and ensure it’s tightened securely.
Next, set the cutting depth so the blade extends about ¼ inch below the countertop’s thickness.
This depth minimizes splintering and provides better control without overworking the motor.
For thicker wood countertops, you can increase the depth slightly but avoid cutting deeper than necessary.
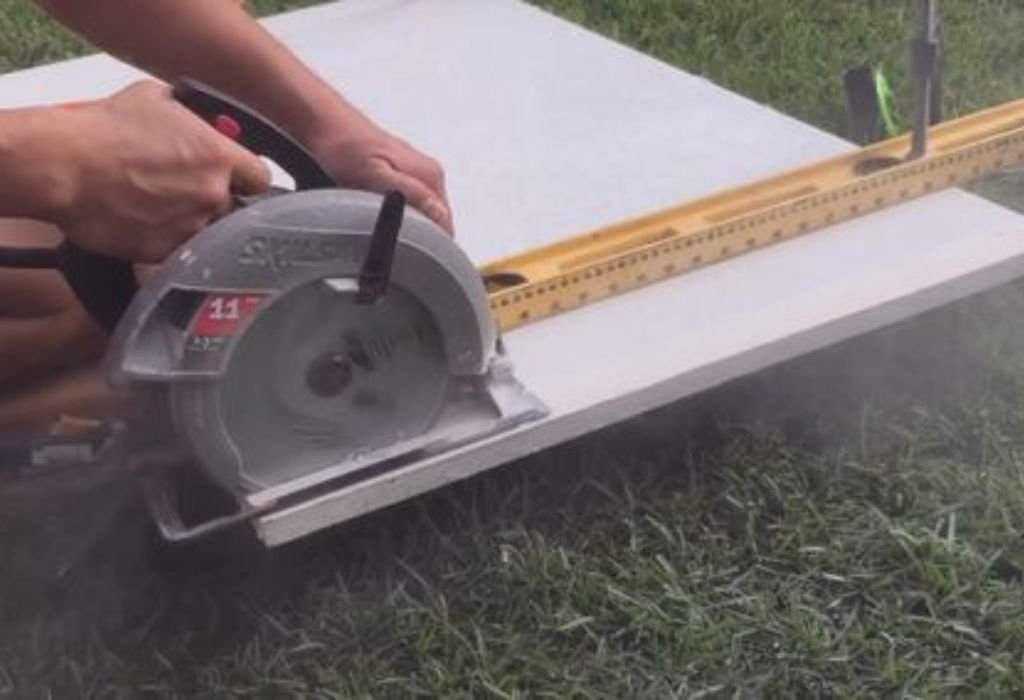
Step 5: Set Up a Straightedge or Guide Rail
A straightedge ensures your cut is perfectly straight, especially for long countertop sections.
You can use a commercial guide rail or simply clamp a straight piece of wood parallel to your cutting line.
Measure the distance from the saw’s base edge to the blade and offset your straightedge by that amount.
Clamp it securely to the countertop so it doesn’t move while cutting.
This setup lets you run the saw base along the guide, ensuring a perfectly straight and even cut.
It’s one of the simplest yet most effective ways to get professional-looking results with a handheld saw.
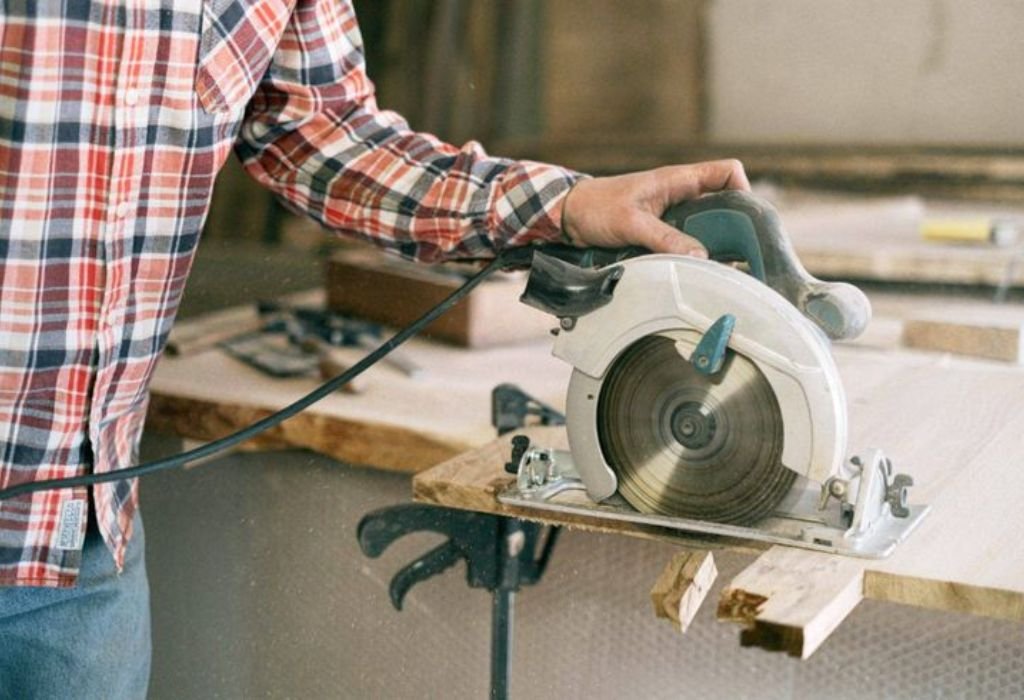
Step 6: Make the Cut
Now comes the critical moment — cutting through your countertop.
Put on your safety gear, check your setup one last time, and ensure your work area is clear of obstructions.
Place the saw at the edge of the countertop and align the blade with your marked line.
Start the saw and let it reach full speed before touching the surface.
Move slowly, maintaining steady forward pressure, and let the saw do the work.
Keep the base of the saw flat on the surface at all times — tilting even slightly can ruin your cut.
For long cuts, pause occasionally to clear dust or check your alignment, but avoid stopping mid-cut unnecessarily.
Once you reach the end, support the off-cut piece with one hand or an assistant to prevent splintering as the blade exits.
After finishing the cut, wait for the blade to stop completely before setting the saw down.
Step 7: Cutting Sink or Stove Openings
If you’re installing a sink or cooktop, you’ll need to cut an opening in the middle of the countertop.
Start by drilling a ½-inch pilot hole in each corner of the cutout area along your marked lines.
Then, insert a jigsaw blade into one of the holes and connect the corners along the cut lines.
You can also use your circular saw for the straight portions, stopping before each corner and finishing with the jigsaw.
Always cut slowly and follow your lines precisely — any deviation will be visible once the appliance is installed.
Smooth the inner edges with sandpaper or a file to remove burrs or sharp corners.
This hybrid method gives you clean, precise openings for any countertop installation.
Step 8: Smooth and Seal the Cut Edges
Once your cut is complete, inspect the edge carefully.
Use fine-grit sandpaper or a file to smooth out any minor chips or rough sections.
If cutting laminate or particle board, immediately seal the exposed edge with silicone, contact cement, or edge banding.
This prevents moisture from seeping in and causing swelling over time.
For wood countertops, apply a thin coat of mineral oil or wood sealer to protect the raw edge from humidity or staining.
Finishing the edge properly not only enhances appearance but also increases durability.
Step 9: Safety and Clean-Up Tips
Cutting countertops creates dust and debris that can irritate your lungs and eyes.
Always wear goggles, a respirator, and hearing protection while cutting.
Use a shop vacuum or attach a dust port to your saw if available to collect debris as you work.
After cutting, clean both the countertop and work area thoroughly to remove sawdust and chips.
Check your blade for wear or buildup — laminate dust can dull blades faster than wood.
Store the saw and blade properly once finished to keep them ready for future use.
Tips for Perfect Countertop Cuts
- Cut upside-down for laminate: Always cut with the laminate face down to prevent chipping.
- Use painter’s tape: It strengthens the laminate edge and reduces tear-out.
- Make test cuts: Practice on scrap pieces before cutting your actual countertop.
- Go slow: Pushing too fast increases chipping and burns the laminate.
- Use a sharp blade: Dull blades tear laminate and scorch solid surfaces.
- Clamp securely: Movement mid-cut causes jagged or uneven edges.
- Sand gently: Don’t over-sand; just remove splinters for a clean edge.
These small habits make a huge difference between an amateur and a professional-looking finish.
Common Mistakes to Avoid
Even experienced DIYers can make costly mistakes when cutting countertops.
Avoid these common errors to ensure a flawless outcome:
- Cutting on the wrong side of the marked line (measure twice, cut once).
- Using a coarse blade designed for wood framing.
- Forgetting to tape the cut line on laminate surfaces.
- Forcing the saw too quickly through the material.
- Cutting without full support under the countertop.
- Failing to seal exposed edges after cutting.
Taking a few extra minutes to set up correctly will always save time, money, and frustration later.
FAQs
Can I cut a laminate countertop with a circular saw?
Yes, but always use a fine-tooth blade (40–60 teeth) and cut with the finished surface facing down to minimize chipping.
What’s the best blade for cutting countertops?
A carbide-tipped fine-tooth blade or laminate-specific blade provides clean, smooth edges.
Can I use a jigsaw instead of a circular saw?
Yes, but jigsaws are better for curved cuts or small openings rather than long straight cuts.
Should I cut from the top or bottom?
For laminate or veneered tops, cut from the bottom to protect the visible surface. For solid wood, cut from the top for cleaner alignment.
How do I prevent burning or melting solid surface materials?
Use a slower cutting speed and keep the saw moving steadily without pausing.
Do I need a guide for cutting straight lines?
Absolutely. A straightedge or rail guide ensures perfect alignment and professional results.
What happens if my cut edge chips slightly?
You can sand small chips smooth and apply color-matched filler or edge trim to hide them.
How do I make circular or irregular openings?
Drill pilot holes and finish with a jigsaw or router to follow the curved pattern accurately.
Can I cut stone or quartz countertops with a circular saw?
Not with a standard model. Those materials require a wet saw with a diamond blade and water cooling.
How can I stop the offcut from breaking near the end?
Support both sides of the cut and slow down during the final inches to prevent snapping or splintering.
Conclusion
Cutting a countertop with a circular saw is all about patience, preparation, and precision.
With the right blade, a stable setup, and careful technique, you can achieve clean, chip-free cuts that look like they came straight from the factory.
Always plan your measurements carefully, use painter’s tape to protect the surface, and take your time guiding the saw steadily along a straightedge.
Remember to support both sides of the countertop fully and seal all exposed edges to prevent moisture damage.
Once you master these techniques, you’ll have the confidence to trim, fit, or modify any countertop for your next home project.
A clean, smooth cut doesn’t just fit better — it reflects craftsmanship, attention to detail, and pride in your work.

I’m Michael R. Turner, the founder, lead writer, and passionate DIY enthusiast behind 101diytools.com. With years of hands-on experience in home improvement and power tools, I built this platform to share practical tips, in-depth guides, and honest reviews to help DIYers of all skill levels tackle projects with confidence and the right tools.