How To Attach Wire With Staple Gun Safely and Effectively
Picture this: you’re finally tackling that long-awaited home improvement project, stringing new wires for your entertainment system. You’ve got your tools, your wires, and a sense of accomplishment brewing. Then you realize you need to secure those wires, and the question hits you – how to do it safely and efficiently? This post is your guide. It’s designed to explore the best methods for safely and effectively using a staple gun to attach wire, ensuring your project is both secure and up to code. You’ll gain practical knowledge, tips, and insights to avoid common mistakes and get professional-looking results. Prepare to enhance your skills and complete your projects with confidence, improving your knowledge to make informed decisions.
Key Takeaways
- Learn the appropriate wire types for staple gun use, avoiding damage or risks.
- Discover how to select the right staple gun and staples for your specific wires.
- Understand and implement safe practices to avoid electrical hazards and injuries.
- Master the techniques for correct staple placement to protect wire integrity.
- Get step-by-step instructions on the proper approach to attaching wire with a staple gun.
- Find out how to handle common problems and ensure a professional finish.
Choosing the Right Wires for Stapling
Choosing the correct wires is essential before you even consider reaching for your staple gun. The type of wire you select will affect the safety and success of your project. Incorrect wire choices can create hazards, cause damage, or not meet building code regulations. Prioritizing wire selection will determine the right choices to make.
Wire Types and Their Applications
Different types of wires are used for different electrical applications. Each wire has features that determine its suitability. Understanding these distinctions is critical for safe and effective wire installation. The most common wire types used in residential electrical work include those discussed below.
-
- Romex (NM-B): Romex cables, also called NM-B (Non-Metallic sheathed cable), are common in homes. They consist of insulated conductors enclosed in a protective plastic sheath. These wires are used for residential interior wiring and are designed to be run through walls and ceilings. Choosing the right NM-B cable type is important for different circuits. They are rated for use in dry locations.
For example, 14/2 with ground Romex is appropriate for 15-amp circuits, while 12/2 with ground is required for 20-amp circuits. These wires should be protected from physical damage because their outer sheathing can be damaged.
-
- UF Cable: UF (Underground Feeder) cable is designed for direct burial and outdoor use. This wire has a solid construction that resists moisture. It is typically used for outdoor lighting and underground circuits. UF cable is more robust than NM-B, making it ideal for the elements. Its water resistance makes it a choice.
UF cable is perfect for outdoor outlets, landscape lighting, and feeding power to detached garages. Using UF cable eliminates the need for conduit, streamlining installation. This cable can resist physical damage, but care is needed to avoid sharp objects.
-
- THHN/THWN: THHN (Thermoplastic High Heat-resistant Nylon) and THWN (Thermoplastic Heat and Water-resistant Nylon) are single-conductor wires often found inside conduit. THHN is heat-resistant, while THWN is heat and water-resistant. These wires are common in both residential and commercial applications. THHN/THWN wires are used to run circuits through conduit.
These wires are ideal for high-temperature and wet environments, like those in a commercial setting. They are not typically used with staple guns directly because they are installed within conduit. Using the proper wire type is important for maintaining safety and compliance.
Wire Gauges and Load Ratings
Wire gauges measure the thickness of the wire. This thickness affects its current-carrying capacity, called its ampacity. Selecting the correct wire gauge is critical. Using a wire gauge that is too small for the circuit load can cause overheating, potentially leading to fires. Conversely, using an oversized wire is safe but can be costly and less space efficient.
-
- 14-Gauge Wire: This wire is typically used for 15-amp circuits, such as lighting circuits and some receptacles.
A good example is in a bedroom, where lights and a few outlets might be served by 14-gauge wire. This gauge is sufficient for these low-demand applications. Always verify that the circuit breaker corresponds with the wire gauge.
-
- 12-Gauge Wire: 12-gauge wire is commonly used for 20-amp circuits, such as kitchen outlets and circuits that run to appliances.
Kitchen circuits often use 12-gauge wire to handle the higher amperage drawn by appliances. These circuits should be protected by a 20-amp breaker. This gauge of wire is also suitable for general purpose circuits that have high energy demands.
-
- 10-Gauge Wire: Larger appliances like electric water heaters or ovens often use 10-gauge wire for 30-amp circuits.
These larger appliances require a more substantial wire to handle the higher electrical current safely. This ensures that the wiring doesn’t overheat, which is critical for safety.
Identifying Wire Specifications
Understanding the markings on wires is crucial for proper selection. These markings provide details about the wire’s type, gauge, voltage rating, and certifications. Knowing how to read these markings ensures that you choose the right wire for your project, which is important. The markings also help you confirm whether a wire meets safety standards.
For example, a wire marked “12/2 with ground NM-B” indicates a 12-gauge wire with two insulated conductors and a ground wire, suitable for NM-B applications. The “NM-B” marking signifies that it meets the requirements for non-metallic sheathed cable.
-
- AWG: AWG (American Wire Gauge) is a standard for wire sizes.
The AWG number, usually found printed on the wire’s outer sheath, indicates its size. Lower numbers indicate thicker wires (e.g., 14 AWG, 12 AWG, 10 AWG). The wire size determines the amount of electrical current that the wire can safely carry. This information is critical for electrical safety.
-
- Voltage Rating: The voltage rating specifies the maximum voltage the wire can handle.
Wire insulation should be rated to handle at least the voltage of the electrical system, typically 120V or 240V for residential use. This rating is often printed on the wire. This rating ensures the wire is safe for use in your circuit.
-
- Certifications: Certifications from organizations like UL (Underwriters Laboratories) indicate that the wire meets safety standards.
Look for markings like “UL Listed” to ensure that the wire meets necessary safety requirements. Certification demonstrates the wire has been tested to meet safety standards. Always use certified wires to guarantee that your wiring installation is safe and compliant with codes.
Choosing the Right Staple Gun and Staples
Once you’ve selected the correct wires, the next step is to choose the correct staple gun and staples. Selecting the right tool and staples ensures that your wire is secure without being damaged. The right tools and materials will help you to prevent damage or safety issues.
Types of Staple Guns for Wire Management
There are several types of staple guns to choose from. Each type is designed for different uses and wire sizes. Staple guns range from manual to electric, each with advantages and disadvantages. Choosing the right staple gun makes the job easier.
-
- Manual Staple Guns: Manual staple guns are hand-powered. They are typically affordable and simple to use.
These are great for small jobs and offer good control, as you manually control the force with each staple. You can easily find them at hardware stores. They’re useful for securing wires where precision is important.
-
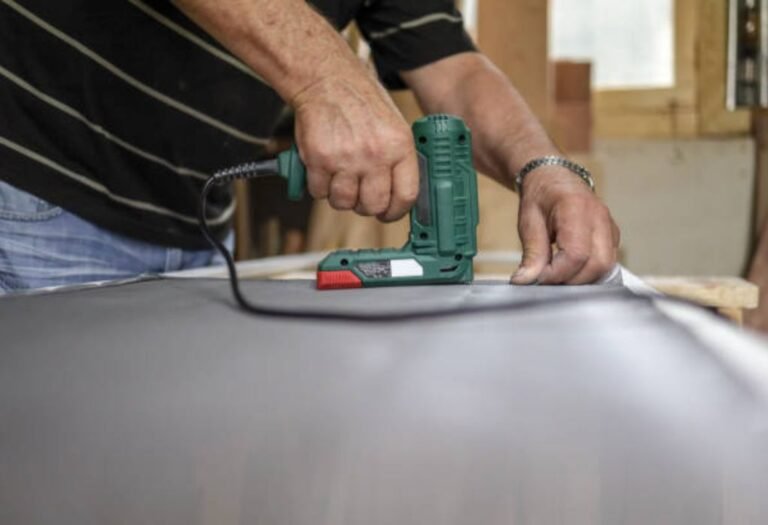
- Electric Staple Guns: Electric staple guns use electricity to drive staples. These are great for bigger projects and are known for their ease of use.
Electric models provide consistent staple depth and speed, which reduces hand fatigue. Electric models are especially useful for running long lengths of wire. They usually come with an adjustable depth setting.
-
- Hammer Tackers: Hammer tackers are designed for quickly stapling materials. They can be good for wire but require more care.
Hammer tackers are faster than manual staple guns. However, they are less precise and are best for large, open areas. You may need to adjust your approach because of the increased speed.
Staple Specifications for Wire
The staples you select are key to a successful wire stapling operation. Using the right staples is crucial for safety and functionality. Staples are available in different sizes, materials, and designs.
-
- Staple Material: Staples can be made from various materials, with steel being the most common.
Steel staples are durable and strong. The coating on the staples can help prevent corrosion. Always make sure the staples you use are suitable for the environment.
-
- Staple Size: The size of the staple must be right for the wire and the surface it is attached to.
Using the correct staple size prevents damage to the wire and ensures secure attachment. Always check the wire’s diameter and the surface’s material when choosing staple sizes. You need to ensure the staple is long enough to hold the wire but not long enough to damage it.
-
- Staple Design: Wire staples are designed to hold wires without crushing them.
The shape of the staples is usually flat or rounded to prevent damage to the wire’s insulation. Using staples specifically designed for wire management is important to maintain the integrity of the wire.
Safety Features of Staple Guns
Staple guns are tools, and safety should always come first. Some features can help improve your safety. Knowing the safety features can make the stapling process much safer. Look for these features when selecting a staple gun.
-
- Safety Lock: A safety lock prevents accidental firing of staples.
Make sure to engage the safety lock when not in use. This can prevent injuries caused by unexpected staple discharges. Engaging the safety lock is an important part of safe tool use.
-
- Depth Adjustment: Adjustable depth settings let you control how deep the staples are driven.
This allows you to set the staples so that they securely hold the wire without damaging it. This feature prevents crushing the wire. Using the adjustable depth setting improves the quality of your work.
-
- Ergonomic Design: Ergonomic designs reduce hand fatigue.
They usually have comfortable grips that are easy to use. This design increases the precision and reduces the physical stress while working. A comfortable tool makes working easier and more enjoyable.
Safe Practices for Attaching Wires
Safe practices are essential when using a staple gun to attach wires. Following safety practices will minimize the risk of electrical shock, injury, and damage to the wires. These practices protect you and keep your electrical work safe. Careful planning and implementation are key for electrical work.
Safety Gear and Preparation
Before you start any electrical work, it’s important to put on personal protective equipment (PPE). Make sure to prepare your work area. Always take the necessary steps to make sure your work is safe. Here are some key points for safe practices.
-
- Wear Eye Protection: Safety glasses or goggles protect your eyes from flying debris.
Staples can become projectiles when fired, so eye protection is a must. Goggles are better than glasses, as they completely enclose the eyes. Safety glasses or goggles should always be worn when using a staple gun.
-
- Use Gloves: Insulated gloves can protect you from electrical shock.
Using insulated gloves can give you an extra layer of protection. These gloves are rated for electrical work. Make sure to choose gloves that are rated for the voltage you are working with.
-
- Clear the Work Area: Remove obstructions from your work area.
A clutter-free work area is a safe work area. Remove any loose materials and tools. Make sure you have enough space to work without tripping or bumping into things.
Working with Electrical Circuits
Working with electrical circuits requires special precautions. Electrical hazards can be deadly, so follow these guidelines for your safety. Make sure you follow these steps whenever you work with electrical circuits.
-
- Turn Off the Power: Before working on any electrical circuit, turn off the circuit breaker.
This will cut off the power supply to the circuit. It is vital to confirm that the circuit is de-energized. Test the wires with a voltage tester before beginning work, even after turning off the breaker.
-
- Use a Voltage Tester: Use a non-contact voltage tester to ensure the wires are not energized.
This is a double-check to confirm that the power is off. A voltage tester can detect live wires. If the tester indicates the presence of voltage, do not proceed with your work and address the cause.
-
- Avoid Working in Wet Conditions: Water can increase the risk of electrical shock.
Always avoid working on electrical circuits in wet conditions. If you must work in a damp area, use a GFCI (Ground Fault Circuit Interrupter) outlet and wear appropriate PPE. If it’s wet outside, make sure to work indoors.
Proper Staple Gun Techniques
Using a staple gun safely and correctly is essential for both your safety and the success of your project. The correct use of the tool is key to achieving the desired outcome. Correct techniques help avoid potential issues.
-
- Staple Placement: Place staples carefully, following the NEC (National Electrical Code) guidelines.
Staples should be placed to secure the wire without causing damage. Position the staple across the wire. Avoid compressing the wire’s insulation. Follow code requirements for spacing and placement.
-
- Spacing and Intervals: Maintain the right distance between staples to support the wire.
Spacing requirements vary depending on the wire type and the location of the installation. Staples are usually spaced every 4.5 feet for horizontal runs and every 12 inches for vertical runs. Follow local codes and regulations. Proper spacing provides secure support and prevents sagging.
-
- Stapling Around Bends: When bending the wire around corners, be careful with staple placement.
Avoid placing staples directly on the bends. Staples can pinch or damage the wire when placed on the bend. Secure the wire on both sides of the bend, but keep the staples away from the bend itself.
Step-by-Step Guide for Attaching Wires
Following a step-by-step guide is important for safely and efficiently attaching wires. This method will help you to perform the task correctly and avoid common mistakes. Proper preparation and following these steps will provide the best results.
Step 1: Planning and Preparation
Before you begin, it’s necessary to plan your wiring route. This includes measuring and marking where the wires will run and where you’ll place the staples. Proper planning is important to make sure the wiring is secure and looks neat. Here’s how to begin.
-
- Assess the Wiring Path: Decide how your wires will run and consider any obstructions.
Plan the most direct route possible while avoiding any sharp turns. Think about the location of your outlets or fixtures. This will help you know the amount of wire needed and where the staples should go.
-
- Measure and Mark: Measure the wire’s length and mark the locations where you’ll be stapling.
Use a pencil or marker to indicate the staple locations on the surface. Make sure you follow the spacing requirements per the NEC and local electrical codes. Careful marking helps guide the stapling process.
-
- Gather Materials: Collect all necessary materials, including the correct wires, staple gun, and staples.
Make sure you have all the necessary supplies. You also need safety gear. Having everything ready to go will make the job much easier.
Step 2: Securing the Wires with Staples
With your plan in place and your materials ready, the next step involves using the staple gun to secure the wires. This step requires precision and attention to detail. This method will provide a secure electrical system.
-
- Position the Wire: Place the wire where it should go, and make sure it is not under tension.
Gently hold the wire against the surface where you plan to staple it. Make sure the wire is in the right position before stapling. Always pull a little slack to ensure the wire isn’t stretched tight.
-
- Position the Staple Gun: Place the staple gun perpendicular to the wire.
Position the staple gun so that the staple will drive over the wire. Make sure the staple gun is straight before firing the staple. This will ensure that the staple stays in place.
-
- Drive the Staples: Drive the staples into the surface using a consistent pressure and depth.
Drive the staples in straight. Make sure the staple doesn’t crush the wire. If you have an adjustable depth setting, set it so that the staples don’t damage the wire’s insulation. Check the staple depth to ensure that it’s safe.
Step 3: Inspection and Final Touches
After securing the wires, you need to check your work. This step will help you make sure everything is correctly done. Performing an inspection ensures that the electrical system is safe and functional. You must make sure your work meets electrical codes.
-
- Inspect Staple Placement: Look at all staples to make sure they are placed properly and don’t damage the wire.
Check that the staples are not too tight or too loose. Also, check for any wires that are pinched or damaged by the staples. Correct any issues before completing your project.
-
- Check Wire Runs: Verify that the wires are securely fastened along their length.
Look at the wire’s path. Make sure there are no areas where the wire is sagging or loose. Make sure that all wires follow the path you planned. This will help ensure that the electrical system is neat and safe.
-
- Final Review: Go over all steps to verify the quality of your work.
Make sure all your wiring and stapling meet local electrical codes. Always follow the manufacturer’s instructions for the wire and tools you used. Make any necessary adjustments.
Common Problems and Solutions
As you attach wires with a staple gun, you may encounter problems. Knowing how to solve common issues can prevent delays and ensure your work looks professional. The following section will help you resolve common issues.
Wire Damage and How to Prevent It
Wire damage is a big concern when stapling wires. Problems can affect the safety and operation of the electrical system. Preventing wire damage is essential for a safe project. Here’s how to avoid causing damage.
-
- Crushing the Wire: Staples that are driven too deep can crush the wire’s insulation.
Crushing the wire can cause shorts or other electrical problems. Use an adjustable depth setting on your staple gun to avoid this issue. Do not overtighten staples.
-
- Puncturing the Wire: If the staple penetrates the wire’s insulation, it can create a short.
This can lead to electrical hazards. Always examine the staples for proper placement. If a wire is damaged,
-
- Using the Wrong Staples: Incorrect staples can damage the wire.
Using staples that are too large or the wrong type can cause issues. Always check that the staples are designed for electrical wires. Match the staples to the size and type of wire. Always choose the correct staples.
Staple Gun Malfunctions and Repair
Staple guns can malfunction during use. Knowing how to deal with these problems can save you time and frustration. The ability to troubleshoot will get you back to work quickly. Here’s how to handle common issues.
-
- Jams: Staple jams are a common problem.
Jams occur when staples get stuck inside the staple gun. Most staple guns have an easy-to-use jam-clearing mechanism. Refer to the manufacturer’s instructions to clear a jam.
-
- Misfeeds: Sometimes, the staple gun does not feed staples correctly.
This can occur due to low staple supply or mechanical issues. Reload the staples and make sure they are aligned correctly. Inspect the gun for any damage or obstruction in the feeding mechanism.
-
- Failure to Fire: The staple gun may not fire staples at all.
This could be due to a dead battery, if it’s battery-powered, or a mechanical issue. Check the power source and ensure that the gun is correctly positioned. Look for a trigger lock and make sure it is disengaged.
Fixing Mistakes and Reworking
Mistakes can happen when working with electrical wiring. This section will show you how to correct and rework the wire stapling. Correcting mistakes and reworking your wiring is part of the process. Knowing how to fix mistakes is critical for good work.
-
- Removing and Replacing Staples: If a staple has damaged the wire, remove it carefully.
Use a screwdriver or pliers to carefully remove the staple. Then replace the damaged section of wire. The process will guarantee that the electrical system is in good condition.
-
- Re-routing Wires: If the wire run is incorrect or poorly stapled, you can re-route it.
Remove the existing staples and reposition the wire. Rerouting can fix aesthetic and safety issues. Make sure the new run meets the requirements of the electrical codes.
-
- Addressing Loose Staples: Looseness of staples can cause issues.
Tighten or replace any loose staples. Loose staples can lead to sagging wires. A properly fastened wire is more durable and safer. Always make sure the staples are properly fastened.
Frequently Asked Questions
Question: What’s the best spacing for staples when attaching wire?
Answer: Usually, you should space staples every 4.5 feet for horizontal runs and every 12 inches for vertical runs. Always check local electrical codes, because spacing may vary.
Question: Can I use any staple gun to attach electrical wires?
Answer: No, you should use staple guns specifically designed for electrical wire. Ensure the gun and staples are designed not to damage the wire’s insulation. Never use a staple gun that is too powerful, as it may damage the wires.
Question: What safety gear is required when using a staple gun?
Answer: The basic safety gear includes safety glasses or goggles to protect your eyes from debris. You may want to use insulated gloves to protect you from shock. Protective gear makes the job safer.
Question: How do I know if the staples are the right size?
Answer: The staples should be long enough to secure the wire without crushing or damaging the insulation. They should be wide enough to hold the wire without causing damage. Read the packaging for wire stapling guidelines.
Question: What do I do if I accidentally staple through a wire?
Answer: If you accidentally staple through a wire, immediately shut off the power to the circuit. Remove the damaged section and replace the wire. Test the circuit after repairs. Call a professional if the damage seems extensive.
Final Thoughts
Learning how to attach wire with a staple gun effectively and safely is a valuable skill for any homeowner or DIY enthusiast. By choosing the right wires and tools, adhering to safety protocols, and following the detailed steps in this guide, you can confidently and efficiently complete your electrical projects. Keep in mind that attention to detail, proper wire selection, and a commitment to safety are the cornerstones of successful and secure wiring. When in doubt, consult a professional electrician. With these insights, you’re prepared to take on projects and elevate your home improvement skills. Remember to always prioritize safety and take your time to ensure all wires are correctly stapled, following local electrical codes for a professional and compliant result. Get started, and watch your skills and confidence grow.

I’m Michael R. Turner, the founder, lead writer, and passionate DIY enthusiast behind 101diytools.com. With years of hands-on experience in home improvement and power tools, I built this platform to share practical tips, in-depth guides, and honest reviews to help DIYers of all skill levels tackle projects with confidence and the right tools.