How Do Power Sanding Tools Work on Furniture Surfaces
Restoring old furniture can be deeply satisfying, but sanding is often the most time-consuming and frustrating part of the process. Uneven pressure, dust everywhere, and sore hands make manual sanding feel endless.
Many furniture restorers struggle to achieve that perfectly smooth surface that looks flawless under stain or paint.
That’s where power sanding tools make a dramatic difference. These machines turn hours of labor into minutes of precision, ensuring uniform finishes that look professional every time.
But how do power sanding tools work on furniture surfaces, and what makes them so efficient compared to traditional hand sanding?
Power sanders operate by combining high-speed motion with abrasive grit, creating controlled friction that removes imperfections layer by layer.
According to HowStuffWorks, the rotating or oscillating motion of sanding pads allows consistent pressure that human hands simply cannot replicate.
In a similar report by The Spruce, power sanders are described as essential for smoothing wood, preparing it for paint, and ensuring finishes adhere evenly — a key factor in professional-grade results.
Yet not all power sanders work the same way. From belt sanders that strip old varnish to random orbital sanders that deliver swirl-free finishes, each tool serves a unique purpose in furniture restoration.
The secret to stunning results lies in understanding how these tools interact with wood fibers, abrasives, and surface contours.
What Are Power Sanding Tools and Why They Matter for Furniture

Sanding furniture by hand is tedious, inconsistent, and physically demanding. Power sanding tools were designed to solve these problems by bringing speed, accuracy, and consistency to every surface.
These tools use electric or pneumatic motors to move abrasive pads or belts rapidly, removing layers of material evenly and efficiently.
Furniture surfaces often include corners, curves, and intricate joints where even small imperfections become visible after staining or painting. Power sanding tools eliminate these flaws with smooth, controlled motion, giving each piece a polished, uniform look.
Core Mechanism – Motion, Abrasive, and Surface Interaction
The magic of power sanders lies in their motion and abrasive power. Every sander works by generating controlled friction between the abrasive surface and the material, gradually leveling and refining the wood.
What motion types do power sanding tools use?
They operate using belt rotation, orbital vibration, or random orbit motion to balance material removal with surface smoothness.
Why does abrasive grit matter on furniture surfaces?
Grit determines how much material is removed; coarse grits strip old finishes, while fine grits refine texture and prepare for coatings.
How does dust collection improve sanding results?
Efficient dust extraction clears debris from the surface, prevents clogging, and enhances visibility for a cleaner finish.
Can improper pressure damage furniture?
Yes. Excessive pressure creates uneven marks or burns on the wood, while too little pressure slows the process.
Why are furniture surfaces unique to sand?
They include multiple materials and contours that require precision; even small errors can affect how stains and finishes absorb.
Types of Power Sanding Tools and Their Uses on Furniture
Not all furniture requires the same approach to sanding. Different materials, shapes, and surface conditions call for different types of power sanding tools.
Each tool offers unique benefits, from aggressive material removal to delicate surface polishing. Knowing which one to use — and when — ensures better results with less effort.
Choosing the right power sander can mean the difference between a perfectly restored table and one full of uneven patches or swirl marks. Below are the main types of sanders commonly used in furniture refinishing and woodworking.
Belt Sanders – For Heavy Material Removal
Belt sanders are the powerhouses of surface preparation. They use a continuous loop of abrasive belt stretched over two rotating drums, ideal for stripping thick varnish or leveling uneven tabletops.
What is a belt sander used for in furniture work?
It’s mainly used for removing old paint, heavy finishes, or sanding large, flat surfaces quickly.
Why should you be careful using a belt sander on furniture?
Because it’s aggressive, even slight tilting or overpressure can dig grooves into the wood.
What grit is best for belt sanding furniture?
Start with 60–80 grit for stripping, then progress to 120 grit for smoothing before switching to a finer sander.
Can it be used on veneers?
No. Veneers are too thin, and a belt sander can easily sand through the surface.
How do you avoid damaging edges?
Keep the tool flat and in motion, never pressing down too hard on corners or sides.
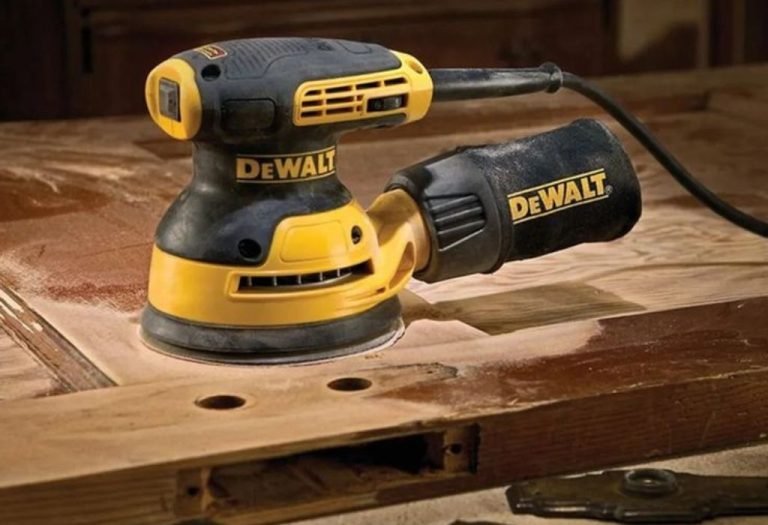
Random Orbital Sanders – For Smooth, Versatile Finishes
Random orbital sanders are the most popular and versatile tools for furniture projects. Their dual circular and elliptical motion eliminates swirl marks while maintaining a fine, consistent finish.
Why are random orbital sanders preferred for furniture refinishing?
They provide smooth, swirl-free results and work well on flat or curved surfaces.
What materials can they handle?
They’re suitable for wood, metal, and even painted surfaces when paired with the right abrasive discs.
What grit progression should be used?
Start with 100–120 grit for initial smoothing, then move to 180–220 grit for finishing.
Do they need dust extraction?
Yes. Most have built-in dust ports to keep air clean and the surface visible during sanding.
Can beginners use a random orbital sander easily?
Absolutely. Their gentle action and random motion make them safe and easy to control.
Detail and Sheet Sanders – For Tight Areas and Corners
Detail and sheet sanders are smaller tools designed for precision work. They’re perfect for chair legs, carvings, or narrow areas that larger sanders can’t reach.
When should a detail sander be used?
Use it for corners, edges, and intricate parts of furniture like molding or joints.
Is it suitable for paint removal?
Yes, though it works best for light-duty stripping rather than full refinishing.
What grit works best for fine sanding?
Use 150–220 grit to smooth surfaces or prepare for a topcoat.
Are detail sanders good for curved furniture?
Yes. Their pointed design and small size allow precise control on rounded shapes.
Do they create swirl marks?
Rarely. Their micro-vibration movement ensures smooth, even sanding on delicate areas.
How to Prepare Before Using Power Sanding Tools on Furniture
Proper preparation is essential for achieving flawless results when using power sanding tools on furniture. Skipping these steps often leads to uneven surfaces, dust contamination, or accidental damage.
By setting up the workspace, tool, and surface correctly, you’ll create the foundation for a smooth and controlled sanding process.
A good setup not only improves sanding performance but also protects both the user and the furniture. From choosing the right sandpaper to securing the piece firmly, every detail matters before you power on your sander.
Setting Up the Workspace and Safety Gear
Before touching the tool, make sure your environment is clean, organized, and well-ventilated. Dust particles can interfere with both sanding quality and your health.
Why is workspace preparation important?
A clutter-free, well-lit space helps maintain precision and prevents accidental tool slips.
What safety gear should be used?
Always wear safety goggles, a dust mask or respirator, and ear protection to avoid exposure to noise and fine dust.
Should furniture be secured before sanding?
Yes. Use clamps or non-slip pads to keep the piece stable during sanding.
Why is ventilation necessary?
Good airflow prevents dust buildup and improves air quality during long sanding sessions.
How should the floor be prepared?
Lay down drop cloths or plastic sheets to catch debris and protect the workspace.
Choosing and Mounting the Right Sandpaper
The type of sandpaper and grit sequence determine how effectively the sander works on furniture surfaces. Always choose abrasives based on the condition of the wood and the type of finish you plan to apply.
What grit should you start with?
Use coarse grit (60–80) for removing heavy finishes, medium grit (120–150) for smoothing, and fine grit (180–220) for final preparation.
Why is grit progression important?
It removes scratches gradually and ensures the surface is smooth enough for painting or staining.
How should sandpaper be attached?
Align the holes with the sander’s dust port, and attach using the hook-and-loop or clamp system provided.
What happens if sandpaper is misaligned?
Misalignment causes vibration, uneven sanding, and premature paper wear.
When should sandpaper be replaced?
Replace it as soon as it becomes clogged, torn, or starts polishing instead of cutting.
Tool Inspection and Testing
A quick inspection before use helps ensure safety and optimal performance. A damaged pad, loose connection, or blocked vent can ruin your furniture or overheat the tool.
What should you check before starting?
Inspect the power cord, pad surface, dust bag, and ensure the sander runs smoothly without unusual noise.
Should you test on scrap wood first?
Yes. Testing helps confirm correct speed, grit, and control before working on the actual furniture.
Why is speed adjustment necessary?
Lower speeds protect delicate veneers, while higher speeds remove material faster on solid wood.
Do all sanders need dust extraction connected?
Yes. Efficient dust collection keeps the sanding area clean and enhances tool performance.
What should you avoid before sanding?
Avoid using damp or oily rags on the surface; moisture can clog sandpaper and affect results.
How Do Power Sanding Tools Work on Furniture Surfaces
Power sanding tools work by combining speed, motion, and abrasive texture to remove layers of material from furniture surfaces.
Unlike hand sanding, which relies on inconsistent manual pressure, these tools deliver controlled motion that ensures even sanding across every part of the piece. Understanding how they operate helps in achieving flawless, professional-level finishes.
At their core, all sanders share three main components: a motor that powers the motion, an abrasive pad or belt that contacts the surface, and a dust collection system to keep the area clean. Together, these parts create a balance between material removal and surface refinement.
The Science Behind the Motion
The type of motion determines how efficiently and evenly a sander works. Belt sanders move abrasives in a straight loop, orbital sanders vibrate in small circles, and random orbital sanders add a slight spinning action that prevents visible swirl marks.
How does motion affect sanding results?
Circular and random motions blend sanding paths, preventing harsh lines or uneven patches on wood surfaces.
Which motion works best for furniture?
Random orbital motion is ideal for furniture since it smooths without leaving directional scratches.
Why do some sanders feel more aggressive?
Belt sanders remove material faster because of their constant forward motion, while orbital types focus on fine finishing.
Does speed impact quality?
Yes. High speed removes more material but increases the risk of burning or uneven sanding; lower speeds give better control.
How can beginners maintain motion control?
Keep the sander flat on the surface, move it slowly, and let the machine’s weight do the work.
The Role of Abrasive Grits and Surface Texture
Grit size determines how coarse or smooth the finish will be. Coarse grits (60–100) strip material quickly, medium grits (120–150) level the surface, and fine grits (180–220) prepare for finishing.
Why is grit progression so important?
Skipping grits leaves deep scratches that become visible after staining or painting.
Can using fine grit too early be a problem?
Yes. It can polish the surface prematurely, preventing stains from adhering evenly.
What grit is ideal for finishing furniture surfaces?
Use 180–220 grit for the final pass to achieve a silky-smooth surface ready for finishing.
Does grit type affect dust production?
Coarser grits create more dust and debris; finer grits produce finer dust that requires better extraction.
What type of abrasive material lasts longest?
Aluminum oxide and ceramic abrasives are durable and perform well on hardwood furniture.
Dust Extraction and Surface Clarity
Modern sanders are designed with built-in dust collection systems that keep the surface clear and reduce airborne particles. Clean surfaces help the abrasive grip better, resulting in a smoother, blemish-free finish.
Why is dust collection crucial for furniture sanding?
It maintains visibility, reduces clogging, and improves final finish quality.
Can sanding without extraction affect the result?
Yes. Dust buildup prevents even abrasion and can scratch the surface as it recirculates.
What’s the best way to manage fine dust?
Connect a vacuum hose or use a HEPA filter to trap small particles efficiently.
Does cleaner sanding mean smoother finishes?
Absolutely. Less debris allows consistent sanding pressure, leading to a polished and even texture.
Is maintenance of dust systems necessary?
Yes. Emptying bags or filters frequently ensures optimal suction and tool performance.
Sanding Techniques and Grit Progression for Flawless Furniture Finishes
Mastering how power sanding tools work on furniture surfaces requires understanding technique as much as technology.
Even the best tool can leave marks or burn the wood if used incorrectly. Technique determines whether your surface ends up dull and uneven — or silky smooth and ready for finish.
Each pass, movement, and grit transition matters. The secret is consistency: steady motion, correct grit order, and the discipline to avoid rushing through the process.
Proper Sanding Technique
The foundation of great sanding lies in letting the tool do the work. Power sanders are designed for minimal pressure — pushing down hard only damages both the tool and the surface.
What’s the correct way to move a power sander?
Move the sander slowly in overlapping passes, keeping it flat and steady across the surface.
Should sanding follow the wood grain?
Yes. Always sand with the grain on belt and sheet sanders. Random orbit sanders can move in any direction without visible scratches.
How can you prevent swirl marks?
Avoid staying in one spot, clean your sanding pad regularly, and never tilt the tool during operation.
Is speed adjustment important?
Yes. Use lower speeds for softwoods and finishing stages; higher speeds work better for stripping or leveling.
How fast should the sander move across the surface?
Maintain a slow, consistent pace — about one inch per second — to ensure even material removal.
Grit Progression for Professional Results
Using the correct grit sequence is the difference between an amateur finish and a professional one. Each grit level refines the scratches from the previous one, gradually smoothing the surface.
What grit sequence works best for furniture sanding?
Start with 80 grit for heavy removal, move to 120 for smoothing, and finish with 180–220 grit for fine polishing.
Can you skip grit levels?
No. Skipping grits leaves deeper scratches that often only appear after applying stain or varnish.
How do you know when to move to the next grit?
When all visible marks from the previous grit are gone and the surface feels uniformly smooth to the touch.
Does sanding too finely cause problems?
Yes. Over-sanding can burnish the wood, closing its pores and preventing finishes from adhering properly.
Should you sand between finish coats?
Yes. Lightly sand with 220 grit between coats to remove dust nibs and ensure better adhesion for the next layer.
Inspecting and Finishing the Surface
Inspection after each sanding stage ensures perfection before finishing. A quick check with good lighting can reveal imperfections invisible to the eye in dim environments.
How do you check for sanding flaws?
Wipe the surface clean and examine under angled light to spot swirl marks or uneven textures.
What if swirl marks appear after finishing?
Re-sand lightly with fine grit and apply another finish coat for correction.
Can dust affect the final finish?
Yes. Dust particles trapped under finish coats create bumps or cloudy patches. Always clean thoroughly before applying coatings.
Should you use tack cloth before finishing?
Yes. A tack cloth removes microscopic dust particles that a regular rag might leave behind.
When is the furniture ready for finish application?
Once the entire surface feels smooth, dust-free, and uniform in appearance — typically after a 220-grit final pass.
Safety and Maintenance When Using Power Sanding Tools on Furniture

Understanding how power sanding tools work on furniture surfaces is only half the skill — the other half is ensuring safety and maintaining your tools properly. These machines run at high speeds, generate heat, and produce fine dust that can harm both your health and your furniture if precautions are ignored. Proper safety habits not only protect you but also extend the lifespan of your sanding tools.
Before turning on the sander, inspect your workspace, check your tool’s condition, and make sure you have the right protective gear. Good safety practices are what separate efficient craftsmen from careless ones.
Essential Safety Tips
Power sanders may seem simple, but their moving parts and high-speed abrasives can cause damage if used improperly. Following basic safety rules keeps you in control and ensures smooth, mistake-free sanding.
What protective equipment is needed?
Always wear safety goggles, a dust mask or respirator, and hearing protection to guard against flying debris, fine dust, and noise.
Why is dust control important?
Fine wood dust can cause respiratory irritation and even pose a fire hazard in enclosed spaces. Using dust extraction keeps air clean and surfaces clear.
Should the furniture be secured before sanding?
Yes. Unstable furniture can shift during sanding, increasing the risk of gouging or tool kickback.
Is it safe to start the sander on the surface?
No. Always start it slightly above the surface and lower it gently to avoid gouging.
What’s the right way to stop sanding?
Lift the tool off the surface before switching it off, then wait for the pad to stop spinning before setting it down.
Maintenance for Long-Term Performance
Proper maintenance ensures your sander continues to perform efficiently and safely. Ignoring maintenance leads to vibration, overheating, and inconsistent sanding results.
How often should sandpaper and pads be replaced?
Change them as soon as they clog, tear, or lose their grip — worn abrasives produce heat and scratches instead of clean finishes.
What about dust bags and filters?
Empty them frequently and clean filters to maintain strong suction and prevent overheating.
Do vents and motors need cleaning?
Yes. Use compressed air or a brush to clear vents and prevent dust buildup around the motor.
Can storing a sander incorrectly cause damage?
Yes. Always store in a clean, dry environment and wrap cords loosely to prevent bending or cracking.
Why register your power tool warranty?
It ensures quick access to repairs or replacements for parts like switches, pads, and motors.
Common Mistakes to Avoid
Even experienced users can make preventable errors that compromise both safety and surface quality.
Can pressing too hard improve sanding speed?
No. It slows the motor, damages pads, and can burn the wood surface.
Is it okay to use a sander without dust extraction?
Not recommended. It increases cleanup time, reduces visibility, and creates unhealthy air quality.
Should you sand near flammable materials?
Never. Sparks from metal sanding or overheating can ignite dust or nearby chemicals.
Can using the wrong extension cord affect performance?
Yes. Thin or long cords reduce power flow and overheat the motor.
Is tool maintenance optional?
No. A poorly maintained sander is less effective, more dangerous, and shortens its overall lifespan.
Conclusion
Understanding how power sanding tools work on furniture surfaces is the key to transforming dull, uneven pieces into smooth, beautifully restored creations.
These tools take the hard work out of sanding while delivering precision and consistency that hand sanding can’t match. When used correctly, they not only save time but also enhance the quality and durability of the final finish.
From aggressive belt sanders to fine-detail sanders, each type plays a unique role in the furniture refinishing process. Success lies in choosing the right tool, following a proper grit sequence, maintaining steady motion, and respecting the grain of the wood.
Small habits — like checking your sandpaper, cleaning dust filters, and keeping light pressure — can make the difference between an average job and a flawless, professional result.
Safety and maintenance are equally vital. Protective gear, proper ventilation, and dust collection systems ensure that your workspace stays healthy and your tools last longer.
Taking care of your equipment also means fewer interruptions, smoother operation, and consistent performance over time.

I’m Michael R. Turner, the founder, lead writer, and passionate DIY enthusiast behind 101diytools.com. With years of hands-on experience in home improvement and power tools, I built this platform to share practical tips, in-depth guides, and honest reviews to help DIYers of all skill levels tackle projects with confidence and the right tools.