Rivet Problems Troubleshooting Guide For Beginners
It’s super frustrating when a project falls apart because the rivet not holding. This is a common issue for anyone just starting with rivets, whether you’re working with metal, leather, or other materials. It can happen for several reasons, like using the wrong type of rivet or not setting it properly. But don’t worry! This guide will break down the problem and provide simple, step-by-step solutions to ensure your rivets stay put. Get ready to learn how to fix this common problem, and keep your projects together. Let’s get started!
What Causes a Rivet Not to Hold?
When a rivet fails to hold, it can be due to a variety of factors related to the rivet itself, the materials being joined, or the tools used. The quality of the rivet plays a significant part; using subpar rivets made from weak materials will quickly lead to failure. The type of rivet must also match the application. For instance, a blind rivet is typically used where access is limited, while solid rivets are great for heavy-duty jobs. The materials involved are also important. Joining thick or dense materials might require specific rivet types or larger sizes for proper hold. Lastly, the tools and techniques utilized during the riveting process are critical. Applying too little force might not set the rivet properly, whereas too much can deform it, compromising its integrity. Let’s explore each of these areas, so you can easily identify and eliminate the problems!
Rivet Selection and Material Compatibility
Picking the right rivet is the first step to success. Think of it like choosing the right tool for the job. You wouldn’t use a screwdriver to hammer a nail, right? The same logic applies to rivets. There are different types, each suited for different materials and tasks. Consider the materials you’re joining. Are they metal, leather, plastic, or a combination? The rivet material should be compatible with both. For example, using a steel rivet on aluminum could cause corrosion. The correct rivet size is also key. Measure the combined thickness of your materials. Then, look for a rivet with a grip range that matches that thickness. This ensures the rivet can expand properly to form a secure bond. Make sure the rivet is strong enough to handle the stress your project will face. Using the correct rivet type and size guarantees that the rivet fills the gap, ensuring proper hold and resisting forces.
- Material Matters: The rivet material must work well with what you’re joining. Avoid mixing metals that can react and weaken the connection.
- Grip Range: Check the rivet’s grip range. This tells you the thickness of material it’s designed to hold. It is critical for a secure hold.
- Rivet Type: Different types of rivets, like solid or blind, are designed for specific needs. Select the proper one for your project.
Tooling and Application Techniques
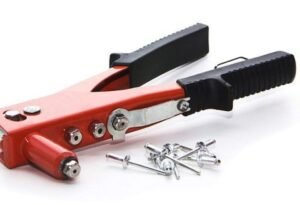
The tools you use to set the rivets are just as important as the rivets themselves. The right tool depends on the type of rivet. For example, solid rivets need a hammer and a rivet set, which is a tool to shape the rivet head. Blind rivets require a rivet gun. The setting process is where the magic happens. For solid rivets, you’ll need to support the manufactured head on one side and then strike the other end with a hammer and set to create a new head. With a blind rivet gun, you squeeze the handles, which pulls the mandrel, causing the rivet to expand and grip the materials. Always make sure the surfaces are clean before riveting. Any dirt or debris can weaken the bond. Setting a rivet requires practice to get it right. You want the rivet to be tight but not over-tightened. Over-tightening can damage the materials or the rivet itself, leading to a weak hold. The pressure applied is important, too. Apply steady, even pressure, or use controlled hammering. Make sure your rivet is seated correctly and that both sides of the materials are clamped securely together before setting the rivet. This careful approach can make all the difference.
- Choose the Right Tool: Match the tool to the rivet. Solid rivets use a hammer and set, while blind rivets need a rivet gun.
- Preparation is Key: Ensure materials are clean and aligned before starting.
- Apply Consistent Force: Whether hammering or using a rivet gun, a consistent, even pressure is important for a strong hold.
Common Problems with Rivet Not Holding
Even when you think you’ve done everything correctly, there are still some things that can go wrong. One of the main reasons a rivet not holding is the rivet itself. The rivet might be too short, which means it doesn’t have enough material to properly expand and grab the materials. Or, it could be too long, which results in a loose connection, or even deformation of the materials. Improper setting is another big culprit. If you don’t apply enough force, the rivet won’t expand fully, and the connection will be weak. Applying too much force can crush the rivet or damage the materials. The quality of your rivets is also key. Cheap rivets made from poor materials can break or fail. Keep an eye on your materials; if you’re working with something like a soft metal, make sure you do not damage it while setting the rivet. Consider the materials and the rivet type, and make sure they match! Using a rivet that is too large for the materials can also cause the connection to fail, as the rivet may not be able to set properly.
- Incorrect Rivet Size: Ensure the rivet fits the material thickness.
- Improper Setting: Not enough or too much force during setting can cause failure.
- Material Issues: Damage to the joined materials or material incompatibility can weaken the bond.
Troubleshooting Rivet Failures
So, you’ve tried your best, but the rivet isn’t holding. What now? First, check the rivet itself. Is it bent, damaged, or of the right type for your project? Inspect the materials you’re joining for damage. Sometimes, the materials can be deformed or weakened during the riveting process, leading to failure. Next, examine the rivet setting. Did you use the right tool? Was there enough force applied? Were you hammering or using a rivet gun correctly? Think about the material. Are they compatible? Incompatible materials can lead to corrosion or a weak hold. Finally, consider the stress the rivet will face. If the project involves vibrations or heavy loads, you might need a stronger rivet or a different type. Careful observation and understanding of the problem are critical. It can take some practice to find the source. With a bit of detective work, you can identify the root cause of the problem and avoid future issues.
Assessing the Rivet and the Materials
Start by examining the rivet itself. Is the rivet bent, or does it show signs of damage? If it’s a solid rivet, check the formed head. Is it properly shaped, or is it distorted? For blind rivets, is the mandrel still present or has it broken off? Next, check the materials. Examine the holes. Are they the correct size for the rivet? Look for signs of damage or deformation around the holes. Sometimes, the materials can become weakened during the setting process. Make sure the materials are compatible with the rivet. Using the wrong materials can cause the rivet to corrode or fail to secure the materials. Check for proper alignment. If the materials weren’t perfectly aligned when the rivet was set, the connection might be weak. Be thorough. Check all the rivets if you’re working on a larger project, because one failure might be a sign of a bigger issue. These steps can help you pinpoint the cause of the problem, leading you to an effective solution.
- Rivet Condition: Check for bends, damage, and proper head formation.
- Material Inspection: Look for hole size issues, deformation, or compatibility problems.
- Alignment Verification: Make sure materials are properly aligned and clamped.
Correcting Rivet Setting Errors
If you’ve determined the issue is related to the setting process, there are specific steps you can take to fix this. Firstly, review the tool you used. Ensure you had the right tool for the job. Did you use a rivet gun for a blind rivet and a hammer and set for a solid rivet? Adjust the force you are applying. Make sure that you are applying adequate pressure without going overboard. Over-tightening can damage the materials or the rivet itself. Another important aspect of the setting process is the angle you’re working at. When hammering solid rivets, make sure you hit the head straight on. For a rivet gun, ensure the tool is perpendicular to the materials. This will ensure an even and secure hold. If the rivet still won’t hold, you can try removing the old rivet. Drill it out carefully, and then
- Tool Check: Confirm you used the correct tool for the rivet type.
- Force Adjustment: Apply enough pressure for a good hold, without causing damage.
- Angle of Approach: Ensure proper alignment of tools and materials during setting.
Repairing and Replacing Rivets
Sometimes, the best solution to a rivet not holding is removing the faulty rivet and installing a new one. If the rivet head has broken off or become distorted, removing it might be required. For solid rivets, use a drill bit slightly larger than the rivet’s body. Drill into the head carefully until the head comes off. Then, you can use a punch to remove the remaining body. With blind rivets, use a drill bit to remove the head. Then, you can use pliers to remove the remaining part. Always make sure to be careful to avoid damaging the materials around the rivet. Next, prepare for the
- Removal Techniques: Drill out or otherwise remove the failed rivet carefully.
- Hole Preparation: Ensure the hole is clean and prepared for the replacement rivet.
- New Rivet Installation: Use the correct type and size for the replacement and set it properly.
Understanding Different Rivet Types
There is a wide variety of rivets, each one is designed for a specific purpose. Understanding the main types can help you make a good choice for your project. Solid rivets are simple, strong, and great for heavy-duty applications. They are used in aircraft and bridges. They’re typically made of steel or aluminum. Their installation requires a hammer and a rivet set. Blind rivets, on the other hand, are designed for jobs where you can only access one side of the materials. Also known as pop rivets, these are common in auto repairs and construction. When you pull the mandrel, the rivet expands, forming a grip. Structural rivets are designed to handle high stress. They are often used in critical structural components, such as in aircraft. The proper rivet is critical. When you pick the right one, the results will be a project that lasts.
Solid Rivets and Their Applications
Solid rivets are the classic choice, valued for their simplicity and strength. These are made from materials like steel, aluminum, or copper. They come in various sizes and materials, making them suitable for many projects. Their strength comes from their simple, solid design, with a head on one end and a shaft that you deform with a hammer and set to create a new head on the other end. Solid rivets are well-suited for applications that involve significant stress or vibration. Some examples include metalworking, industrial equipment, and construction. They provide a permanent and reliable joint when correctly set. The installation can be simple, but it does require access to both sides of the materials. Proper alignment of the holes, and careful hammering technique, is important. A good hammer and a rivet set are essential for setting solid rivets, to ensure a strong hold. Practicing with solid rivets can help you get a great result.
- Durable Construction: Solid rivets provide a strong, permanent joint.
- Material Variety: Available in various materials, suitable for different uses.
- Suitable for Stress: Ideal for projects with heavy loads or vibration.
Blind Rivets and Their Advantages
Blind rivets, also known as pop rivets, offer a unique advantage: you can install them from one side. This feature makes them ideal for projects where you cannot access both sides of the materials. They work by using a mandrel that is pulled through the rivet body. This causes the rivet to expand and grip the materials, creating a secure joint. Blind rivets are widely used in a lot of applications. Some examples are in automotive repairs, aircraft construction, and general assembly work. They come in different sizes and materials, including aluminum, steel, and stainless steel. This allows you to choose the perfect one for your project’s material and environment. The installation is quick and simple. You just need a rivet gun to pull the mandrel. The versatility and ease of use of blind rivets make them popular for both professionals and DIY enthusiasts.
- Single-Side Access: Easy installation when you only have access to one side.
- Versatile Usage: Ideal for many materials and applications.
- Quick Installation: Installation is typically fast and simple.
Specialty Rivets and Their Uses
Beyond the basics, there are many types of specialty rivets designed for specific tasks. These rivets are designed to provide extra performance and reliability. For instance, structural rivets are designed for situations that need to bear a heavy load. They are often used in the construction of aircraft and other critical applications. Self-piercing rivets offer a faster installation. They pierce the materials as they are set, and they eliminate the need for pre-drilled holes. These types are commonly used in the automotive industry. Some rivets are also designed for specialized materials like plastics or composites. These rivets are usually made with non-corrosive materials. The right type of specialty rivet can increase the life and dependability of your project. Considering factors like material type, structural requirements, and installation time, you can choose the specialty rivet that is best suited for your project. Knowing your project’s specific requirements, and the range of options, is the key to choosing the correct specialty rivet.
- Structural Rivets: Made for high-stress applications.
- Self-Piercing Rivets: Eliminate the need for pre-drilled holes.
- Material-Specific Rivets: Designed for plastics, composites, and more.
Frequently Asked Questions
Question: Why is my rivet not holding even when it seems set properly?
Answer: There are several reasons. The rivet might be too short for the material thickness, the holes might be too large, or you might not have applied enough force during setting. The materials being joined might also be incompatible or damaged.
Question: How can I tell if I’m using the right size rivet?
Answer: Measure the total thickness of the materials you’re joining. Choose a rivet with a grip range that matches or slightly exceeds this thickness to ensure proper expansion.
Question: What’s the difference between a solid rivet and a blind rivet?
Answer: Solid rivets require access to both sides of the materials for installation and are set by hammering. Blind rivets, or pop rivets, can be installed from one side using a rivet gun.
Question: How do I remove a rivet if it’s not holding?
Answer: For solid rivets, use a drill bit slightly larger than the rivet’s body to drill off the head. Then, use a punch to remove the remaining body. For blind rivets, drill off the head and use pliers to remove the rest.
Question: Are there any tools I should avoid when setting rivets?
Answer: Avoid using excessive force or the wrong tools. Using a hammer on blind rivets can damage the materials. Always use the proper tools and techniques for the rivet type.
Final Thoughts
We’ve explored the common causes behind why a rivet not holding and learned how to fix it, from choosing the proper rivet type to mastering the setting process. It’s often due to an incorrect rivet size, material incompatibility, or issues during installation. Remember that the key is matching the rivet to the job and using the correct tools and methods. Troubleshoot by inspecting the rivet, the materials, and the setting. When things go wrong, replacing the rivet with the correct type and size is often the best fix. With a little practice and patience, you can perfect your technique and ensure your projects are secure and long-lasting. So, the next time a rivet gives you trouble, you’ll be ready to take action and keep your projects together. Keep learning, keep practicing, and enjoy the satisfaction of a well-riveted project!

I’m Michael R. Turner, the founder, lead writer, and passionate DIY enthusiast behind 101diytools.com. With years of hands-on experience in home improvement and power tools, I built this platform to share practical tips, in-depth guides, and honest reviews to help DIYers of all skill levels tackle projects with confidence and the right tools.