Why your nail gun is blowing out wood and how to stop it
Stop your nail gun from blowing out wood by first ensuring you’re using the correct nail length and gauge for the material, and then by properly adjusting your air compressor’s pressure. Splintering and blowouts often stem from nails being too long or thick, or from excessive force, which can be mitigated with these simple adjustments and improved technique.
Ever been there? You’re in the zone, making great progress on a DIY project. The hum of your compressor, the satisfying *thwack* of the nail gun – it’s all going perfectly. Then, *bam!* Instead of a neatly driven nail, you’re left with a jagged, splintered mess. Your beautiful piece of wood is ruined, and your frustration levels just went through the roof. If this sounds familiar, you’re not alone. The dreaded phenomenon of a nail gun blowing out wood is a common headache for beginners and seasoned DIYers alike.
It’s incredibly disheartening when your tools, which are supposed to make things easier, seem to actively work against you. That moment when your nail gun is blowing out wood can make you question everything. But don’t worry, it’s usually not a fault with your skill or your specific nail gun. More often than not, it comes down to a few adjustable factors and a better understanding of your materials and tools. Consider this your friendly guide to troubleshooting and preventing those frustrating wood blowouts.
In this post, we’ll dive deep into why your nail gun is blowing out wood and, more importantly, how to stop it in its tracks. We’ll cover everything from simple pressure adjustments to understanding different wood types and nail choices. By the end, you’ll have the knowledge to achieve clean, professional-looking results every time, saving you time, material, and a whole lot of exasperation.
Key Takeaways
- Reduce Air Pressure: High pressure often causes wood blowouts.
- Adjust Depth Setting: Calibrate the tool for flush or slightly recessed nails.
- Choose Proper Nail Length: Match nail to wood thickness precisely.
- Avoid Edges and Ends: Drive nails away from the wood’s margins.
- Select Correct Nail Type: Use suitable nail gauge for wood density.
- Pre-drill Hardwoods: Prevent splitting when working with dense materials.
- Hold Gun Firmly: Ensure stable, perpendicular contact with the wood.
📑 Table of Contents
- The Anatomy of a Blowout: Why Does Wood Split?
- Pressure & Depth: Your Nail Gun’s Power Settings
- Nail Selection: Size, Gauge, and Type
- Understanding Your Material: Wood Type and Grain
- Technique & Maintenance: Mastering the Art of Nailing
- Pro Tips: When All Else Fails (or to Prevent It)
- Nail Gun Settings: A Quick Reference Guide
- Conclusion
The Anatomy of a Blowout: Why Does Wood Split?
Before we can fix the problem, it helps to understand what’s actually happening when your nail gun is blowing out wood. Imagine a tiny, high-speed projectile (the nail) being driven into a material (the wood). When the force of that impact is too concentrated, or the wood’s structure can’t handle it, something has to give. That “something” is often a splintered surface or a split in the wood.
Pressure vs. Resistance
Wood fibers have a natural grain, and they offer resistance to anything trying to push through them. When your nail gun delivers too much force, or the nail hits a weak point, the wood’s resistance is overcome too violently. This causes the fibers to tear and separate rather than neatly part around the nail. It’s like trying to push a pencil through a stack of paper too fast – it’s going to rip more than it pierces.
Common Causes of Splitting
- Too Much Force: The most straightforward reason – your nail gun is just too powerful for the task.
- Weak Points: Nailing too close to the edge of a board, into a knot, or directly into end grain creates inherent weak spots where wood is more likely to split.
- Brittle Wood: Very dry or hard wood is less forgiving and more prone to cracking under pressure.
Pressure & Depth: Your Nail Gun’s Power Settings
The number one culprit behind a nail gun blowing out wood is often incorrect pressure and depth settings. These are your nail gun’s primary controls for how much force it applies.
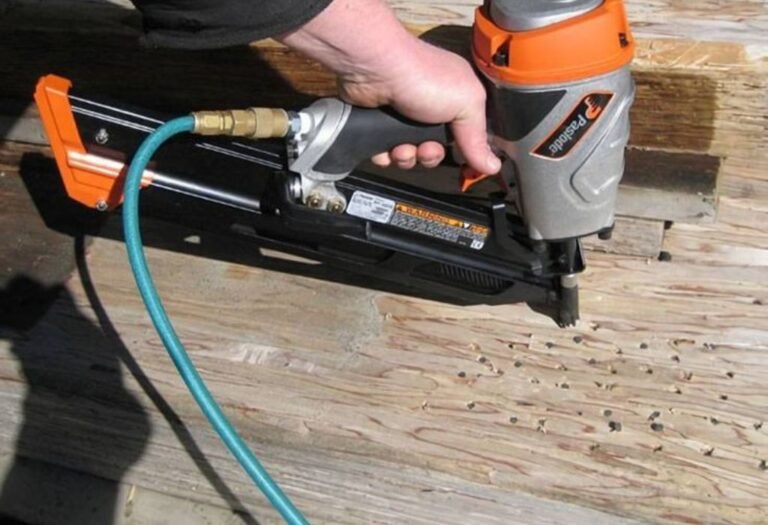
Too Much Air Pressure (Pneumatic Nail Guns)
Think of air pressure as the “muscle” behind your nail gun. If you’re driving small finish nails into soft pine with the compressor cranked up to 120 PSI, you’re essentially using a sledgehammer to tap in a thumbtack. The excessive force blasts the nail into the wood, often driving it too deep and causing the surrounding wood to splinter or blow out.
Practical Tip: Always start with the lowest recommended PSI setting for your nail gun, typically around 60-70 PSI for finish nailers. Then, test it on a scrap piece of the same wood you’re using. If the nail head isn’t flush or slightly recessed, gradually increase the pressure in 5-10 PSI increments until you achieve the perfect drive. You’ll be amazed at how much difference a small adjustment makes to prevent your nail gun blowing out wood.
Incorrect Depth Setting
Most nail guns have a depth adjustment feature, often a small dial or lever near the nose of the tool. This controls how far the nail is driven into the wood. If your depth setting is too aggressive, the nail will be driven too far below the surface, creating a crater and often causing the wood to tear or split around the entry point.
Practical Tip: Adjust the depth setting so that the nail head is either perfectly flush with the wood surface or slightly recessed (if you plan to fill the hole later). Again, always test on scrap wood first. Fine-tuning this setting is crucial for clean work and avoiding a nail gun blowing out wood.
Nail Selection: Size, Gauge, and Type
You wouldn’t use a tiny pin to hold together a hefty piece of lumber, right? The same logic applies to your nail gun. Using the wrong nail for the job can easily lead to a nail gun blowing out wood.
Nail Length Matters
The length of your nail is critical for both holding power and preventing blowouts. A general rule of thumb is that the nail should be about three times the thickness of the material you are fastening. So, if you’re attaching a 1/2-inch piece of trim, you’d want nails around 1 1/2 inches long.
- Too Long: If a nail is excessively long for the receiving material, it can create unnecessary stress, poke through the back, or even curve inside the wood, causing splits.
- Too Short: While less likely to cause blowouts, nails that are too short won’t provide adequate holding power for your project.
Nail Gauge and Type
Nail gauge refers to the thickness of the nail. A higher gauge number means a thinner nail (e.g., 23 gauge is much thinner than 15 gauge). Thinner nails create smaller holes and are less likely to split wood, especially delicate pieces. Thicker nails provide more holding power but come with a higher risk of splitting, particularly in hardwoods.
- 18-Gauge Brad Nails: Excellent for trim, small crafts, and delicate applications. Less prone to splitting.
- 16- or 15-Gauge Finish Nails: Good for heavier trim, baseboards, and applications requiring more holding power. Use with caution on very hard or thin woods.
- Framing Nails (typically 21-30 degree, various gauges): Designed for structural work, not typically for delicate finishes.
- Specialty Nails: Ring-shank nails offer superior holding power but increase the risk of splitting if not used carefully.
Always consider the wood type and the nail gauge together. A 15-gauge nail that’s fine for pine might cause your nail gun to blow out wood if used on oak.
Understanding Your Material: Wood Type and Grain
The very material you’re working with plays a huge role in whether your nail gun is blowing out wood. Not all wood is created equal when it comes to nailing.
Hardwood vs. Softwood
- Softwoods (Pine, Fir, Cedar): Generally more forgiving. Their softer fibers allow nails to penetrate more easily with less risk of splitting. However, they can still split if excessive pressure or poor technique is used.
- Hardwoods (Oak, Maple, Cherry): These dense woods are beautiful but notoriously difficult to nail without splitting. Their tight grain offers significant resistance, making them much more susceptible to blowouts. When working with hardwoods, it’s often necessary to lower air pressure significantly, use finer gauge nails, or even pre-drill pilot holes.
Grain Direction and Knots
The way wood fibers run (the grain) dramatically impacts how it behaves under impact.
- Nailing with the Grain: Nailing directly along the grain, especially near the edge of a board, is a recipe for splitting. The nail acts like a wedge, forcing the parallel fibers apart.
- Nailing into End Grain: This is arguably the most challenging type of nailing. End grain is highly prone to splitting because you are driving the nail directly into the ends of the wood fibers, which are very weak in this direction.
- Avoid Knots: Knots are areas where tree branches grew, and their grain runs differently and often much harder than the surrounding wood. Nailing into a knot is incredibly unpredictable and very likely to cause your nail gun to blow out wood. Try to visually locate and avoid them.
Technique & Maintenance: Mastering the Art of Nailing
Even with all the right settings and nails, poor technique or a poorly maintained tool can still lead to a nail gun blowing out wood.
Proper Nail Gun Handling
- Hold Firm and Square: Always hold your nail gun perpendicular to the wood surface. Apply firm, consistent pressure to ensure the nose piece fully engages the material. This helps prevent the nail from “skipping” or driving at an angle, which can cause splitting.
- Mind the Edges: Avoid nailing too close to the edges or ends of your workpiece. Leave at least 1/2 inch to 1 inch from any edge to reduce the risk of splitting. If you must nail closer, consider pre-drilling (more on that below).
- Stagger Your Nails: Instead of nailing in a straight line, slightly stagger your nails. This disperses the stress on the wood and reduces the chances of creating a single line of weakness.
Tool Inspection and Maintenance
A well-maintained tool performs better and more reliably.
- Check the Driver Blade: For pneumatic guns, a worn or bent driver blade can cause nails to misfire or drive improperly, contributing to wood damage.
- Clean the Nosepiece: Sawdust and debris can build up in the nosepiece, affecting depth consistency and potentially causing the gun to hesitate or misfire.
- Lubrication: Pneumatic nail guns require a few drops of pneumatic tool oil daily (or before each use) in the air inlet. This keeps internal components moving smoothly and prevents erratic operation that could cause your nail gun to blow out wood.
Pro Tips: When All Else Fails (or to Prevent It)
Sometimes, despite your best efforts, certain situations just make wood splitting inevitable. Here are some advanced strategies to help.
When to Pre-Drill Pilot Holes
Pre-drilling is your best friend when working with dense hardwoods, very delicate trim, or when you absolutely must nail close to an edge or into end grain. A pilot hole creates a clear path for the nail, significantly reducing the stress on the wood fibers.
Practical Tip: Choose a drill bit that is slightly smaller in diameter than the nail shank. Test on scrap wood to find the perfect size that allows the nail to go in smoothly without losing its grip. This method virtually eliminates the risk of your nail gun blowing out wood.
Utilize Wood Glue
For many joinery projects, wood glue provides a much stronger bond than nails alone. When glue is used, nails often serve primarily as clamps to hold pieces together while the glue cures. This means you can use fewer nails or finer gauge nails, reducing the stress on the wood and minimizing the chance of your nail gun blowing out wood. Plus, the combined strength is far superior.
Sacrificial Backing for Delicate Work
If you’re nailing thin or very delicate pieces, placing a scrap piece of wood directly behind the workpiece can help. This “sacrificial backing” absorbs some of the impact and provides support, preventing the nail from pushing through or blowing out the back of your primary material. It’s a simple trick that can save a lot of frustration.
Nail Gun Settings: A Quick Reference Guide
To help you dial in your settings, here’s a general guide. Remember, these are starting points – always test on scrap wood first!
| Wood Type | Nail Gauge | Suggested PSI Range (Pneumatic) | Depth Setting | Notes |
|---|---|---|---|---|
| Softwood (Pine, Fir) | 18ga (Brad) | 60-75 PSI | Flush/Slightly Recessed | Lower risk of splitting, but still test. |
| Softwood (Pine, Fir) | 16ga/15ga (Finish) | 70-85 PSI | Flush/Slightly Recessed | Good for general framing/trim work. |
| Hardwood (Oak, Maple) | 18ga (Brad) | 50-65 PSI | Flush | Pre-drilling often recommended near edges. |
| Hardwood (Oak, Maple) | 16ga/15ga (Finish) | 60-75 PSI | Flush | Pre-drilling highly recommended to prevent splitting. |
| Delicate Trim/Molding | 23ga (Pinner) | 40-60 PSI | Flush | Very fine nails, minimal blow out risk. |
Conclusion
Dealing with a nail gun blowing out wood can feel like a frustrating setback, but as you can see, it’s a very solvable problem. It’s rarely a sign of your inadequacy or a broken tool. More often, it’s about understanding the subtle interplay between your nail gun’s power, the type of nail you’re using, and the unique characteristics of the wood you’re working with.
By taking the time to adjust your air pressure and depth settings, selecting the right nail for the job, respecting the wood’s grain, and practicing good technique, you can dramatically reduce – if not eliminate – those frustrating blowouts. Remember to always test on a scrap piece first! This small step can save you a lot of grief and wasted material.
Armed with these insights, you’re now ready to tackle your projects with confidence. Say goodbye to ruined wood and hello to clean, perfectly driven nails. Happy building!
Frequently Asked Questions
Why does my nail gun keep blowing out wood?
This common issue often stems from excessive air pressure, an incorrect nail depth setting, or using nails that are too long or thick for the material. It can also occur if the wood itself is particularly soft, brittle, or has a tendency to split easily.
How can I prevent my nail gun from blowing out wood?
To prevent this, first reduce your air compressor’s PSI gradually and adjust the nail gun’s depth setting until the nail sets flush without damage. Ensure you’re using the correct length and gauge of nails for your specific wood type and always test on a scrap piece first.
Is excessive air pressure the main reason for a nail gun blowing out wood?
High air pressure is a primary culprit. When the pressure is too great, the nail is driven with excessive force, causing it to over-penetrate, splinter, or create a larger blow-out crater around the nail head. Always aim for the lowest effective pressure that consistently sinks the nail properly.
What nail types should I use to avoid my nail gun blowing out wood?
Choose nails with an appropriate length and gauge for your wood’s thickness and density. Shorter, thinner nails are generally better for delicate or thin stock, while longer, thicker nails are suitable for robust framing without going overboard. Consider using brad nails or finish nails for less impact on surfaces.
Can my nailing technique cause the nail gun to blow out wood?
Yes, poor technique can definitely contribute. Ensure you’re holding the nail gun firmly and perpendicular to the wood surface; driving nails at an angle or with inconsistent pressure can lead to splintering and blow-outs. Also, avoid nailing too close to the edge or end of the wood where it’s weakest.
Why does my nail gun blow out soft wood more often than hardwoods?
Softer woods, like pine or cedar, are more susceptible to blow-outs because their fibers are less dense and more easily displaced or splintered by the force of the nail. Hardwoods, while tougher to penetrate, tend to resist splintering around the nail much better once the nail is successfully driven due to their denser structure.

I’m Michael R. Turner, the founder, lead writer, and passionate DIY enthusiast behind 101diytools.com. With years of hands-on experience in home improvement and power tools, I built this platform to share practical tips, in-depth guides, and honest reviews to help DIYers of all skill levels tackle projects with confidence and the right tools.