Learn How to Use Nail Gun for Molding Like a Pro
Mastering a nail gun for molding involves precision, safety, and choosing the right tools for a flawless finish. Learn essential techniques like proper gun handling, accurate nail placement to prevent splitting, and achieving consistent depth for secure, professional-looking trim installations. With practice and attention to detail, you can transform your home’s appearance with expert-level molding work.
Have you ever walked into a beautifully finished room and admired the crisp lines of its molding, thinking, “I wish I could do that myself”? Or perhaps you’re staring at a stack of new baseboards, wondering how to get them perfectly straight and secure without making a mess. If you’ve ever felt intimidated by the idea of tackling molding installation, especially with power tools, you’re absolutely not alone.
For many DIY enthusiasts, a nail gun feels like a professional-only tool, a bit scary, perhaps. But let me tell you, once you learn how to use a nail gun for molding, it truly becomes your best friend. It transforms a tedious, hand-cramping job of hammering tiny nails into a swift, satisfying process. This isn’t about being a seasoned carpenter; it’s about understanding the basics, building confidence, and getting professional-looking results right in your own home.
In this guide, we’re going to break down everything you need to know about using a nail gun for molding. We’ll cover selecting the right tools, mastering the technique, and even some clever tricks for making your finished project shine. So, grab a cup of coffee, and let’s get ready to make your molding dreams a reality!
Key Takeaways
- Prioritize Safety: Always wear eye and ear protection before operating.
- Choose the Right Tool: A finish nailer is ideal for most molding projects.
- Select Proper Nails: Match nail length and gauge to molding thickness and substrate.
- Practice First: Test on scrap wood to perfect depth and angle settings.
- Master Technique: Hold firmly, shoot perpendicularly, and aim for studs.
- Adjust Depth Correctly: Countersink nails slightly for a flawless finish.
📑 Table of Contents
Gearing Up: Essential Tools and Safety First
Before you even think about putting a nail into wood, it’s crucial to gather your supplies and prioritize safety. Think of it as preparing for a friendly DIY adventure!
Choosing Your Nail Gun: Brad vs. Finish
When it comes to attaching molding, you’ll primarily be looking at two types of nail guns: a brad nailer or a finish nailer. So, which one is right for your nail gun for molding project?
- Brad Nailer: These use smaller, thinner nails (typically 18-gauge). They create tiny holes, which are great for delicate trim or when you want minimal patching. However, brad nails offer less holding power.
- Finish Nailer: These use slightly thicker nails (typically 15 or 16-gauge). They provide a much stronger hold, which is ideal for securing thicker baseboards, crown molding, or door casing. The holes are a bit larger but still easily filled.
For most molding projects, especially baseboards and crown, a finish nailer is generally the better choice due to its superior holding power. If you’re working with very thin, decorative trim, a brad nailer might be sufficient.
The Right Nails for the Job
Once you’ve picked your nail gun, you need the right nails. Nails are categorized by gauge (thickness) and length. For most molding, you’ll want nails that are long enough to penetrate through the molding and into the wall studs or framing by at least an inch. Common lengths range from 1 ½ inches to 2 ½ inches. Always match the nail gauge to your nail gun!
Beyond the Nail Gun: Safety Gear and Accessories
No DIY project is worth risking your safety. Here’s what you’ll need:
- Safety Glasses: Non-negotiable! Nails can ricochet, and wood splinters happen.
- Hearing Protection: Nail guns can be loud. Protect your ears.
- Measuring Tape and Pencil: For accurate cuts.
- Miter Saw: Essential for precise angle cuts on your molding.
- Stud Finder: To locate wall studs for the strongest hold.
- Wood Filler, Caulk, Sandpaper: For those professional finishing touches.
- Pry Bar/Hammer: For removing old molding or making adjustments.
Understanding Your Molding: Types and Measurements

Molding isn’t just decoration; it serves a purpose and comes in various forms. Knowing what you’re working with helps immensely when using your nail gun for molding.
Common Molding Types
- Baseboard: Covers the joint between the wall and the floor. It’s often the easiest to install for beginners.
- Crown Molding: A decorative trim that sits at the junction of the wall and ceiling. This one can be tricky due to compound angles, but a nail gun makes it much more manageable.
- Casing: The trim around door and window frames.
- Shoe Molding/Quarter Round: A small trim piece often used at the base of baseboards, especially with hardwood floors, to hide small gaps.
Accurate Measuring and Cutting is Key
This is where patience pays off. The golden rule is “measure twice, cut once.”
- Straight Cuts: Simple 90-degree cuts for end pieces.
- Inside Corners: These usually require a 45-degree miter cut, with the long point facing the room.
- Outside Corners: Also 45-degree miter cuts, but with the short point facing the room.
- Coping Joints: For inside corners, some pros prefer a coped joint for a tighter fit that’s less affected by wall movement. This involves cutting one piece straight and then using a coping saw to cut the profile of the adjacent piece.
Always cut your molding slightly long if you’re unsure – you can always trim a little more off, but you can’t add it back! Practice on scrap wood to get comfortable with your miter saw’s angles before cutting your good molding.
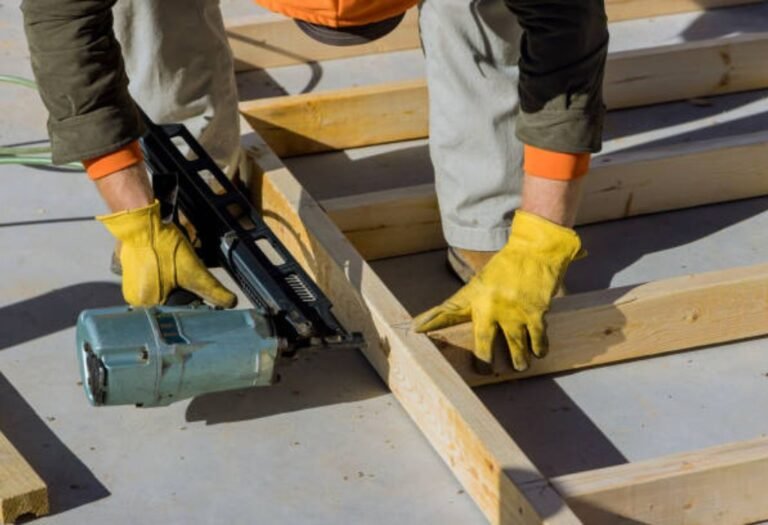
Mastering the Nail Gun: Technique for Flawless Results
Now for the fun part: learning how to expertly handle your nail gun for molding. It’s all about control, precision, and confidence.
Loading and Adjusting Your Nail Gun
Each nail gun model is a little different, but loading nails is generally straightforward. Refer to your manual if you’re unsure. The most critical adjustment is the depth setting. You want the nail head to be slightly recessed below the surface of the wood, not sticking out and not too deep that it crushes the wood. Test this on a scrap piece of molding first. Adjust the depth until you achieve a perfectly countersunk nail head.
The Perfect Grip and Angle
When holding the nail gun, use both hands for maximum stability. Hold the molding firmly against the wall. When you pull the trigger, ensure the nail gun is pressed flat and firmly against the molding. Avoid shooting nails too close to the edge of the molding, as this can cause splitting.
For extra holding power, especially with thicker molding, consider “toe-nailing.” This involves shooting nails at opposing angles into the wall. For example, nail one nail straight into a stud, then another nail at a slight upward angle into the wall plate, and a third at a slight downward angle into the stud. This creates a strong bond.
Securing the Molding Properly
- Find the Studs: Use your stud finder to mark the locations of wall studs. Nailing into studs provides the strongest hold for your molding.
- Start Smart: Begin your installation in an inconspicuous corner or at a doorway.
- Nail Spacing: For most molding, aim for a nail every 12-16 inches. Add extra nails at seams and corners for extra security.
- Baseboards: Hold the baseboard firmly against the wall and floor. Nail into studs where possible. If no stud is present, aim for the top and bottom plates (where the wall framing meets the floor and ceiling).
- Crown Molding: This is often a two-person job initially, as it can be heavy and awkward. Hold it firmly against the wall and ceiling, maintaining consistent pressure. Nail into the ceiling joists and wall studs where available.
- Casing: Secure the side pieces first, then the top. Nail into the framing around the door/window opening.
Troubleshooting Common Challenges and Smart Fixes
Even seasoned DIYers encounter hiccups. Knowing how to troubleshoot helps you keep your cool and finish strong when using your nail gun for molding.
Nails Not Setting Flush
If your nails aren’t sinking completely, it’s usually one of two things: your depth setting is too shallow, or you’re not applying enough pressure to the nail gun. Re-adjust your depth setting and ensure you’re pressing the tool firmly against the molding before firing. If the nail is still slightly proud, you can carefully tap it in with a nail set and hammer.
Splitting Wood or Nail Blowouts
This happens when a nail is shot too close to the edge of the molding, or if the wood is particularly brittle. To avoid this:
- Don’t nail closer than ½ inch from the edge.
- If working with very thin or delicate molding, consider pre-drilling pilot holes (though this somewhat defeats the speed benefit of a nail gun).
- Ensure you’re using the correct gauge nail for your molding type.
Dealing with Gaps and Imperfections
Even with perfect cuts, slight gaps can appear between molding pieces or between the molding and the wall. Don’t fret! This is where your wood filler and caulk come into play. Small gaps at joints or against the wall are easily remedied and part of the professional finishing process.
The Finishing Touches: Making It Look Professional
The true magic happens in the cleanup and finishing. This is what truly elevates your nail gun for molding project from DIY to professional quality.
Filling Nail Holes and Sealing Gaps
- Nail Holes: Use a high-quality wood filler or spackle. Apply a small dab with your finger or a putty knife, ensuring it fills the hole completely. Wipe away any excess immediately.
- Gaps: For gaps between molding pieces, use wood filler. For gaps between the molding and the wall/ceiling/floor, use paintable caulk. Apply a thin, even bead and smooth it with a wet finger or a caulk tool.
Sanding and Painting/Staining
Once your fillers and caulk are dry, lightly sand any rough spots or excess filler. This creates a smooth, seamless surface. Finally, it’s time for paint or stain. Choose a color that complements your room, and apply it carefully. The paint will further blend any minor imperfections, leaving you with a beautifully finished result.
Conclusion
There you have it! From choosing the right tools to nailing those intricate corners and applying the perfect finishing touches, you now have a comprehensive understanding of how to use a nail gun for molding. This tool, once perhaps a little intimidating, is now within your grasp, ready to empower you to transform your home.
Remember, every expert started as a beginner. Be patient with yourself, take your time, and don’t be afraid to practice. The satisfaction of stepping back and admiring your perfectly installed molding, knowing you did it yourself with the help of your trusty nail gun, is truly rewarding. Go ahead, tackle that project – your home (and your hands!) will thank you for it!
Frequently Asked Questions
What type of nail gun should I use for installing molding?
For most interior molding like baseboards, crown molding, or trim, a finish nailer or brad nailer is ideal. These nail guns use smaller gauge nails (15 to 18 gauge for finish, 18 gauge for brad) which create smaller holes, making the finishing process much easier and less noticeable.
How do I safely operate a nail gun when attaching molding?
Safety is paramount when using a nail gun for molding. Always wear safety glasses and hearing protection, and ensure the air compressor is set to the recommended PSI for your tool. Never point the nail gun at yourself or others, and keep your free hand away from the firing area.
What’s the best technique to avoid splitting molding when using a nail gun?
To prevent splitting, aim your nails slightly off-center on the molding, especially near ends or corners. For thinner pieces, you can angle the nail gun slightly to drive the nail in at an acute angle, providing better holding power and reducing the risk of splits.
How do I choose the correct nail length for my molding project?
The general rule is that the nail should penetrate at least 1 to 1.5 inches into the framing or substrate behind the molding. This ensures a strong hold. Measure the thickness of your molding and add the required penetration depth to determine the ideal nail length for your nail gun.
What preparation is needed before I start using a nail gun on my molding?
Before firing your nail gun, properly measure and cut your molding pieces to fit perfectly, performing dry runs to ensure accuracy. It’s also crucial to locate and mark wall studs or ceiling joists, as nailing into these will provide the most secure attachment for your molding.
After I’ve used my nail gun for molding, what are the final steps for a clean finish?
Once all your molding is securely attached with the nail gun, the final steps involve filling nail holes with wood putty or caulk. Then, apply caulk along any gaps between the molding and the wall or ceiling for a seamless appearance, followed by painting or staining to match your decor.

I’m Michael R. Turner, the founder, lead writer, and passionate DIY enthusiast behind 101diytools.com. With years of hands-on experience in home improvement and power tools, I built this platform to share practical tips, in-depth guides, and honest reviews to help DIYers of all skill levels tackle projects with confidence and the right tools.