Learn How To Use Brad Nailer For Trim Like A Pro
Achieve professional-grade trim installation by mastering your brad nailer with essential safety practices and precise techniques. This guide equips you to select the right nails, adjust air pressure, and execute flawless fastening for a seamless finish on any trim project. Elevate your craftsmanship and ensure every piece of trim looks expertly installed.
Ever found yourself staring at a pile of perfectly cut trim pieces, feeling a mix of excitement and dread? You’re ready to transform your space, but the thought of painstakingly nailing each piece by hand, perhaps even splitting that beautiful wood, can be pretty intimidating. Trust me, I’ve been there. The good news? There’s a tool that makes this process not just manageable, but genuinely enjoyable, and helps you achieve that polished, professional finish every time.
That magical tool is the brad nailer. It’s a game-changer for anyone looking to install trim, molding, or even complete small woodworking projects with speed and precision. No more hammer dents or bent nails; just clean, consistent fastening that elevates your DIY skills to the next level. If you’ve ever wondered how the pros make trim installation look so effortless, a big part of their secret weapon is understanding how to properly use a brad nailer.
Today, we’re going to dive deep into mastering this essential tool. Whether you’re hanging baseboards, framing a doorway, or adding decorative crown molding, learning how to use a brad nailer for trim will empower you to tackle these projects with confidence. Get ready to transform your home with seamless, beautiful trim that looks like it was installed by an experienced carpenter!
Key Takeaways
- Prioritize Safety: Always wear eye and ear protection when operating the tool.
- Choose Correct Nails: Select appropriate length and gauge for your trim type.
- Adjust Nail Depth: Test on scrap wood to prevent over or under-driving.
- Maintain Stable Grip: Hold the nailer firmly for accurate, consistent shots.
- Angle Nails Strategically: “Toenail” into framing for stronger, secure trim adhesion.
- Inspect and Prepare: Ensure trim and surfaces are clean and aligned for best results.
- Practice on Scraps: Master your technique before tackling finished trim work.
📑 Table of Contents
Understanding Your Brad Nailer
Before you start firing nails, it’s really helpful to get acquainted with your tool. Think of it like making a new friend – you want to know their strengths and how they operate!
What is a Brad Nailer?
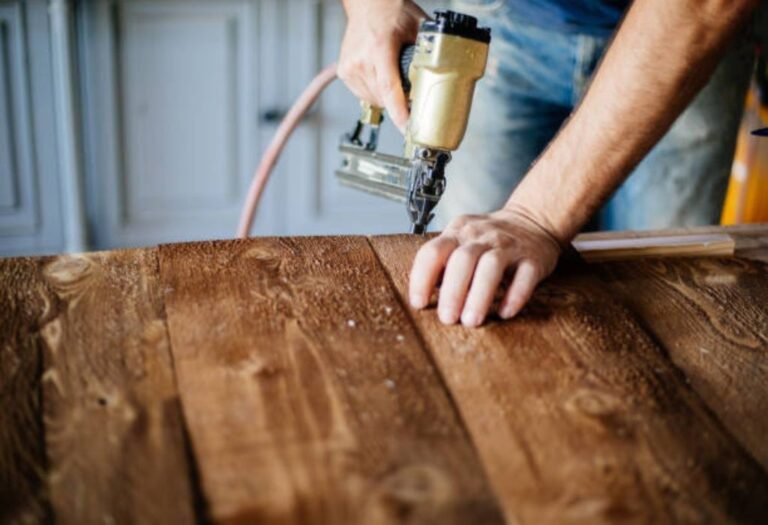
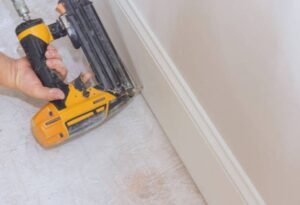
Simply put, a brad nailer is a type of nail gun that drives 18-gauge nails, often called “brads.” These nails are thin and have a small head, making them ideal for delicate trim work because they leave a minimal hole. This means less filling and sanding later! It’s perfect for attaching decorative molding, window and door casings, and of course, general trim installation.
Components and Controls
Most brad nailers, whether pneumatic (air-powered) or cordless (battery-powered), share similar features:
- Magazine: This is where you load the strip of brad nails.
- Trigger: Just like a drill, this activates the tool to fire a nail.
- Safety Mechanism: Usually a contact tip that must be pressed against the workpiece before the trigger can be pulled. This prevents accidental firing.
- Depth Adjustment: A crucial feature that lets you control how deep the nail sinks into the wood.
- Air Inlet (Pneumatic): Where the air hose from your compressor connects.
- Battery (Cordless): Powers the tool and provides portability.
Understanding these parts is the first step in learning how to use a brad nailer for trim effectively and safely.
Safety First! Always
I can’t stress this enough: safety is paramount. A brad nailer, while incredibly useful, is still a power tool that can cause injury if not handled correctly. Let’s make sure your fingers stay exactly where they belong.
Essential Safety Gear
- Safety Glasses: Non-negotiable! Nails can ricochet, wood can splinter. Protect your eyes.
- Hearing Protection: If you’re using a pneumatic brad nailer, the air compressor can be loud. Earplugs or earmuffs are a good idea, especially for extended use.
- Gloves: Optional, but they can improve grip and protect against splinters.
Safe Operating Practices
- Read the Manual: Seriously, every tool has its quirks. Familiarize yourself with your specific model.
- Keep Fingers Clear: Always be aware of where your non-dominant hand is, especially when holding small pieces of trim.
- Disconnect Power: Before loading nails, clearing a jam, or making adjustments, always disconnect the air hose or remove the battery.
- Never Point at People: Treat it like a loaded firearm.
- Work in a Clear Area: Ensure no one can accidentally bump into you or your tools.
Following these simple safety rules will ensure your experience using a brad nailer for trim is both productive and incident-free.
Preparing for Flawless Trim Installation
The secret to a professional-looking finish isn’t just in the nailing, it’s also in the preparation. A little foresight goes a long way when you’re installing trim.
Choosing the Right Brad Nails
Selecting the correct nails is vital for securely attaching your trim. Brads typically range from 1/2 inch to 2 inches in length. A good rule of thumb is that the nail should penetrate the trim piece and go at least 1/2 to 3/4 inch into the substrate (the wall stud, header, or base plate). So, if your trim is 3/4 inch thick, you’ll want nails that are at least 1 1/4 to 1 1/2 inches long. For areas exposed to moisture, consider galvanized brads to prevent rust.
Setting Up Your Workspace
A clean, well-lit, and organized workspace is your best friend. Have your miter saw ready, your trim pieces cut and labeled, and any necessary caulk or wood filler nearby. A sturdy set of saw horses or a workbench will make cutting and preparing your trim much easier.
Test Shots and Adjustments
This is a step many skip, but it’s crucial! Grab a scrap piece of the same trim material and a piece of scrap drywall or wood that mimics your wall. Fire a few test shots:
- Depth Adjustment: Use the depth adjustment feature on your brad nailer to ensure the nail head sets just below the surface of the wood. You want it slightly recessed so you can easily fill it later.
- Air Pressure (Pneumatic): If using an air compressor, adjust the PSI (pounds per square inch). Too high, and the nail might blow through the trim; too low, and it won’t sink flush. Start around 70-90 PSI and adjust as needed.
Getting these settings dialed in beforehand will save you a lot of frustration and repair work when you start installing your actual trim pieces.
Nailing Trim Like a Pro – Step-by-Step
Okay, you’ve got your safety gear on, your workspace is prepped, and your brad nailer is adjusted. It’s showtime!
Positioning the Trim
Carefully position your trim piece. For baseboards, ensure it’s snug against the floor and wall. For door casings or window trim, align it perfectly with your reveals. Take your time to ensure all mitered corners fit tightly before you start nailing.
Proper Nailing Technique
Here’s how to use a brad nailer for trim with precision:
- Hold Firmly: Grip the brad nailer firmly with both hands, if possible.
- Perpendicular Approach: Hold the nose of the nailer perpendicular (90 degrees) to the surface of the trim. This ensures the nail drives straight.
- Engage Safety: Press the safety tip firmly against the trim where you want the nail to go.
- Pull Trigger: Smoothly pull the trigger. You’ll hear the nail fire.
- Stagger Nails: Avoid nailing in a straight line or too close to the edges of the trim, which can cause splitting. Stagger your nails slightly.
- Toe-Nailing: For extra holding power, especially on thicker trim or at corners, you can slightly angle the nailer (10-15 degrees) when firing. This “toe-nailing” technique helps lock the trim into place more securely.
Nailing Patterns for Different Trim Types
- Baseboards: Nail into the wall studs (usually every 16 inches) and into the bottom plate where it meets the floor. Angle nails slightly to hit the stud centers.
- Door/Window Casings: Nail into the door frame/window frame and into the wall studs. Again, staggering nails and aiming for framing members provides the best hold.
- Crown Molding: This can be trickier. You’ll typically nail into the ceiling joists and wall studs. Because crown molding often requires holding it in place while nailing, you might benefit from temporary supports or having a helper.
Practice makes perfect. Don’t worry if your first few nails aren’t flawless; you’ll quickly get a feel for the tool.
Finishing Touches for a Seamless Look
You’ve installed all your trim with your trusty brad nailer! Now, let’s make it truly shine and hide any evidence that a tool was ever involved.
Filling Nail Holes
Since brad nails leave tiny holes, this step is relatively easy. For painted trim, use paintable wood filler or spackle. Apply a small dab over each hole with your finger or a putty knife, ensuring it slightly overfills the recess. For stained trim, use a wood filler that can be stained to match your wood species.
Sanding and Painting/Staining
Once your filler is dry, lightly sand the patched areas flush with the trim surface using fine-grit sandpaper (220-grit). Be gentle! If you’re painting, wipe down the trim to remove any dust, then prime and paint. If you’re staining, ensure all dust is removed before applying your stain and topcoat.
Troubleshooting Common Issues
Even pros run into snags. Here are a few common brad nailer problems and how to fix them:
- Nails Not Sinking Flush: Your depth adjustment might be too shallow, or your air pressure (if pneumatic) is too low. Adjust both until nails sink slightly below the surface.
- Nails Not Firing/Jams: First, disconnect power! Then, check the magazine to ensure it’s loaded correctly. Most nailers have an easy-release latch to clear jams in the nosepiece. Sometimes, low air pressure or an empty magazine is the culprit.
- Double Firing: This can happen if you quickly lift the nailer and press it down again. Try a smoother, more deliberate motion. Also, check for adequate air pressure; sometimes very low pressure can cause erratic firing.
A little patience and a systematic approach will help you resolve most issues quickly, getting you back to using your brad nailer for trim like a pro.
Conclusion
And there you have it! From understanding the basics to achieving those seamless finishing touches, you now have the knowledge to confidently use a brad nailer for trim projects around your home. What might have once felt like a daunting task – installing all that beautiful trim – is now within your grasp, ready to be tackled with precision and efficiency.
Embrace the power and convenience that a brad nailer brings to your DIY arsenal. It truly transforms the tedious process of hand-nailing into a quick, satisfying task, leaving you with results that look professionally installed. So go ahead, grab that brad nailer, practice those techniques, and get ready to enjoy the stunning, polished look of perfectly installed trim in your home. You’ve got this!
Frequently Asked Questions
What is a brad nailer best used for when installing trim?
A brad nailer is ideal for attaching delicate trim pieces such as baseboards, crown molding, door casings, and window trim. It uses small-gauge nails (typically 18-gauge) that create tiny holes, which are less noticeable and easier to fill, resulting in a cleaner finish.
What size brad nails should I use for trim applications?
For most interior trim installations, 1.25-inch to 2-inch brad nails are generally suitable. The rule of thumb is that the nail should be long enough to penetrate through the trim piece and embed at least 0.5 to 1 inch into the framing or substrate behind it for a secure hold.
How do I prevent splitting the wood when using a brad nailer for trim?
To prevent splitting, ensure your nailer’s depth setting is correctly adjusted to drive the nail just below the surface without excessive force. Avoid nailing too close to the edges or ends of the trim, and consider angling the nail slightly on very thin or delicate pieces to follow the grain and reduce stress.
Do I need to use glue in addition to a brad nailer for trim installation?
While a brad nailer provides excellent immediate holding power, using construction adhesive or wood glue in conjunction with the nails is highly recommended for a more permanent and secure installation. The nails hold the trim in place while the adhesive cures, creating a much stronger and lasting bond.
What safety precautions should I take when operating a brad nailer for trim?
Always wear safety glasses to protect your eyes from ricocheting nails or debris, and consider hearing protection, especially in enclosed spaces. Ensure the work area is clear of obstructions, keep your non-dominant hand away from the nail discharge area, and always disconnect the air hose or battery before clearing jams or making adjustments.
How do I properly hide the nail holes after using a brad nailer for trim?
After installing your trim with a brad nailer, use a nail set to ensure all brad nails are slightly recessed below the wood surface. Then, fill the small holes with a suitable wood filler, spackle, or paintable caulk. Once the filler is dry, lightly sand if necessary, and then paint or stain the trim for a seamless, professional finish.

I’m Michael R. Turner, the founder, lead writer, and passionate DIY enthusiast behind 101diytools.com. With years of hands-on experience in home improvement and power tools, I built this platform to share practical tips, in-depth guides, and honest reviews to help DIYers of all skill levels tackle projects with confidence and the right tools.