How to Cut a Laminate Countertop with a Circular Saw Cleanly
Cutting a laminate countertop might seem intimidating at first. The glossy surface chips easily, and one wrong move can ruin an entire slab. But with the right circular saw setup and careful technique, you can achieve a perfectly clean, straight cut that looks like a factory finish.
Whether you’re installing new kitchen counters, trimming a prefab piece to size, or making a sink cutout, the process requires patience and precision. Many homeowners assume a table saw or professional tools are necessary, but a well-tuned circular saw does the job beautifully.
The key lies in preparation—choosing the correct blade, supporting the laminate properly, and using the right cutting method to avoid chipping or tear-out. Even small mistakes in blade direction or feed speed can leave jagged edges that are hard to fix.
In this complete guide, you’ll learn step-by-step how to cut a laminate countertop with a circular saw cleanly, safely, and confidently—just like a pro installer.
Understanding Laminate Countertops
Laminate countertops are made by bonding a thin decorative sheet of plastic laminate to a particleboard or MDF core. The surface layer gives the countertop its color and texture, while the core provides structure and thickness.
This top layer is both durable and delicate. It resists stains and scratches but chips easily along cut lines if handled roughly. Because of this, cutting laminate requires extra attention to blade choice and support.
Most laminate sheets are less than 1/16 inch thick, but once bonded to the core, the countertop typically measures between 1¼ and 1½ inches. Cutting through both materials evenly is crucial to prevent splintering.
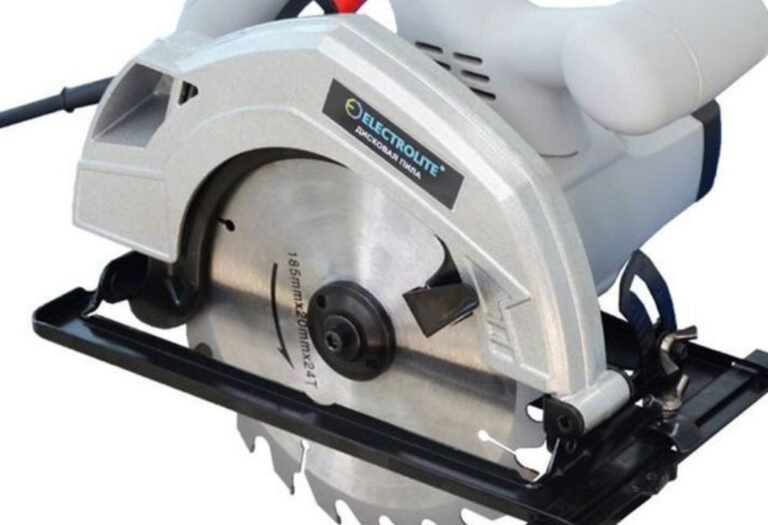
A circular saw, when equipped with the right fine-tooth blade and steady guide, slices through cleanly and efficiently. It’s the ideal tool for DIYers who want professional-looking results without specialized machinery.
Tools and Materials You’ll Need
Before making any cuts, gather all the essential tools and supplies. Proper preparation ensures smoother work and prevents costly mistakes.
You’ll need:
- Circular saw with adjustable depth and angle
- Fine-tooth carbide-tipped blade (at least 60–80 teeth)
- Measuring tape and pencil
- Straight edge or cutting guide
- Masking tape
- Clamps
- Workbench or sawhorses
- Safety glasses, dust mask, and hearing protection
- Fine file or sanding block for finishing edges
Optional but helpful items include a jigsaw for cutouts and painter’s tape to reduce chipping. Always double-check your measurements before cutting—laminate can’t be patched once damaged.
Can I use any circular saw blade for laminate?
No, use a fine-tooth carbide blade designed for plywood or laminate to avoid chips.
What blade size works best?
A 7¼-inch blade with at least 60 teeth gives a smooth finish.
Do I need a special table or support?
Yes, support the countertop fully on both sides to prevent cracking.
Should I wear protection while cutting?
Always wear safety glasses and a mask to protect from dust and flying chips.
Can I reuse the same blade later for wood?
Yes, but it may dull faster on hard laminate surfaces.
Measuring and Marking the Cut Line
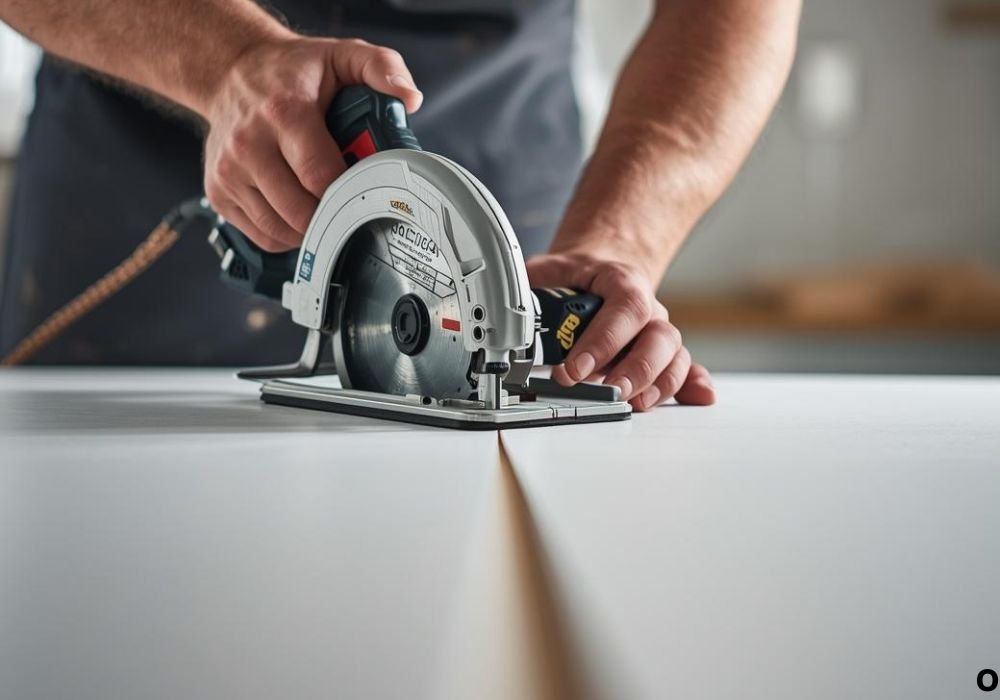
Accuracy begins with careful measuring and marking. Place the countertop on a stable work surface and measure twice before marking once. Use a straight edge or framing square for straight, crisp lines.
Always mark the underside of the countertop if possible. Cutting from the back minimizes chipping on the visible surface because the saw teeth enter the material from below and exit upward.
Use masking tape along the cut line on both sides of the board. The tape holds the laminate fibers together and further prevents splintering. Mark your measurements directly on the tape for better visibility.
When trimming for a wall or cabinet fit, leave a small margin—usually 1/16 inch—for final sanding or fitting. Precision now saves frustration later.
Choosing the Right Blade and Saw Setup
The blade choice determines how cleanly your countertop will cut. A fine-tooth carbide blade or a laminate-specific triple-chip grind (TCG) blade is best. These blades slice rather than tear the surface.
Install the blade with the teeth facing forward in the normal cutting direction. Set the blade depth so the tips just clear the bottom of the board by about 1/8 inch. Too deep a cut increases tear-out.
For laminate, slower speeds produce smoother edges. Avoid forcing the saw; let it glide naturally through the material. Adjust the base plate so the saw sits flat and stable.
If possible, use a guide rail or straight edge clamped to the countertop to ensure a perfectly straight line. This prevents wandering and uneven edges during the cut.
How deep should the blade be set?
About 1/8 inch below the surface of the material for smoother control.
Can I use a plywood blade?
Yes, as long as it has fine teeth and sharp carbide tips.
Why do laminate blades have so many teeth?
More teeth mean smaller bites, reducing chip size and surface damage.
Should I cut fast or slow?
Cut slowly and steadily; rushing increases chipping.
Do I need lubrication or wax?
Not usually, but waxed guides can help the saw glide smoothly.
Protecting the Laminate Surface
Laminate is prone to splintering if unsupported. Always face the finished side downward when cutting with a standard circular saw. The blade teeth cut upward, leaving the bottom surface cleaner.
If you must cut from the top—for example, when using a track saw—use a blade designed for downward cutting. These specialized blades have reversed teeth that minimize surface tear-out.
Lay masking tape directly along the cut line on both sides. The tape holds the laminate surface in place during cutting and peels off cleanly afterward.
Supporting the entire countertop with sawhorses prevents vibration, another major cause of chips. Make sure the off-cut piece won’t drop suddenly when you finish the cut; support it or have a helper hold it steady.
Setting Up the Cutting Guide
A straight edge or track guide ensures your circular saw stays aligned throughout the cut. Without one, even a small deviation can ruin the countertop.
Measure the distance from your saw’s base plate edge to the blade. Subtract or add this distance when positioning the guide relative to your marked line. Clamp the guide tightly at both ends to prevent movement.
If you don’t have a guide rail, use a long, perfectly straight piece of scrap wood or metal bar. Double-check alignment from multiple points along the line before cutting.
Guided cuts not only improve accuracy but also reduce vibration, resulting in a smoother, cleaner finish on laminate surfaces.
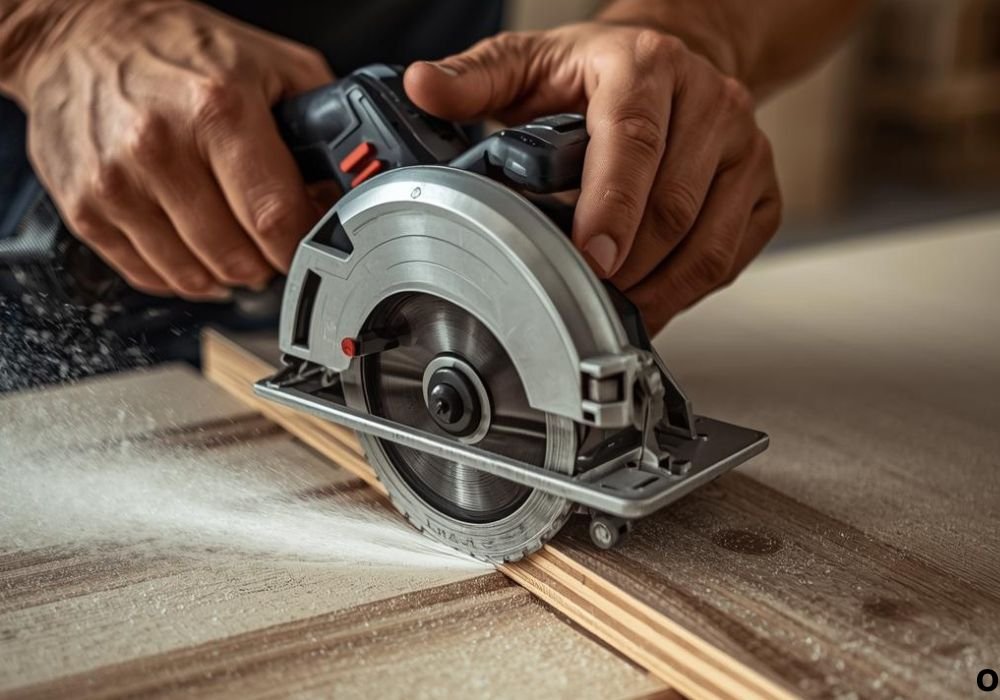
Making the Cut
Once the setup is complete, you’re ready to cut. Put on your safety gear and ensure all clamps are secure. Start the saw before it contacts the material and let the blade reach full speed.
Begin the cut slowly, following the guide. Maintain a steady pace—too fast causes chipping, while too slow may burn the laminate. Keep both hands on the saw for maximum control.
As you near the end of the cut, support the off-cut piece carefully. Prevent it from snapping off under its own weight, which can tear the laminate at the edge.
After finishing, inspect the edge. It should look smooth and even with minimal roughness. If you see small chips, they can be sanded or filed later.
Cutting a Countertop to Fit a Wall
Walls are rarely perfectly straight. When fitting your countertop, measure the wall at several points to determine the widest section. Mark the largest width onto the countertop.
Transfer any irregular wall shapes using a scribe tool or compass. Mark these directly onto the laminate surface. Then, cut slightly outside your line to allow room for final adjustments.
You can smooth edges later using a belt sander or file. Always maintain a gentle hand when sanding laminate—its thin surface layer can wear through quickly.
For L-shaped corners, cut each section separately and join them later using a seam kit or corner fasteners.
How can I keep my cuts straight?
Use a clamped straight edge or guide track aligned with your line.
Can I flip the countertop for top-side cutting?
Yes, but use a down-cut or laminate-rated blade to avoid chipping.
What if the wall isn’t square?
Scribe the countertop edge to match the wall’s shape before cutting.
Should I cut both ends at once?
No, measure each section individually to ensure perfect fit.
Can I use masking tape as my only guide?
No, tape helps prevent chips but doesn’t guide the saw accurately.
Making Cutouts for Sinks or Cooktops
Sink and cooktop cutouts require precise cuts within the countertop surface. Start by measuring the manufacturer’s template and marking it on the laminate using masking tape and pencil.
Drill a pilot hole at each corner of the outline large enough for a jigsaw blade. Use the circular saw for long, straight cuts where possible, stopping short of the corners. Complete the corners with a jigsaw for tight turns.
Support the center piece during cutting to prevent cracking or tearing as it loosens. Go slowly and follow the marked line carefully.
After finishing, use a fine file to smooth edges. Apply silicone sealant to exposed particleboard areas to protect them from moisture.
Finishing the Edges
Even a clean cut benefits from minor finishing touches. Use a fine file or sanding block to remove micro-chips or burrs. Always stroke downward along the laminate edge—never upward—to avoid lifting the surface.
If the countertop edge will be visible, consider applying edge banding or trim for a polished look. Heat-activated laminate strips adhere easily with an iron and protect against moisture.
For seamless joints, sand lightly with 220-grit paper on a sanding block until the edge feels smooth to touch. Wipe away all dust before applying any finish or sealant.
A well-finished edge enhances both the appearance and durability of your countertop installation.
Troubleshooting Common Issues
If you notice chipping, rough edges, or burning during the cut, don’t panic. Most issues are easy to correct once you identify the cause.
Chipping: Usually from a dull blade or cutting too fast. Replace the blade and reduce feed speed.
Burn marks: Occur when cutting too slowly or using excessive pressure. Keep the blade clean and sharp.
Wandering cuts: Indicate a loose guide or unstable support. Always clamp everything securely before cutting.
Small chips can be filled with color-matched laminate repair paste or covered with edge trim. Major damage may require trimming the piece again for a clean finish.
Safety Tips for Cutting Laminate
Circular saws can produce dangerous kickback if misused. Always stand slightly to the side of the saw path, never directly behind it. Keep your hands clear of the blade at all times.
Use clamps to secure both the countertop and guide firmly. Never try to hold the workpiece with one hand while cutting with the other.
Let the saw blade stop completely before setting it down. Disconnect power before adjusting or changing blades.
Wear protective gear at all times—laminate dust contains fine particles that irritate lungs and eyes. A clean, organized workspace minimizes hazards and improves precision.
Is cutting laminate dangerous?
Not if you follow proper safety precautions and wear protective gear.
Can the saw kick back?
Yes, if the blade binds or pinches. Keep the cut line clear and steady.
Should I cut indoors or outdoors?
Outdoors is best; laminate dust can spread quickly.
Can I cut freehand without a guide?
It’s possible, but results will likely be uneven or chipped.
What’s the safest speed to cut at?
Steady and moderate—let the saw do the work without forcing.
Maintaining Your Circular Saw After Cutting
Laminate’s resin surface can dull blades faster than wood. After completing your cuts, clean the blade with a pitch remover or mineral spirits. This removes built-up adhesive that causes friction.
Check for dull or chipped teeth. Replace the blade if cutting performance declines—it’s cheaper than ruining another countertop.
Inspect the saw base and guard for dust buildup. Use compressed air or a brush to remove debris. Proper maintenance ensures consistent accuracy and extends tool life.
Store your circular saw in a dry place with the blade guard locked down. This keeps it ready for your next project.
Professional Tips for Perfect Results
- Always cut from the back side to protect the visible laminate surface.
- Use masking tape over the line to minimize chipping.
- Keep the saw blade clean and sharp for every project.
- Support both pieces of the countertop to avoid snapping or edge damage.
- Practice on a scrap section first to test your setup and blade.
These small steps make a big difference in the quality of your final cut. A careful, methodical approach turns an intimidating task into a simple, satisfying job.
Conclusion
Cutting a laminate countertop with a circular saw doesn’t require advanced tools—just attention to detail and proper technique. With the right blade, accurate measuring, and careful handling, you can achieve professional-grade results even as a DIYer.
Always remember the golden rules: cut from the underside, move slowly, and support your material fully. Protect the laminate surface with tape, and finish edges smoothly for a clean, seamless look.
A circular saw is one of the most versatile tools in your workshop. When used properly, it handles laminate just as precisely as expensive stationary saws.
Follow these steps carefully, stay patient, and your laminate countertop cuts will look flawless—ready for perfect installation and years of use.

I’m Michael R. Turner, the founder, lead writer, and passionate DIY enthusiast behind 101diytools.com. With years of hands-on experience in home improvement and power tools, I built this platform to share practical tips, in-depth guides, and honest reviews to help DIYers of all skill levels tackle projects with confidence and the right tools.