How to Cut Melamine with a Circular Saw Without Chipping
You measure twice, mark the line, and begin cutting through a shiny melamine board. Everything looks perfect until you lift the piece and see chipped edges and rough flakes.
This is the frustration many DIYers and carpenters face when cutting melamine for cabinets or shelves. Unlike solid wood, melamine has a thin, brittle coating that easily tears when a saw blade spins too fast or at the wrong angle.
Imagine spending hours designing custom shelves, only to watch the clean surface ruin at the final step. The disappointment is real, but the good news is — it’s completely avoidable with the right technique.
Professional woodworkers achieve smooth, chip-free melamine cuts every day using simple methods. From choosing the correct saw blade to adjusting the depth and feed speed, every detail matters.
This guide will walk you through everything you need to know about cutting melamine cleanly using a circular saw. You’ll learn how to prepare, mark, cut, and finish your board just like a pro.
By the end, you’ll be able to make flawless edges that don’t need repair strips or sanding fixes. Cutting melamine will feel easy, precise, and satisfying — no more chipped frustration.
What Is Melamine and Why It Chips So Easily
Melamine is a decorative surface made by bonding resin-saturated paper onto particleboard or MDF. The surface looks glossy and strong, but it’s actually thin and brittle.
When a fast-spinning blade cuts through, the teeth lift the coating before slicing, causing chips along the edge. That’s why smooth cutting requires very sharp and fine-tooth blades.
Heat is another enemy of melamine boards. When the blade gets too hot, the resin softens, and the edge can melt or tear. Keeping the blade cool through proper speed helps avoid this.
Melamine’s internal core also contributes to chipping. Since particleboard lacks fiber strength, it cannot support the top layer during the cut. This leads to edge flaking if not supported.
A high tooth-count blade and slower cutting feed minimize the lifting action. Professionals often use 60- or 80-tooth carbide-tipped blades for melamine projects.
Melamine surfaces are common in furniture, cabinets, and closets because they’re affordable and stylish. But that same beauty demands extra care during cutting.
If you rush or use a dull blade, the coating will splinter instantly. Patience and preparation are the keys to success.
The goal is to slice through melamine like butter — clean and smooth. With the right setup, even a regular circular saw can give you perfect edges.
Understanding the material’s weakness helps you plan the perfect cut. Let’s now see what kind of blade you should use.
Choosing the Right Circular Saw Blade for Melamine
A circular saw blade determines 70% of your cutting quality. Using the wrong one guarantees chips and cracks before you finish the first line.
Choose a fine-tooth blade specifically designed for laminates or melamine. These blades have smaller, sharper teeth that shear rather than tear the surface.
Carbide-tipped teeth last longer and maintain sharpness even through dense material. An 80-tooth blade on a 7¼-inch saw gives the cleanest result.
Avoid framing or ripping blades with fewer teeth. They’re designed for speed, not precision, and will destroy the surface finish.
An alternate top bevel (ATB) blade works best for melamine. Each tooth alternates its cutting direction, giving a smoother edge.
A triple chip grind (TCG) blade is also effective for durability and reduced chip-out. Professionals often prefer TCG for frequent melamine projects.
Ensure your blade is clean and free from pitch buildup before cutting. Sticky residue can burn the surface and increase chipping.
A thin-kerf blade reduces waste and pressure on your saw motor, making cleaner cuts with less vibration.
Always install the blade with the correct rotation direction indicated by the arrow on your saw guard. Backward installation ruins the material and the blade.
Investing in a high-quality blade pays off for years. One good blade can make hundreds of flawless melamine cuts with proper care.
Preparing Your Workspace and Materials
A stable, level workspace is crucial when cutting melamine. Any vibration or movement causes uneven cuts and chipped edges.
Use sawhorses or a large table to fully support both sides of your board. Unsupported edges can snap off mid-cut.
Clamp the melamine firmly to keep it from shifting. Even a small movement during cutting can ruin your line.
Clear your workspace of dust and loose pieces before starting. A clean surface ensures smoother saw movement.
If possible, use foam insulation sheets under the melamine for full support. This absorbs vibration and prevents tear-out on the bottom.
Plan your cuts ahead of time to minimize waste. Mark and double-check each measurement carefully before you power up the saw.
Use a soft pencil or masking tape for marking so you don’t scratch the surface. Pen ink can smear and stain the glossy finish.
Good lighting helps you align the blade precisely with your markings. Shadows can cause misjudgment and crooked cuts.
Keep a vacuum or dust extractor nearby to maintain clear visibility. Melamine dust is fine and spreads quickly around the workspace.
Finally, ensure your circular saw base is clean and smooth. Dirt or metal burrs under the shoe can scratch the melamine as you cut.
Marking and Scoring the Cut Line
Scoring is a secret trick professionals use to prevent chipping. It involves cutting just through the top coating before the actual full-depth cut.
Use a sharp utility knife and a straightedge to lightly score along your marked line. This pre-cuts the brittle layer so it won’t tear later.
Apply masking tape tightly over the line after scoring. The tape keeps the surface fibers in place during sawing.
Mark both sides if you plan to flip the board. This ensures accurate alignment when cutting from the underside.
Always cut with the finished face facing down when using a circular saw. The blade teeth cut upward, and this minimizes top surface chips.
If you want the top surface perfect, consider cutting halfway through from both sides. This “double-cut” method gives flawless results.
Use a high-contrast pencil line so you can see clearly while following the saw path.
Avoid using thick markers since they hide the true cut line. Precision depends on clarity.
Press down gently when scoring — too deep may crack the surface. You only need to slice through the coating, not the core.
This small preparation step dramatically reduces chipping and improves your final cut edge.
Setting Up the Circular Saw Correctly
Before cutting, check your saw’s base plate for alignment. A tilted shoe causes uneven edges or wandering cuts.
Set the blade depth so that it extends about one-quarter inch below the board. Too deep a cut increases tear-out.
Make sure the blade is firmly tightened and the guard moves freely. A stuck guard can damage the surface when retracting.
Adjust the saw speed if you have a variable setting. Medium speed is ideal for melamine — too fast burns, too slow tears.
Use both hands to guide the saw steadily along the line. Maintain a constant feed rate without stopping mid-cut.
Avoid forcing the saw forward. Let the blade do the cutting at its own pace for the smoothest result.
If possible, use a guide rail or straightedge to keep your line perfectly straight. Freehand cutting increases chip risk.
Position yourself comfortably with balanced footing. Awkward angles cause shaky movement and uneven edges.
Start the saw before touching the material, then ease it gently into the cut. This prevents sudden impact that chips the coating.
Finish the cut completely before lifting the saw. Stopping early can leave rough edges that flake easily.
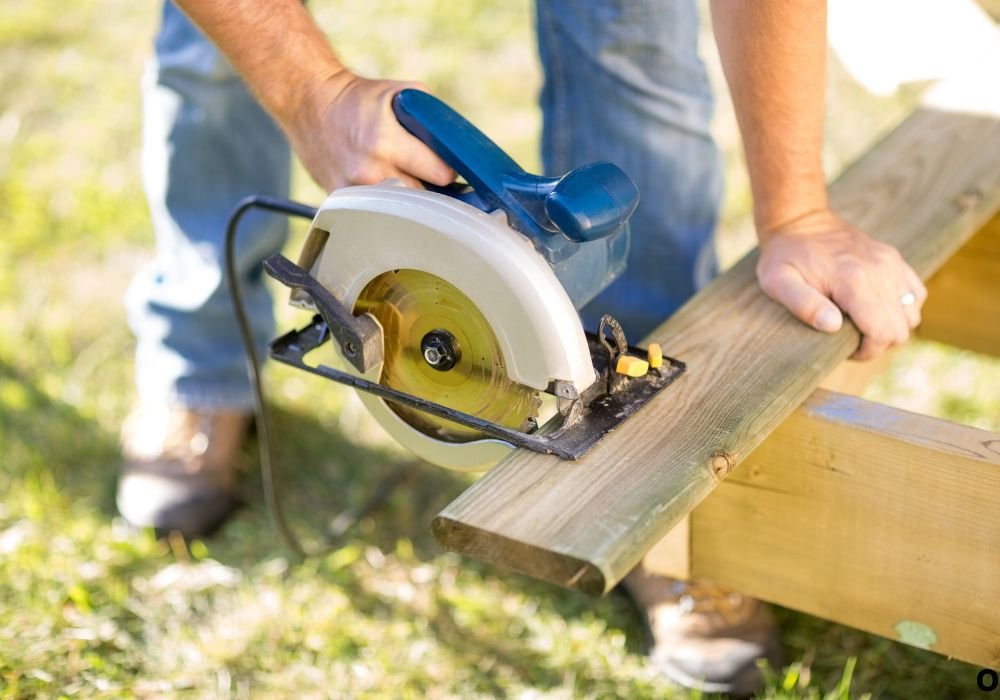
The Correct Cutting Technique
Cutting melamine is all about control, not speed. A smooth, consistent motion gives the cleanest results.
Begin the cut slowly and keep the blade aligned with your guide line. Small corrections during cutting can cause vibration.
Use the full base plate of your saw to rest firmly on the surface. This stabilizes the cut from start to finish.
Do not stop midway or lift the saw early. Once you begin, follow through in one continuous motion.
If cutting long panels, support both pieces equally to prevent binding or snapping.
Feed the saw at a moderate pace. Too fast pulls the surface; too slow burns it.
Keep your eyes on the guide mark, not the blade itself. Trust your markings and steady pressure.
If possible, cut from the back side to hide minor chips underneath.
After cutting, inspect the edge before removing the tape. If it’s clean, peel slowly to reveal a perfect finish.
This steady, patient method separates clean professional results from rough amateur cuts.
Using Masking Tape or Sacrificial Board to Prevent Chips
Masking tape acts as a simple yet effective shield against chipping. Apply it tightly along both sides of your cut line.
The tape keeps melamine fibers from lifting as the blade passes. Peel it off slowly after cutting for a crisp finish.
For even better results, place a sacrificial board under your melamine sheet. It supports the lower surface during the cut.
The blade exits through both layers at once, preventing tear-out on the underside.
Use scrap MDF or plywood for this purpose. It’s cheap and easy to replace after each project.
Always clamp both boards together to prevent shifting. A slight gap eliminates the protective effect.
This technique is essential for cabinetry and visible edge work. It ensures both top and bottom edges look flawless.
If cutting multiple boards, sandwich them tightly and cut together. This saves time and reduces edge chipping.
Masking tape plus a sacrificial base offers the best combination of protection.
These small precautions turn ordinary cuts into professional-grade results every time.
Fine-Tuning and Finishing the Cut Edge
Even perfect cuts may need a bit of refinement. Light sanding smooths micro-chips invisible to the eye.
Use 180- or 220-grit sandpaper for gentle edge polishing. Rub lightly along the cut direction, not across it.
If the edge will remain visible, consider applying edge banding for a factory finish.
Iron-on edge banding seals exposed particleboard and adds a polished look.
Trim excess banding with a sharp knife and sand lightly for uniform smoothness.
For edges inside cabinets, clear sealant or wood glue can protect against moisture.
Never use rough sandpaper or power grinders on melamine — they scratch instantly.
Inspect your edge under good lighting to ensure no cracks remain.
If small chips appear, you can fill them with white putty or matching color wax.
These finishing touches make your project look professional and long-lasting.
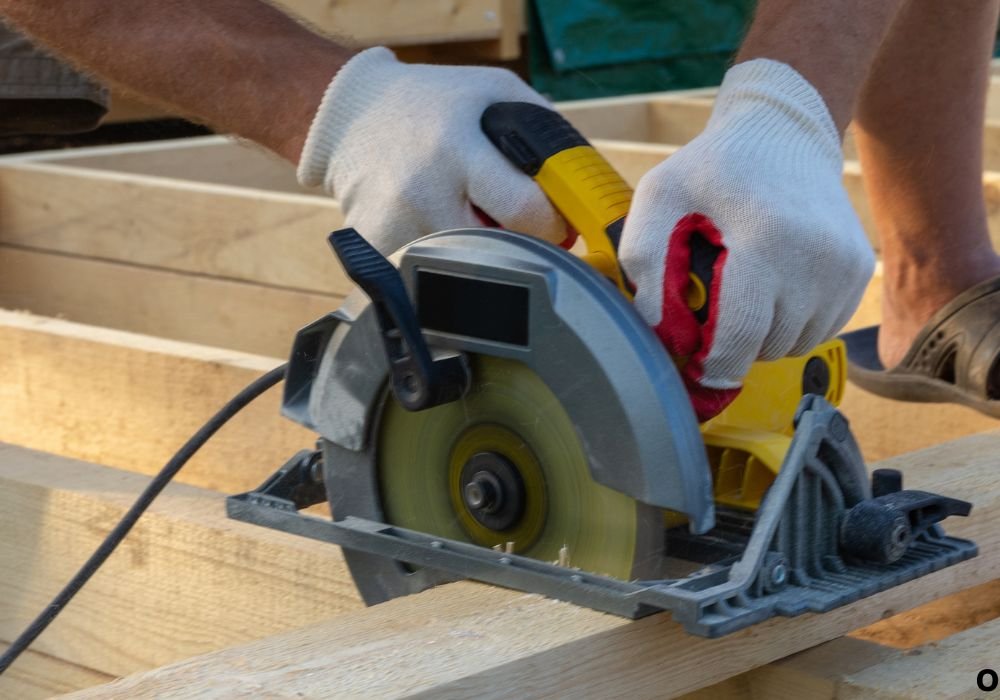
Safety Precautions When Cutting Melamine
Safety is always the top priority when using power tools. Melamine dust can irritate eyes, lungs, and skin.
Always wear a dust mask and protective goggles before cutting. The fine dust particles spread quickly.
Use ear protection if you’re cutting for long periods. Circular saws produce high noise levels that damage hearing.
Work in a well-ventilated area or connect a shop vacuum to your saw’s dust port.
Keep loose clothing, jewelry, or long hair away from the spinning blade.
Ensure your blade guard is functional and closes automatically after cutting.
Never remove the safety guard for faster work — it’s there for a reason.
Unplug the saw when changing blades or making adjustments.
Maintain a firm stance and two-hand grip during operation for control.
A calm, focused approach keeps your work safe and your results perfect.
Common Mistakes and How to Avoid Them
One of the biggest mistakes is using a dull or wrong blade. Always start with a sharp, fine-tooth blade.
Rushing the cut is another common problem. Slow and steady movement produces clean edges.
Cutting face-up with a circular saw leads to visible chips. Always keep the finished side down.
Skipping masking tape or scoring often causes unnecessary damage. Don’t ignore these easy steps.
Feeding too fast overheats the blade and burns the surface. Take short pauses if needed.
Cutting without support lets the board flex and snap under pressure. Always use backing boards.
Using a high-tooth ripping blade designed for lumber never works for melamine.
Ignoring proper blade depth leads to excess tear-out. Keep it shallow and precise.
Not cleaning the blade can result in melted resin buildup. Clean frequently for smooth rotation.
Avoiding these mistakes ensures every project ends with clean, professional-looking edges.
Alternative Tools for Cutting Melamine Cleanly
Circular saws work great, but other tools can offer even cleaner results. A table saw with a fine-tooth blade and zero-clearance insert is a top choice.
Panel saws, used in woodworking shops, give factory-grade precision with minimal chip-out.
Track saws are another excellent option for straight and clean cuts on large panels.
A jigsaw with a reverse-tooth blade can handle smaller cuts, though with less accuracy.
Routers with flush-trim bits are great for finishing or edge repairs.
Each tool has its purpose, depending on the project size and budget.
For home use, a good circular saw setup is usually enough.
Professionals combine these tools for maximum efficiency and quality.
Whatever tool you choose, always focus on blade type and technique.
The cleaner the tool setup, the smoother the final melamine edge.
Pro Tips for Flawless Melamine Cuts
Use a zero-clearance insert on your saw whenever possible. It supports the cut line directly under the blade.
Keep your saw blade clean and sharp before every project. Dull edges cause vibration and tear-out.
Cut slightly outside your line and sand down for precision fitting.
Mark your waste side clearly to avoid confusion during cutting.
Maintain steady pressure — not too light, not too heavy. Balance is key.
Store melamine boards flat to prevent warping before cutting.
Try test cuts on scrap pieces before your final board. Adjust blade height if needed.
Use anti-chip tape designed for laminate surfaces for extra protection.
Don’t forget to double-check blade rotation direction before each cut.
Following these pro tips guarantees perfect melamine cuts every time.
Frequently Asked Questions
How can I cut melamine without chipping the edges?
Use a fine-tooth carbide blade, masking tape, and a steady slow feed speed for best results.
Should I cut melamine face up or face down?
Cut face down with a circular saw, since the blade teeth cut upward and reduce top-side chipping.
What is the best blade for melamine?
An 80-tooth carbide-tipped ATB or TCG blade designed for laminates gives smooth, clean edges.
Can I use a regular wood blade for melamine?
You can, but it will likely chip the surface badly. Use a laminate-specific blade instead.
Do I need to score melamine before cutting?
Yes, scoring lightly with a utility knife prevents the coating from lifting or tearing.
Can masking tape really help?
Yes, masking tape supports surface fibers and significantly reduces chip-out.
Should I use a sacrificial board under melamine?
Absolutely. It supports the bottom surface and prevents exit-side chipping.
Is it safe to sand melamine edges?
Yes, but only gently using 220-grit sandpaper to smooth small imperfections.
What causes burning when cutting melamine?
A dull or dirty blade and cutting too slowly cause heat buildup and discoloration.
Can I use a track saw instead of a circular saw?
Yes, track saws with fine-tooth blades provide even cleaner cuts and better accuracy.
Conclusion
Cutting melamine cleanly with a circular saw isn’t difficult once you understand the process. The secret lies in the right blade, proper setup, and patience during cutting.
By scoring, taping, supporting, and feeding slowly, you can avoid chips completely. Each step adds precision and professionalism to your work.
Always keep your workspace clean, your tools sharp, and your safety gear on. A steady, thoughtful approach ensures consistent, perfect cuts.
Melamine might be delicate, but with these techniques, you’ll handle it like a pro. Your next project — whether it’s a shelf, cabinet, or countertop — will look sharp, smooth, and factory-finished.

I’m Michael R. Turner, the founder, lead writer, and passionate DIY enthusiast behind 101diytools.com. With years of hands-on experience in home improvement and power tools, I built this platform to share practical tips, in-depth guides, and honest reviews to help DIYers of all skill levels tackle projects with confidence and the right tools.